DESCRIPTION ATTRIBUTES PRICE CONFIGURATION INVENTORY
A product is the item you sell to your customers at the point of sale.
Products are organised by groups and categories to maintain an agile structure in both the back office and the app. You can define various details and related objects to create a customised solution that best suits your business.
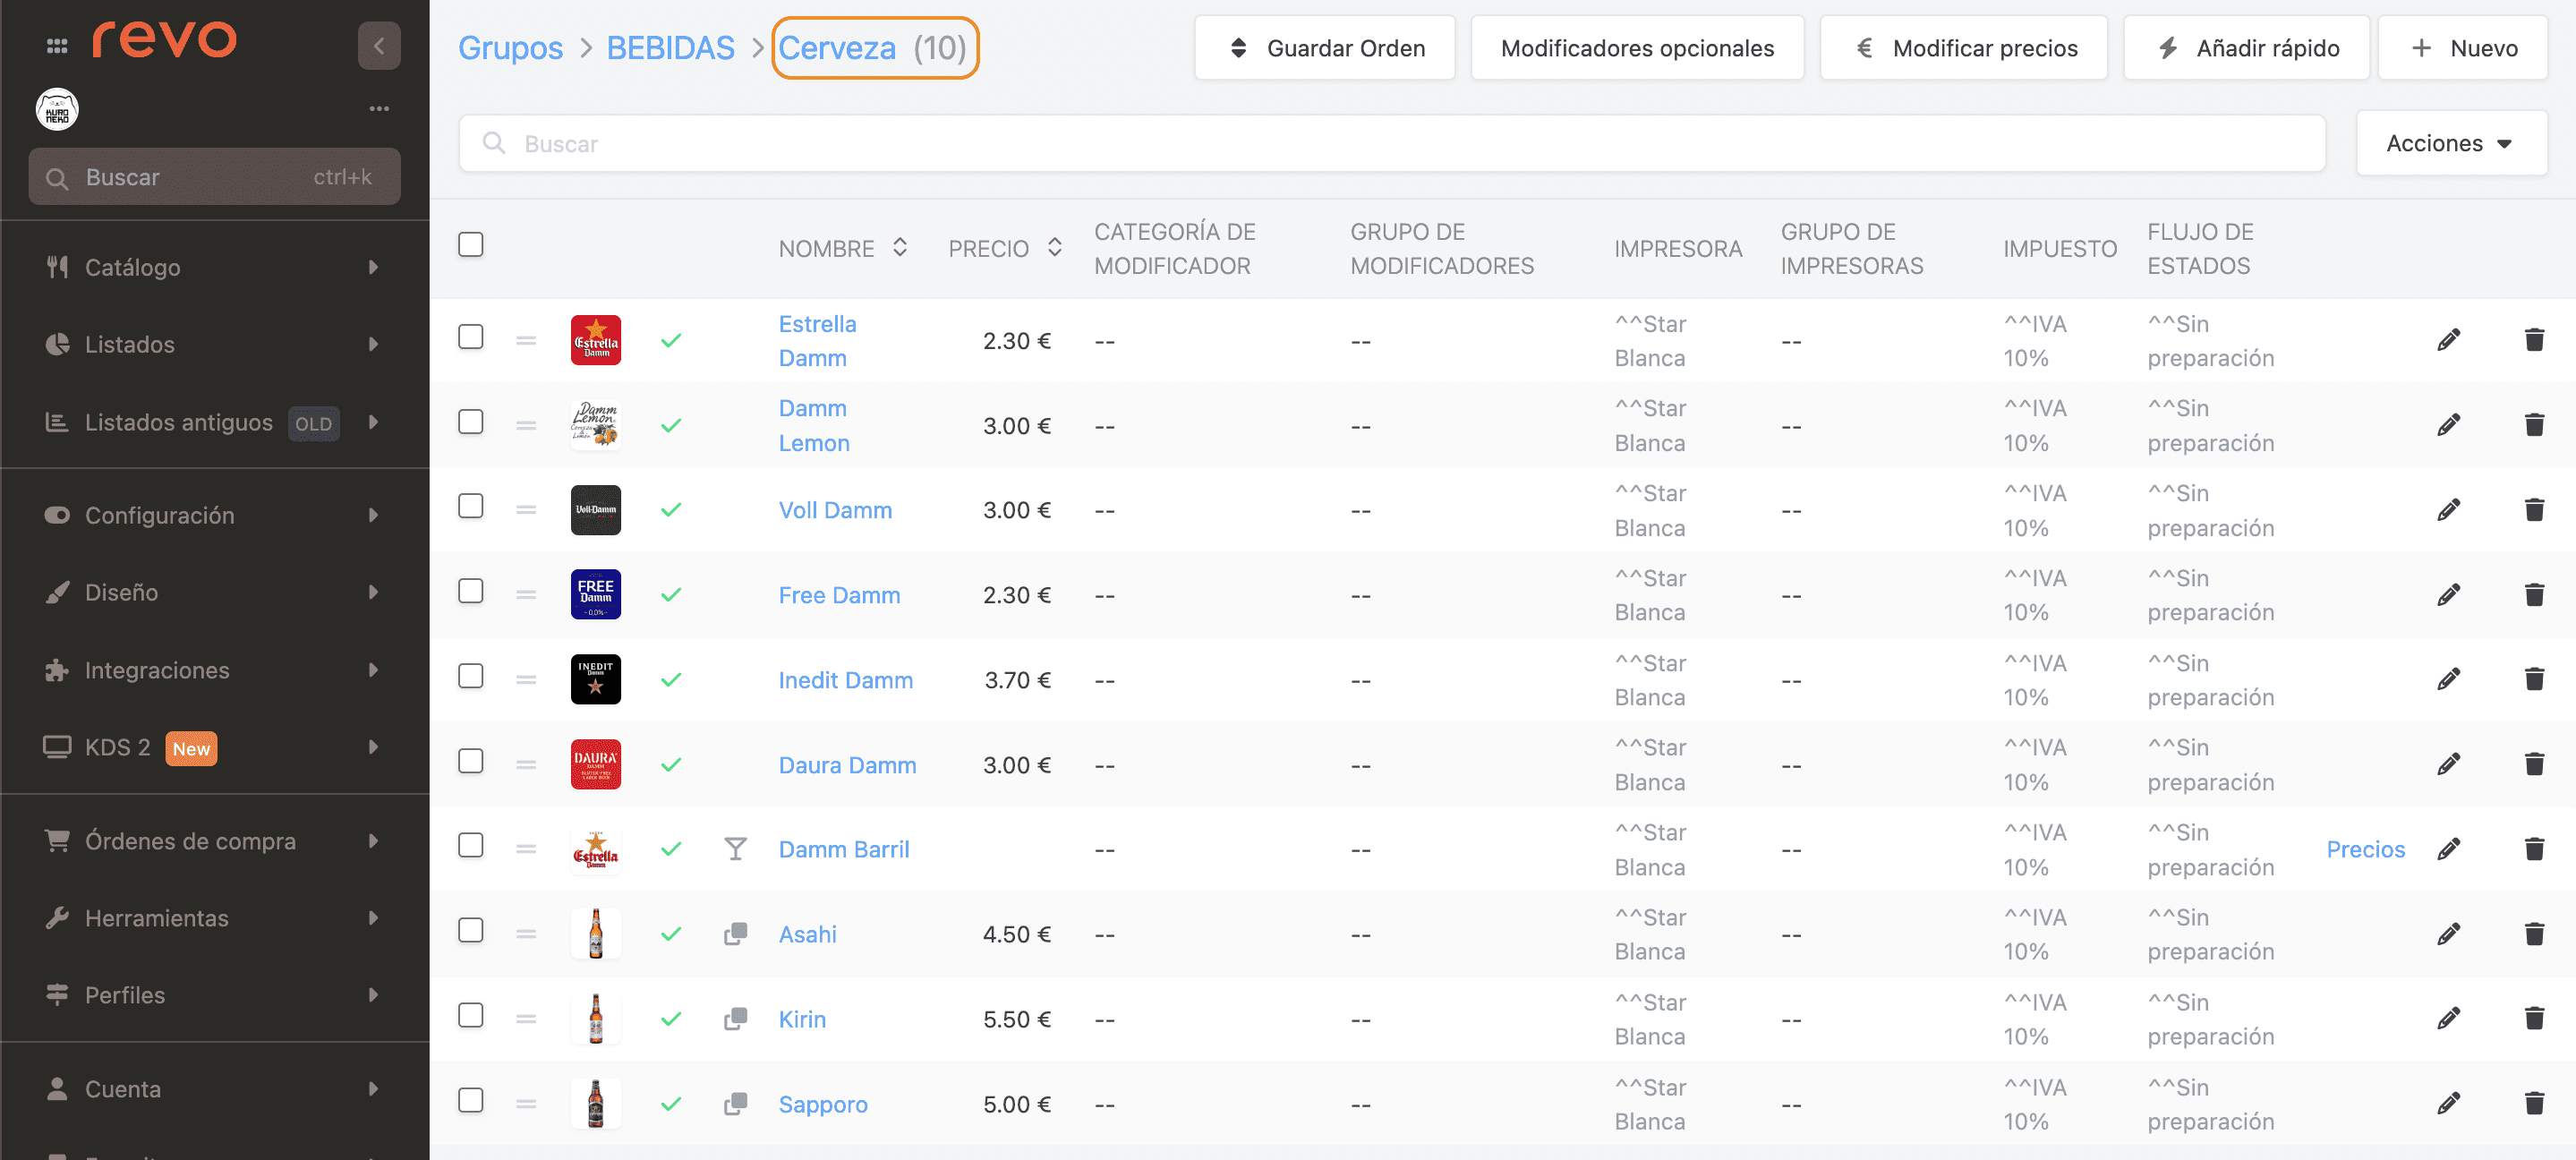
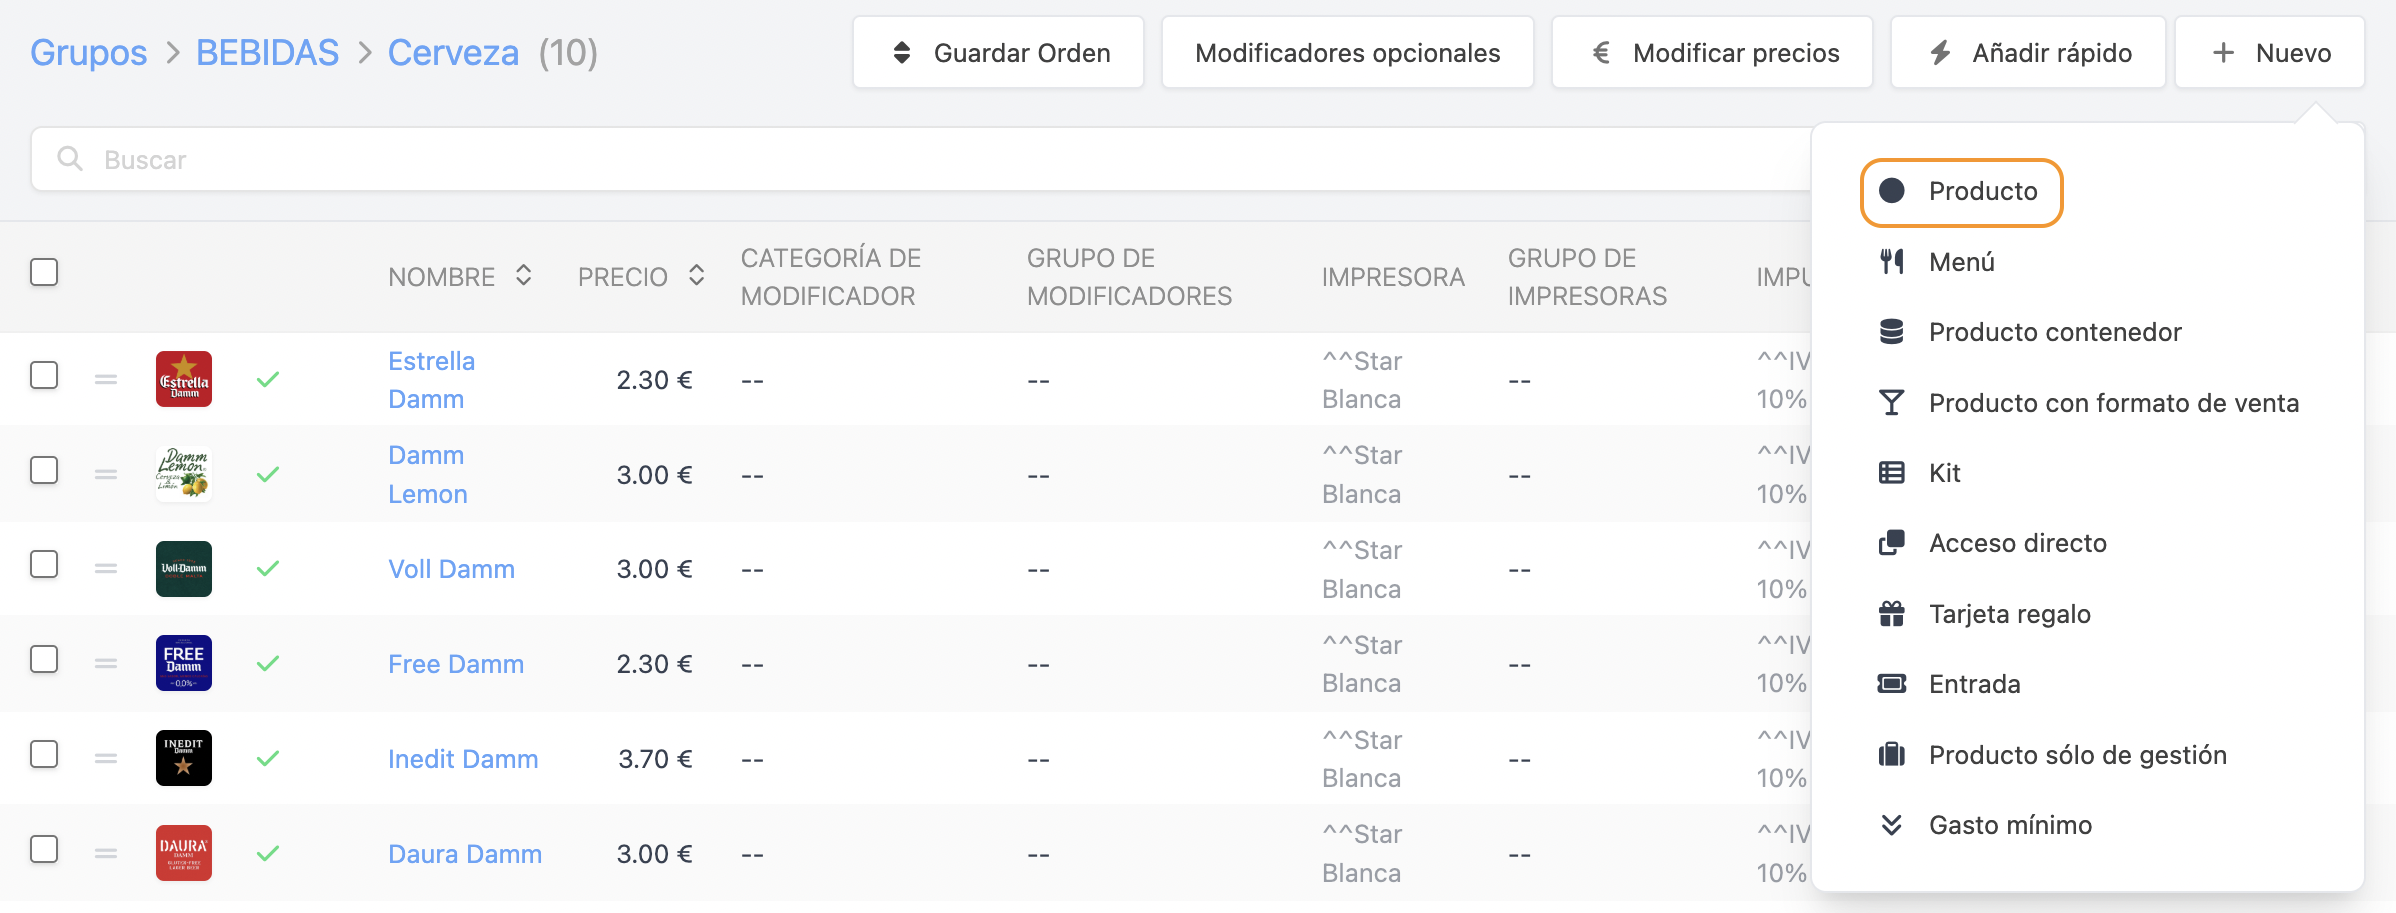
When you enter a category, you will see a screen with all the products it contains. Here you find the following information:
-
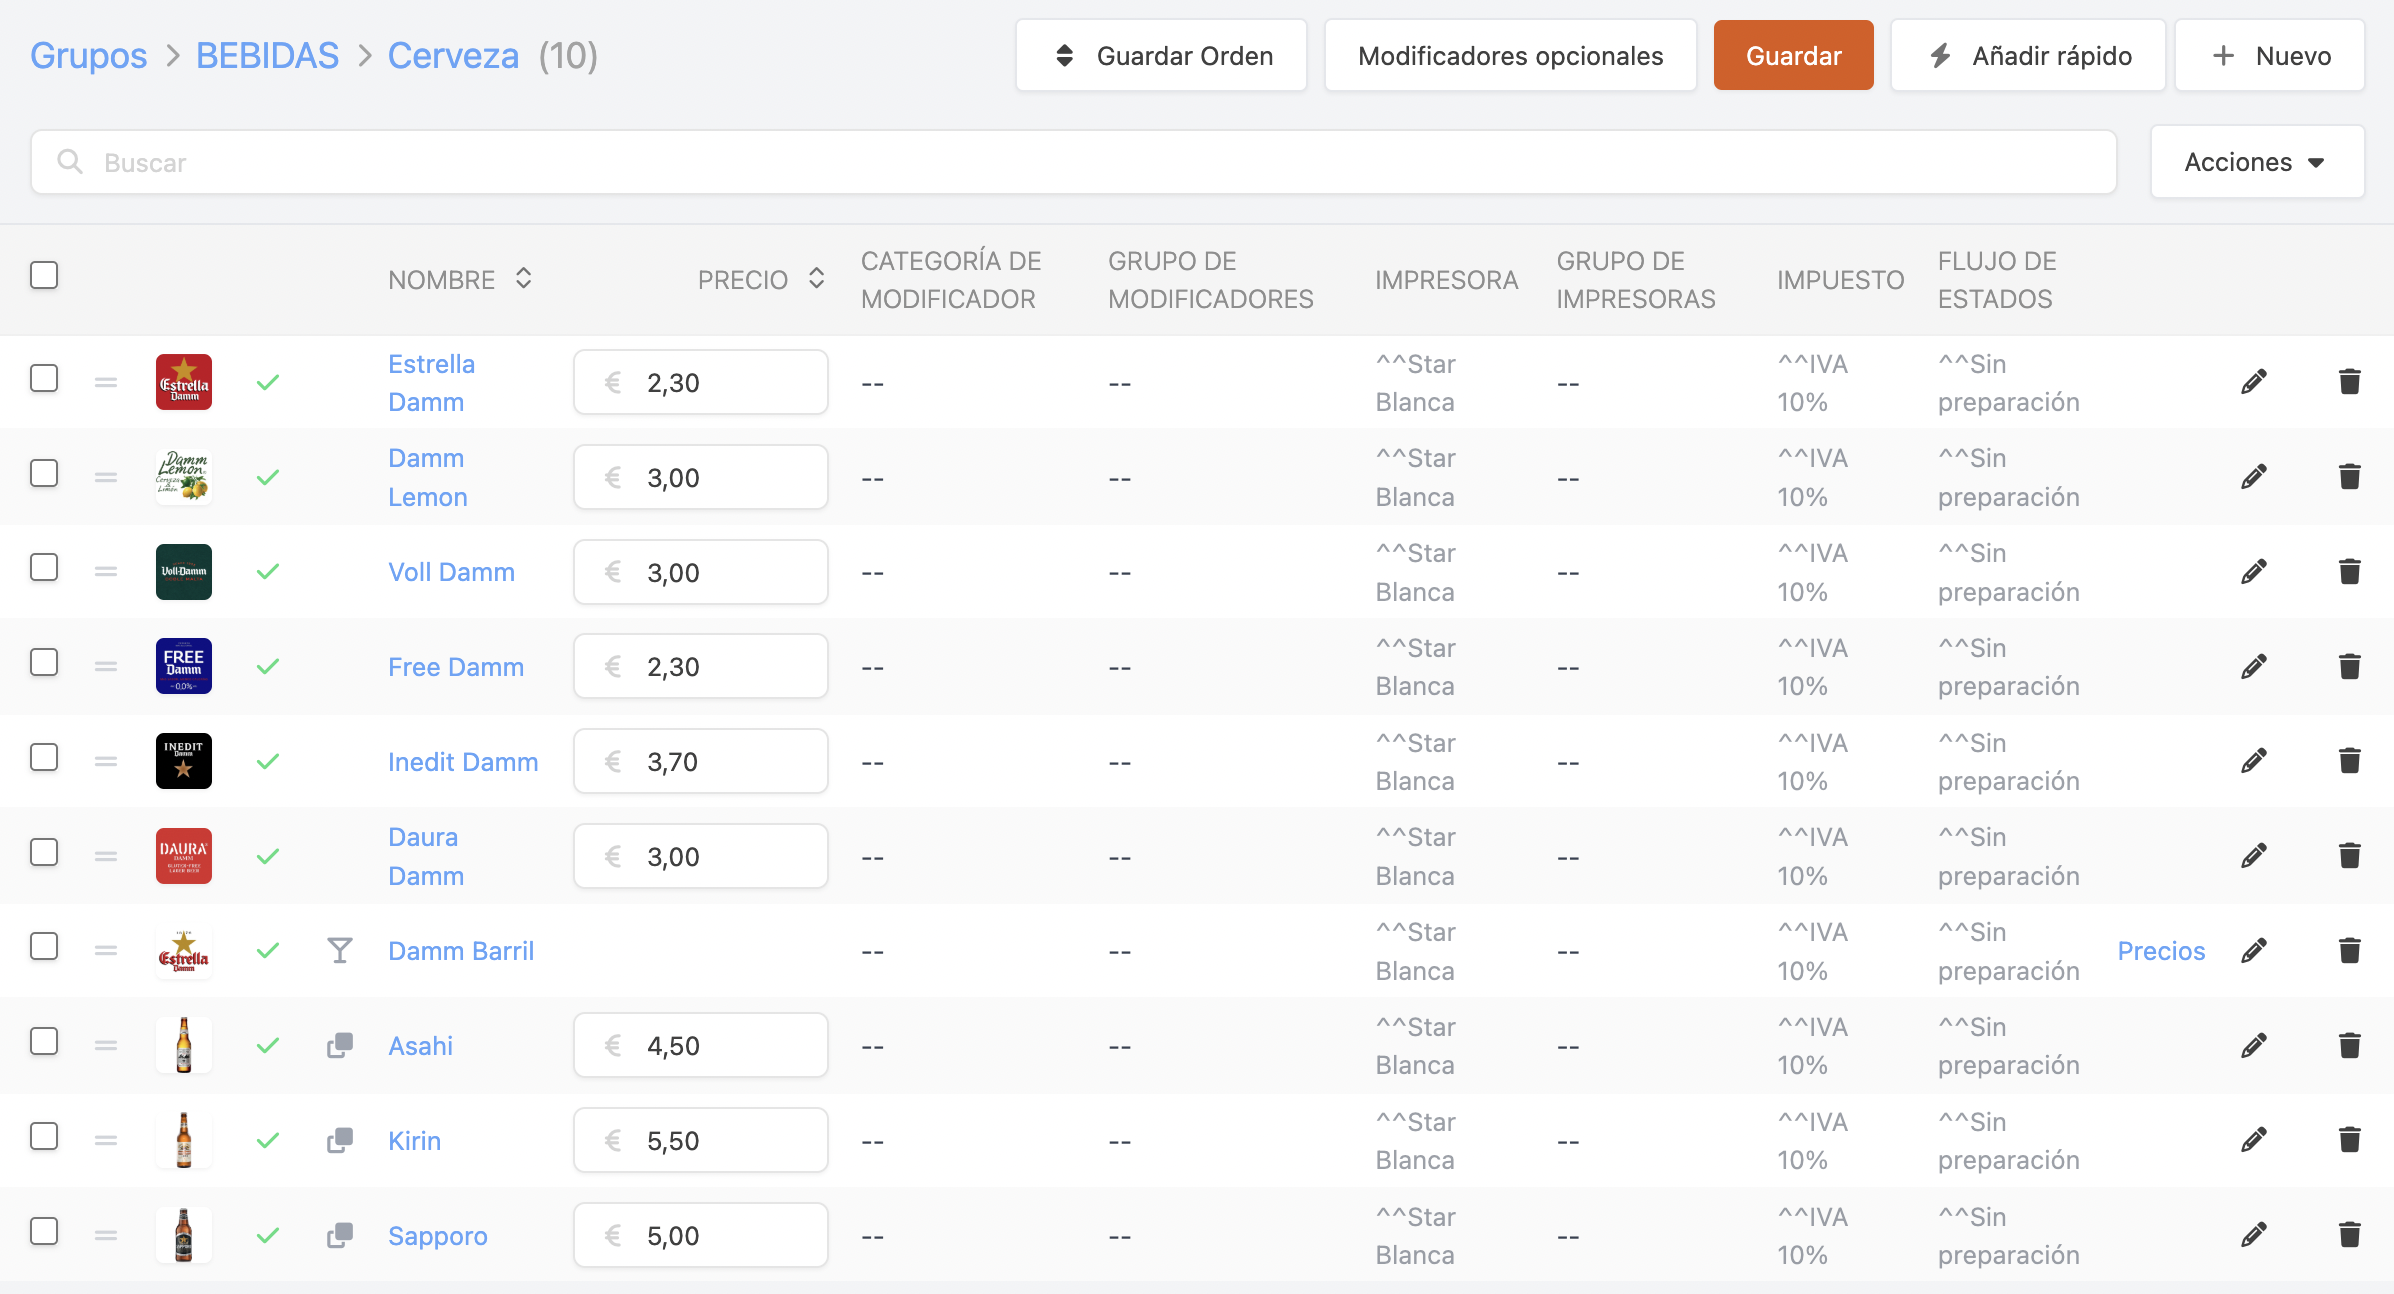
Save Order: Once you change the order of the products, you need to click this button to save the change.
-
Optional modifiers: You can add optional modifiers for this category. Learn more here.
-
Modify Prices: You can directly modify all product prices.
-
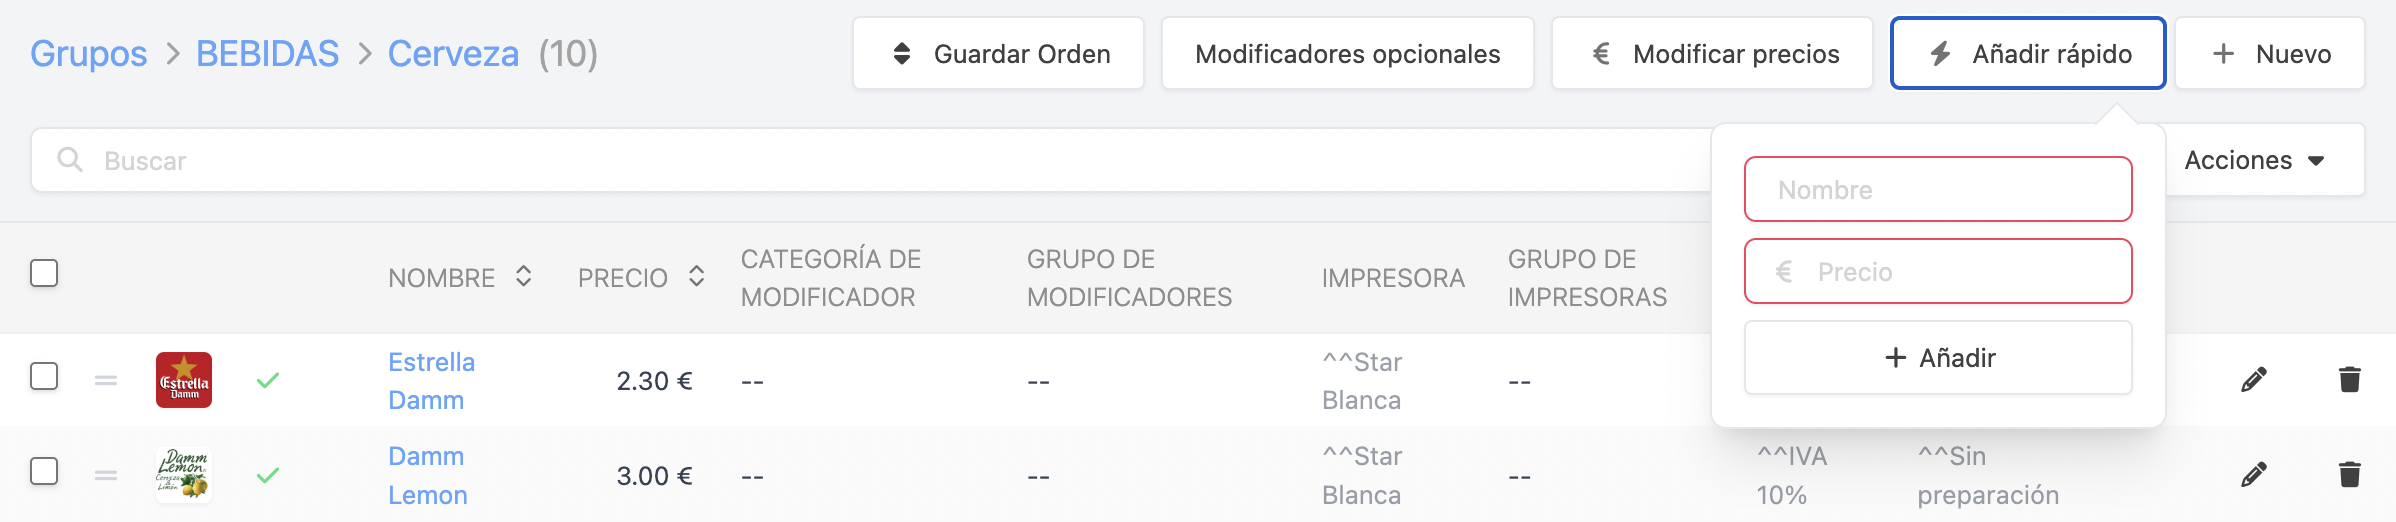
Quick add: From here, you can quickly add a product by entering the name and price.
-
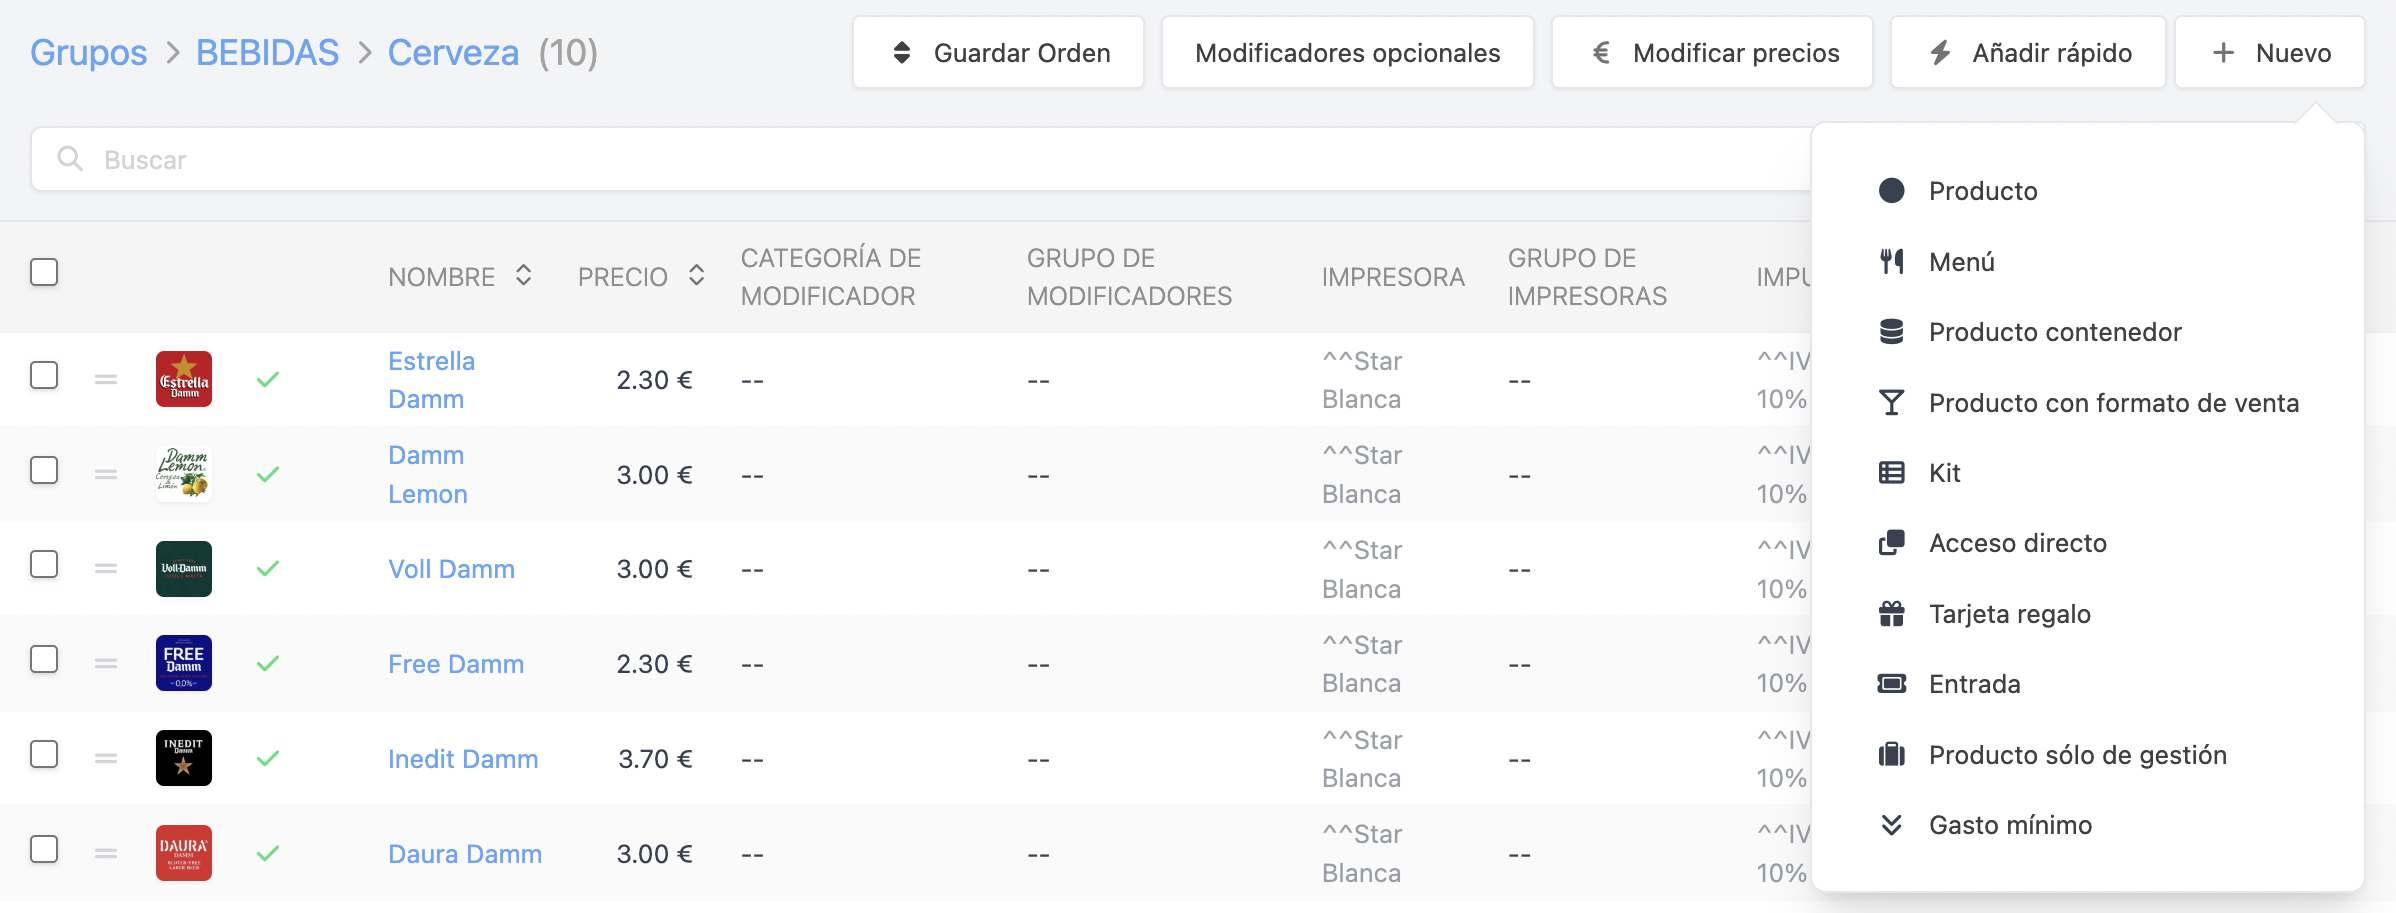
+ New: Menu to add new products, containers, products with different sales formats, etc.
-
Search: Search for products in your account.
-
Actions: By selecting one or more products, you can:
- Duplicate: Enter a name and select the target category. More details here.
- Move: Select the target category. More details here.
- Convert to Sales Format: Convert a regular product to one with a sales format.
- Activate Stock: Enable the stock of multiple products without entering each one.
- Search Image: Automatically assign an image to products without one.
- Prices with Operations: Perform operations of addition, subtraction, etc., on prices.
-
Delete: Delete multiple products.
-
: Select multiple products.
-
: Change the order of products by dragging them up or down. Remember to click save order when you finish.
-
: Add an image to the product.
A minimum width of 350-400 pixels and a maximum size of 1 MB is recommended.
-
: Disable a product by clicking on , so that it is not visible in the app. To enable it, click on the .
-
Name: By clicking on the product name, you can enter and edit its configuration.
Click on the Name field to sort products alphabetically, click save order to keep the change. -
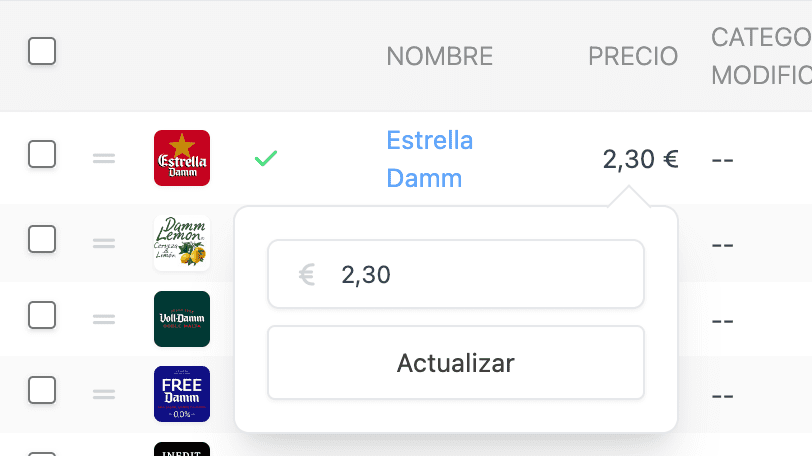
Price: Shows the price of the product. If you click on it, you can edit the price directly.
-
Modifier Category: Indicates if the product has an assigned modifier, in bold if assigned to the product and in grey if assigned to the category.
-
Modifier Group: Indicates if the product has an assigned group of modifiers, in bold if assigned to the product and in grey if assigned to the category.
-
Printer: Indicates if the product has an assigned printer, in bold if assigned to the product and in grey if assigned to the category or group (^category/^^group).
-
Printer Group: Indicates if the product has an assigned group of printers, in bold if assigned to the product and in grey if assigned to the category or group (^category/^^group).
-
Tax: Indicates if the product has an assigned tax, in bold if assigned to the product and in grey if assigned to the category or group (^category/^^group).
-
State flow: Indicates whether the product has a state flow assigned to it.
-
: Edit the product.
-
: Delete the product if it has no associated sales.
If you want to stop selling the product temporarily, it is simpler to disable it.
HOW TO ADD A NEW PRODUCT
You can create products easily. Once in the category, in the top right corner is the + New button, choose Product.
Then, you'll see the following screen with different tabs:
DESCRIPTION:

-
Active: If you enable it , the product will be visible in the app. If you disable it, it will be hidden.
Useful for new products not yet for sale or seasonal.
-
Name: Give a name to the product, used in the app and the invoice.
-
Translations: Add the product name in different languages. Learn how to configure these languages here.
-
Description in print: Modify the name on order tickets, avoiding long names.
-
Button name: Displays a different name in the app.
-
Description: Describe ingredients or notes. Visible by tapping on the product with two fingers in the app.
-
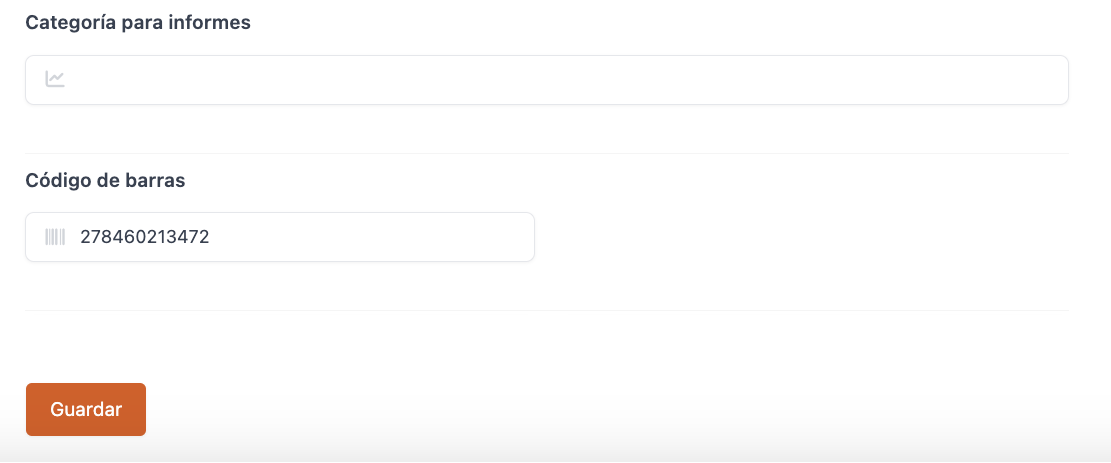
General group: By default, the configuration of the category or group is applied.
Create a new one by tapping . More information here.
-
Barcode: Useful for inventory.
ATTRIBUTES:
-
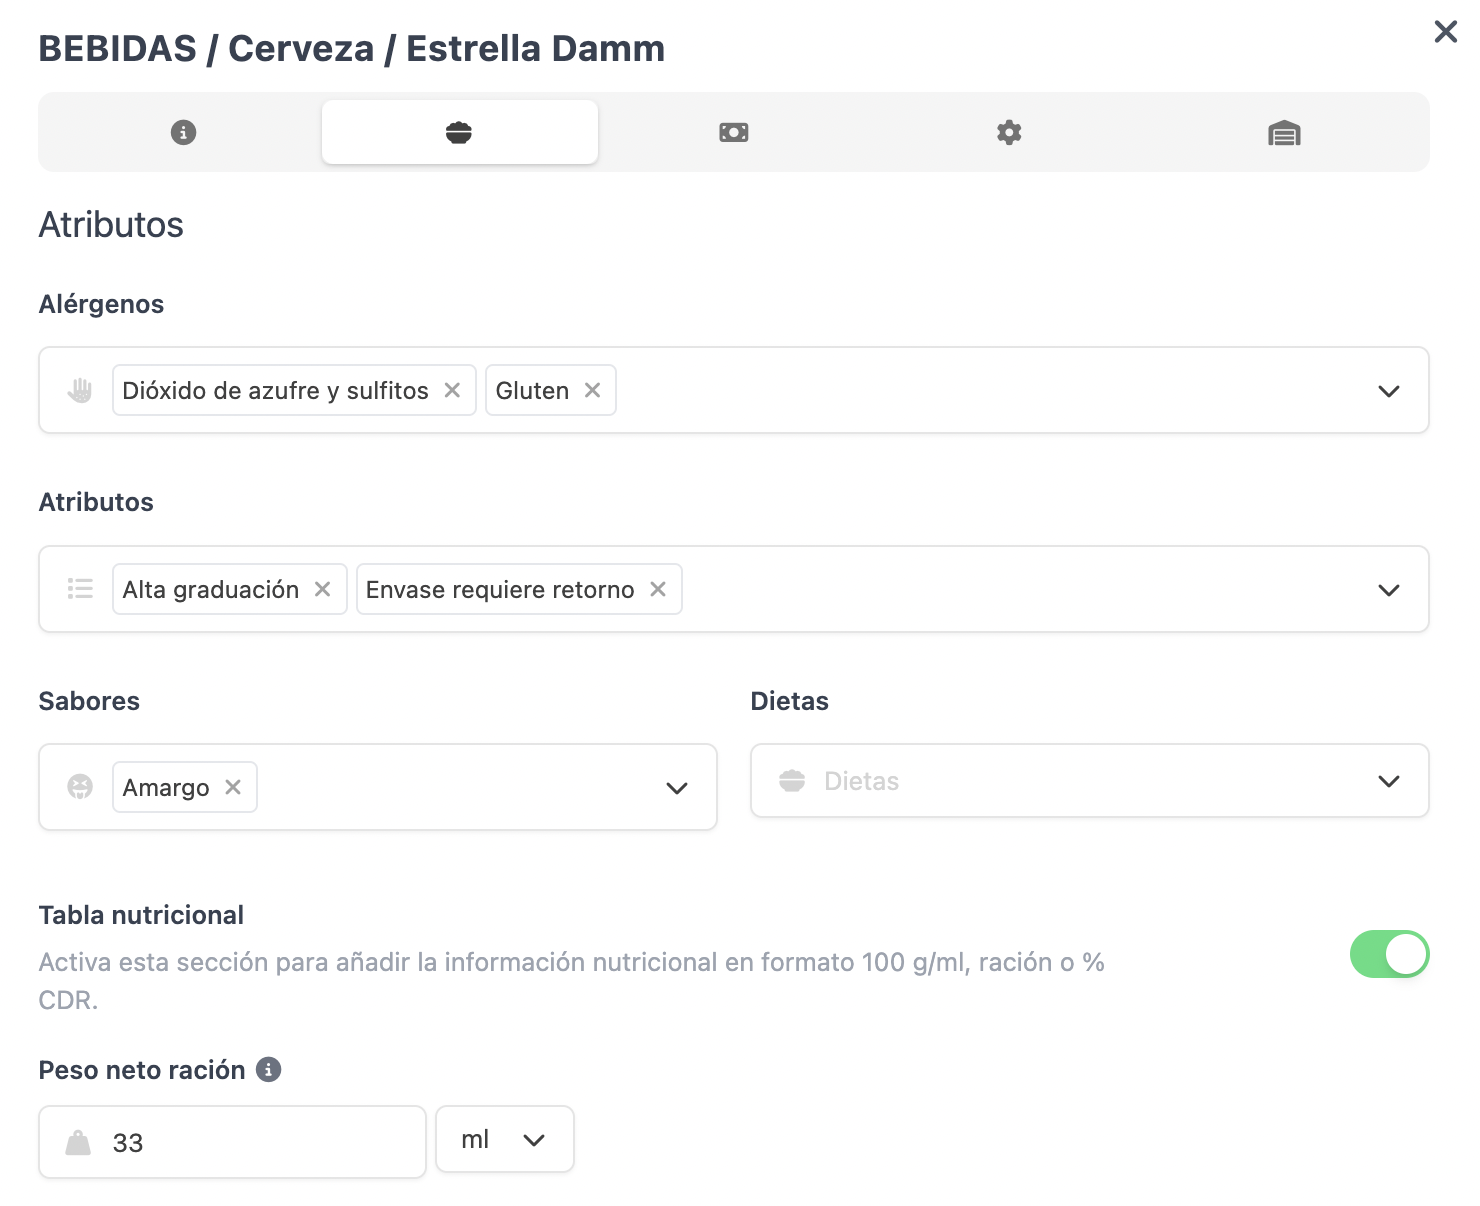
Allergens: Easily mark allergens, visible by tapping the product with two fingers in the app.
-
Attributes: Add attributes, such as "Packaging requiring return" for a beer bottle. These attributes are visible in some lists.
-
Flavours: Choose flavours for the product. Example: Bitter.
-
Diets: Choose dietary options for the product. Example: Vegetarian.
-
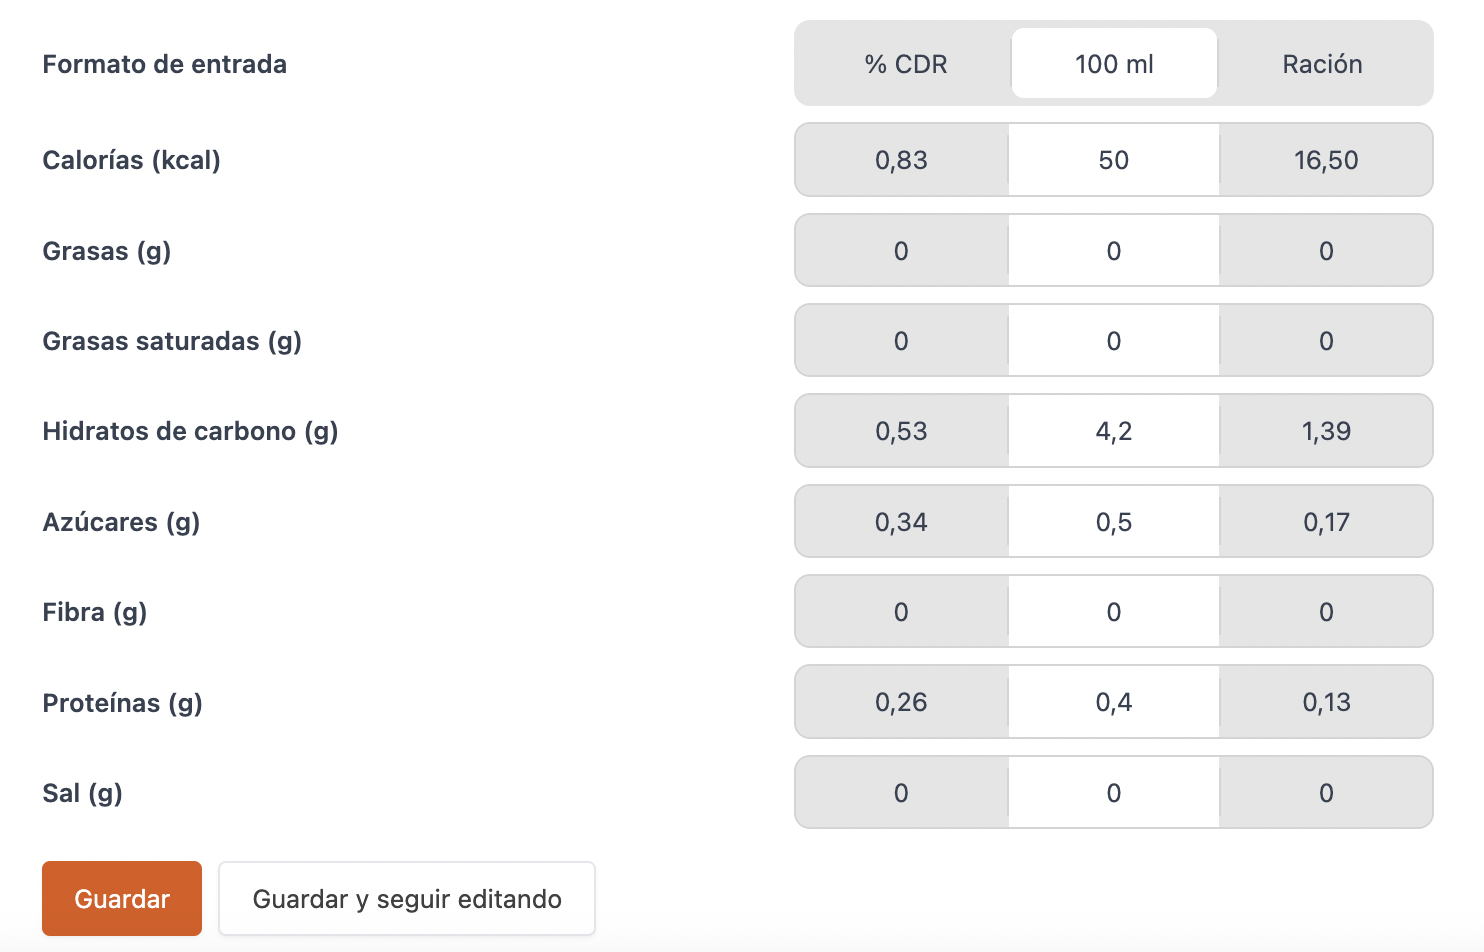
Nutritional table: Activate to add the nutritional information of the product.
-
Net portion weight: Enter the value of the portion and select from the drop-down menu whether it will be in g or ml.
-
Input format: Select how you will enter the data: % RDA, 100 g/ml, or serving.
The selected column will appear white and automatically complete the others based on the data you enter.
PRICE:
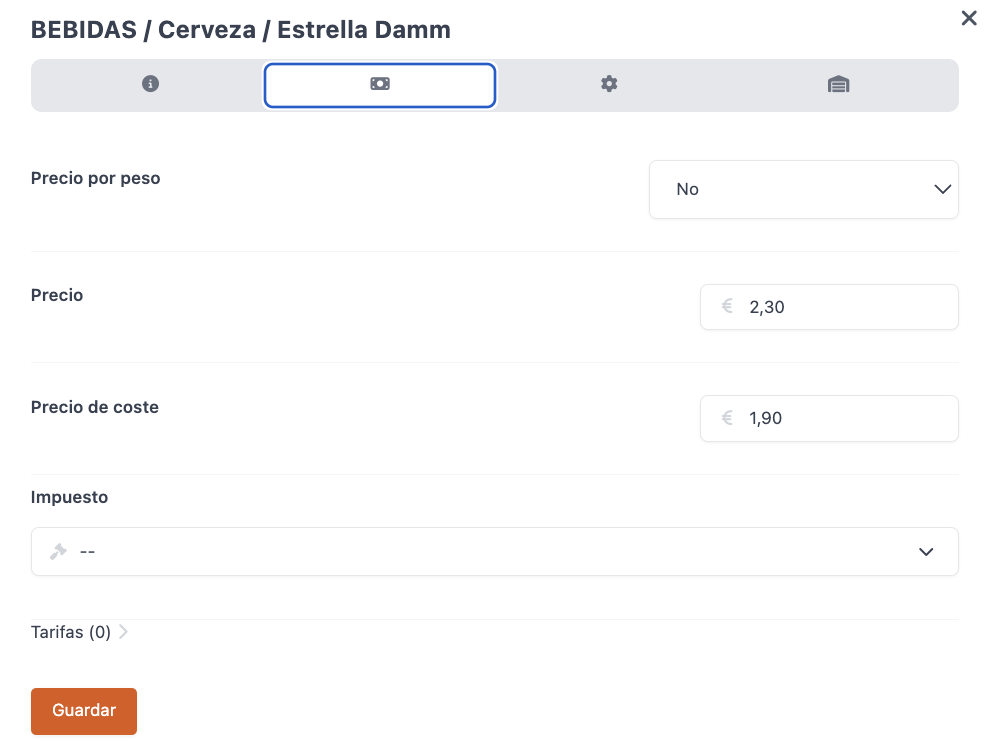
-
Price per weight: Choose:
-
No: Do not use weight.
-
Yes, extras proportionally: Extras are calculated proportionally to the weight.
The formula is: (Product Price x Product Weight) + (Modifier Price x Product Weight).
For example: A Lobster at €10 / KG with a modifier "Truffle Sauce" with a supplement of €2.
Result: (10 x 0.75 KG) + (2 x 0.75 KG) = €9 -
Yes, extras apart:
FROM VERSION 4.4 OF THE APP
Add the modifier price separately from the weight price.
The formula is: (Product Price x Product Weight) + Modifier Price.
For example: A Lobster at €10 / KG with a modifier "Truffle Sauce" with a supplement of €2.
Result: (10 x 0.75 KG) + 2 = €9.5
-
-
Price: Add the selling price. Taxes included by default.
-
Cost price: Add the price excluding taxes to calculate the selling margin.
-
Tax: Choose a tax for this product.
If already selected in the category or group, no need to do it again here. But if you do, it will work the same way.
-
Price Rates: Here you can add different rates with amounts. They must be created beforehand. More information here.
CONFIGURATION:
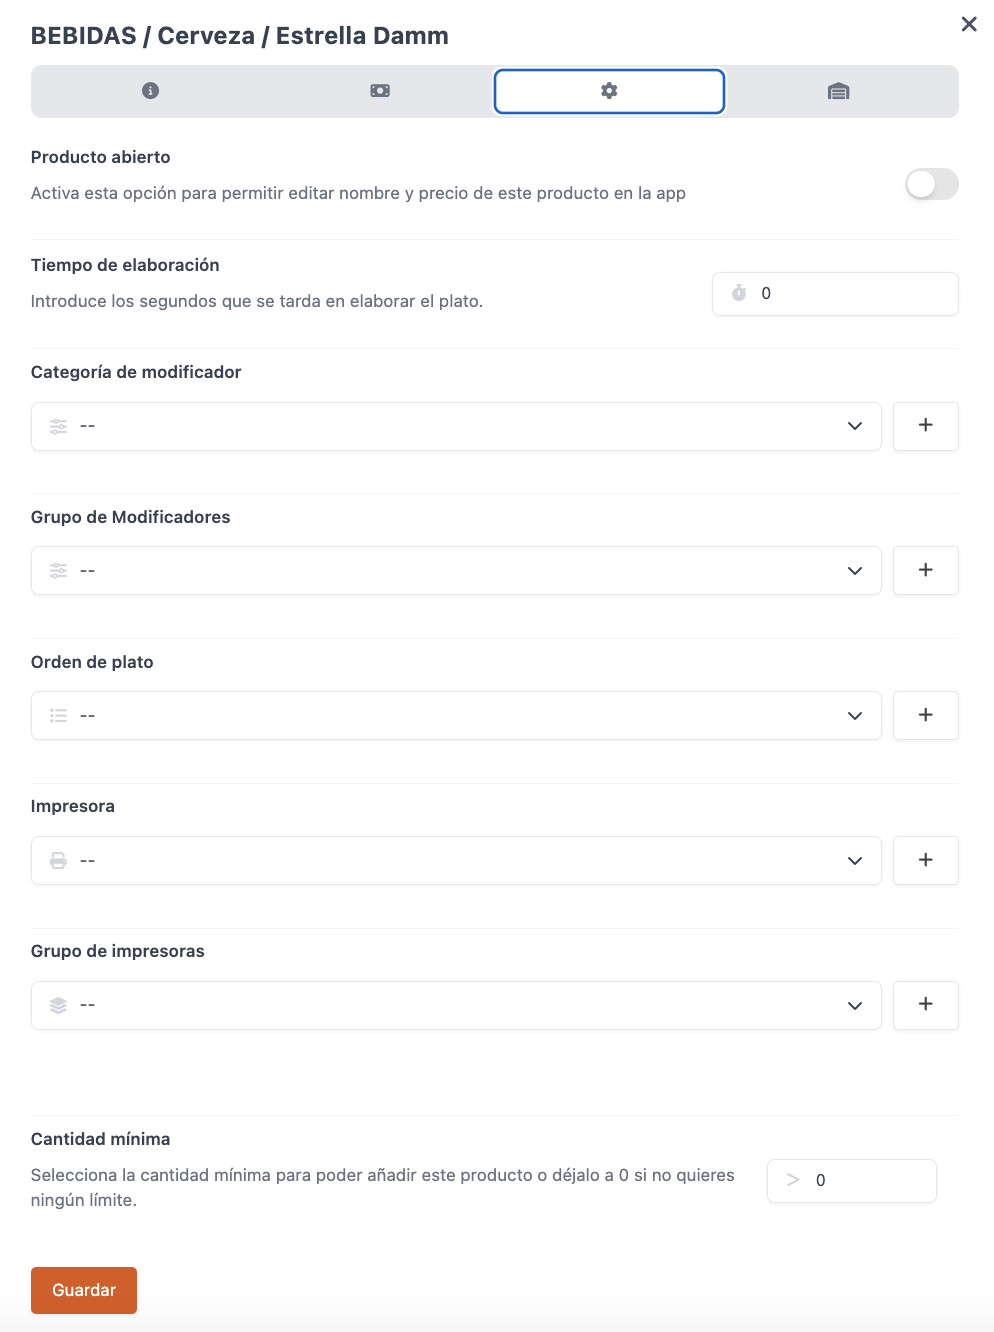
-
Open product: If you enable this option, you'll be able to edit the name and price of this product in the app.
It's not recommended to activate this option for all products, as it could affect the statistics in reports. One way to avoid this would be to create a single product with this option enabled, for example, "Miscellaneous".
-
Cook duration (seconds): Enter the time required to prepare this product for better control in the KDS.
-
Modifier Category: Associate a modifier with this product. By tapping on the product, the modifier will appear.
You can create a new one by clicking . More information here.
-
Modifier Group: Associate a group of modifiers (more than one) with this product. By tapping on the product, the modifier group will appear.
You can create a new one by clicking . More information here.
-
Dish Order: Associate a default dish order. This way, when you tap on the product in the app, the dish order will be automatically assigned, making ordering easier. Recommended for drinks and desserts.
You can create a new one by clicking . More information here.
-
Printer: Configure the printer where the order tickets for this product will be printed. You must first configure the printers in your company.
You can create a new one by clicking . More information here.
-
Printer Group: If you want to print order tickets on multiple printers simultaneously, configure a printer group.
You can create a new one by clicking . More information here.
-
State flow: Selects the KDS 2 state flow to be used.
-
Minimum quantity: Set the minimum quantity required to add the product to the order.
INVENTORY:

-
Inventory: Activate this option to manage the inventory of this product. Once activated, you will see the following options.
-
Unit: Select the management unit for this product.
It is important that the units are the same for the product, the warehouse, and the purchasing module.
-
Average cost price: Activate this option for REVO to calculate the average cost price if you use the purchasing module.
-
(x) Items use this as inventory: Indicates if this product is part of the bill of materials for other products.
-
Display stock in the app: If you activate this option, an icon with the remaining units will be displayed in the app. You will see how the stock decreases as you sell products. This is updated at intervals of approximately 30 seconds.
-
Inventory (x): Add the stock units to your inventory for this product.

-
Items distribution (x): Add the ingredients of this product.
-
Vendors (x): Add the supplier or suppliers of this product.

-
Finally, you will see the warehouse, the inventory, and the inventory alert for the product.
Learn how to properly manage your inventory from here.
Remember to SAVE to apply the changes.
In the following links, you will find more information about: