2. KDS CONFIGURATION 2.1. ADD THE PRINTER 2.2. CREATE PROFILES
3. KDS OPERATION 3.1. HEADER 3.2. ORDER ACTIONS 3.3. ORDERS 3.4. SCREEN FOOTER
Optimise your kitchen and say goodbye to traditional tickets!
Revo KDS (Kitchen Display System) is the ideal application to transform your kitchen. Forget printing tickets and streamline your workflow with strategically placed iPads.
How does it work?
1. Send your orders from Revo XEF.
2. They instantly appear on one or more iPads with Revo KDS.
3. Easily view the status of each order: cooked, pending, or served.
Benefits for you:
- Total control: Precisely manage dishes being prepared, pending, and served.
- Improved efficiency: Optimise preparation times and reduce errors.
- Complete overview: Access a summary of all pending orders at any time.
- Quick search: Instantly find specific orders.
- Customization to suit your needs: Configure the options to match your requirements.
Requirements to use Revo KDS:
- Revo XEF: Revo KDS works in conjunction with Revo XEF, but not independently.
- Dedicated iPad: Install Revo KDS on an iPad dedicated to its use.
- Power connection: Ensure the iPad has access to a power outlet to prevent it from running out of battery during service.
- Always-on screen: Set the iPad so it never turns off, as this could cause connection errors when sending orders from Revo XEF.
1. IPAD SETUP
Follow these simple steps to ensure your kitchen iPad works seamlessly with the Revo KDS application:
1. Assign a static IP:
- Go to Settings on your iPad.
- Tap on Wi-Fi.
- Touch the information icon of the connected Wi-Fi network.
- Select Configure IP.
- Choose Manual (should be selected ).
- Manually enter the IP address, subnet mask (typically: 255.255.255.0), router, and save the changes.
- Access Configure DNS.
- Choose Manual (should be selected ).
- Manually enter a DNS address (8.8.8.8) and save the changes.
- Return to the previous menu by pressing Wi-Fi.
Recommended: The static IP should be outside the range of dynamically assigned IPs by the router or network device.
2. Ensure all devices, including those using KDS, are connected to the same Wi-Fi network.
3. In Settings on the iPad, go to Display & Brightness and then Auto-Lock. Select Never to prevent the iPad from turning off while using the application.
4. We recommend turning off all Notifications in Settings.
5. Get the Revo KDS app from the App Store.
2. KDS CONFIGURATION:
All configuration is done from the back-office of Revo XEF.
2.1. ADD PRINTER:
1. Access the back-office.
2. Go to Configuration / PRINTERS to add the KDS.
3. Click + New to create the printer. Select the printer type as Revo KDS and use port 2000.
For more information on creating printers, see this article.
2.2. CREATE PROFILES:
1. Go to Configuration / KDS.
2. Click the + New button to create a profile.
Create as many profiles as KDS devices you have. For example, if you are only using one iPad with KDS in the kitchen, you only need to create one profile.
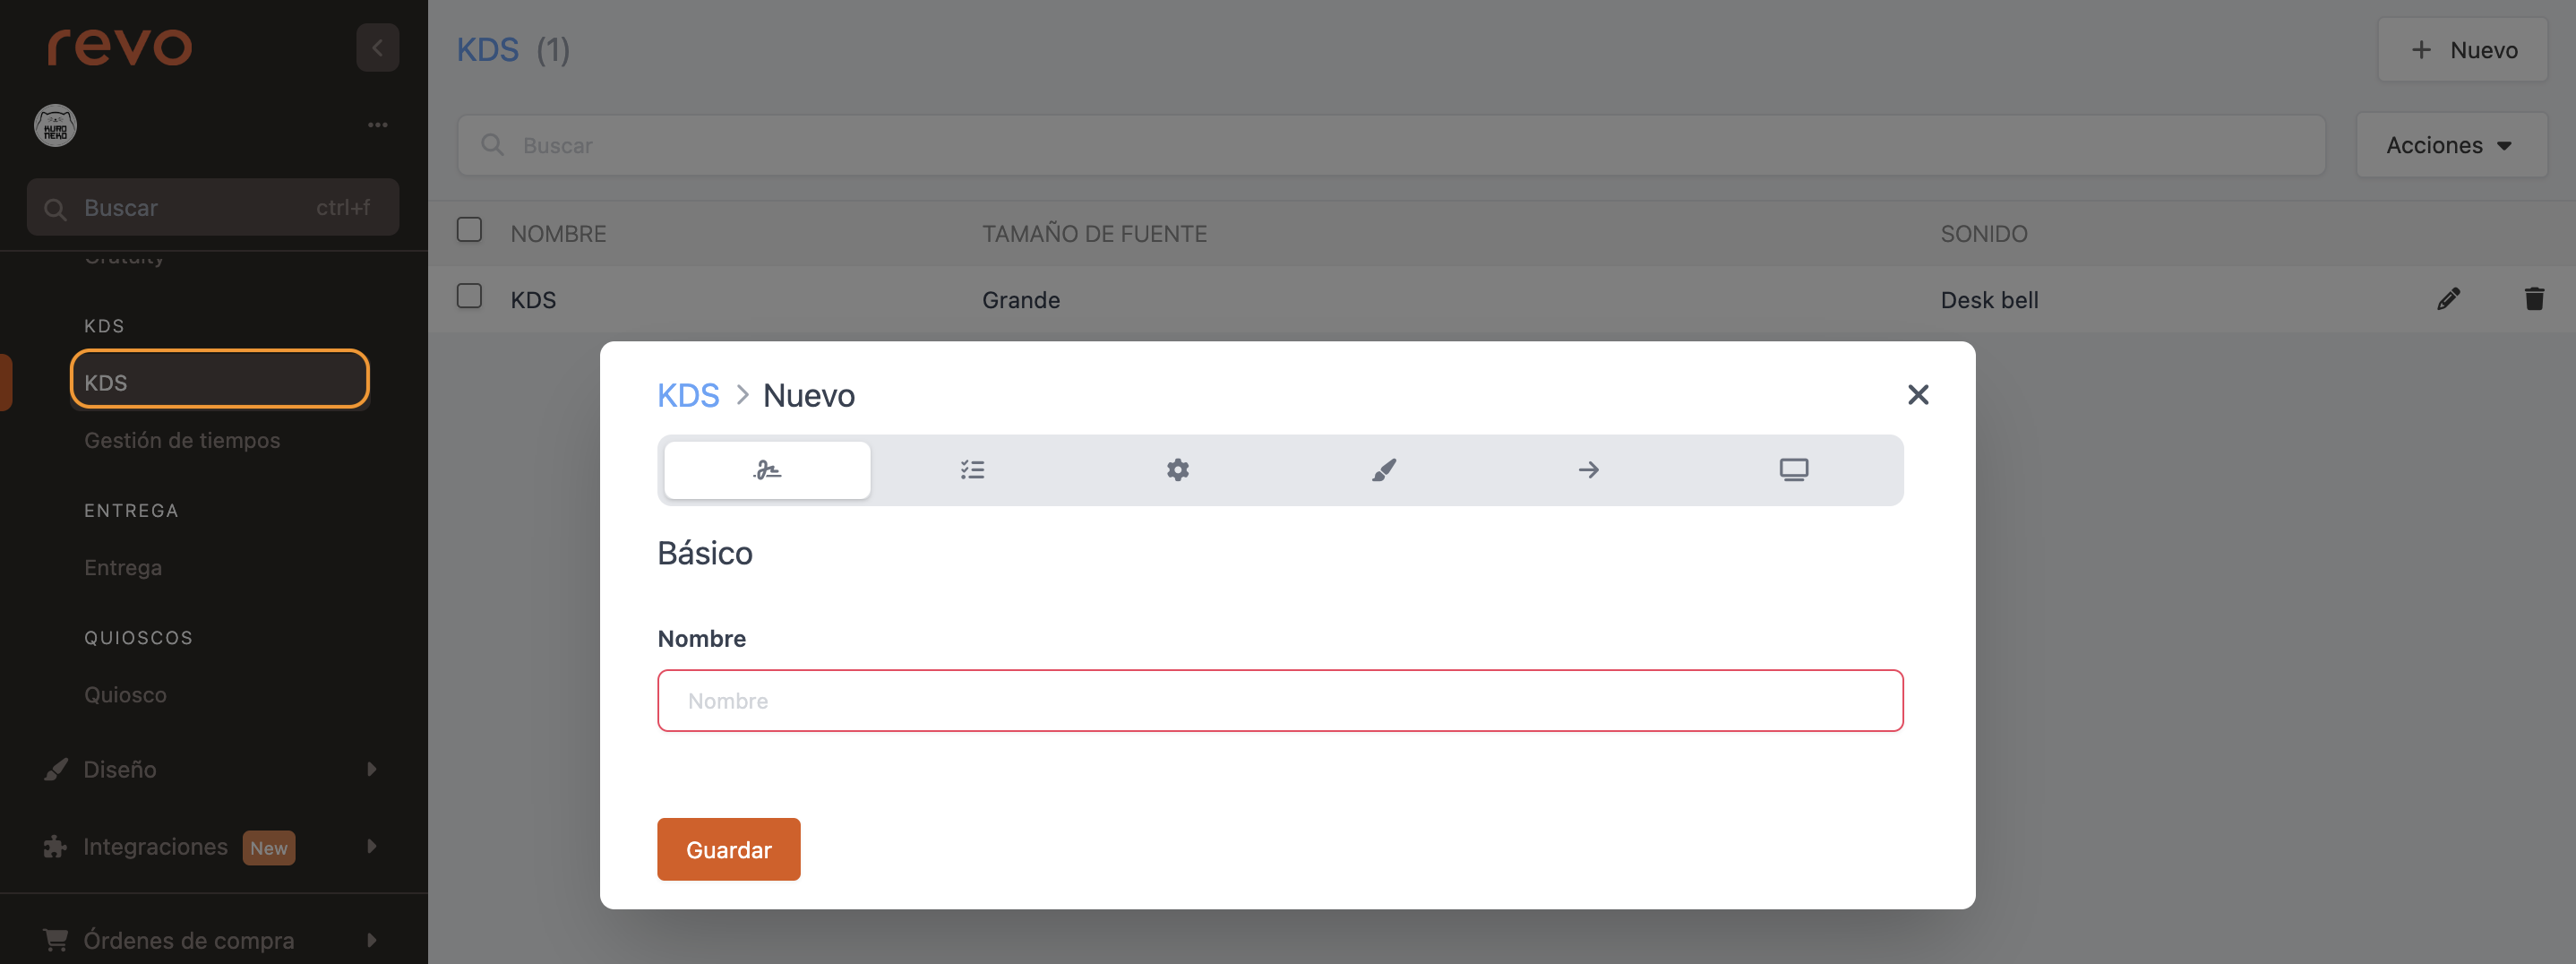
BASIC
- Name: Enter a descriptive name for the KDS profile.
BEHAVIOUR
-
Combine orders: Enable this option so that when new tickets from the same order arrive, products are added to the already open order in the KDS. If the order is closed, it will be added as a new ticket.
-
Sum quantities: Enable to show the total sum when a new order arrives with the combine orders option enabled and the content is the same.
-
Change state on click: Enable to mark products in yellow when clicked as done.
-
Use 'In Progress' state: Enable this option to enable a third state of content: In progress. Clicking on the dish will change it from "new" to "in progress" and clicking again will change it to "done".
-
Use 'Passed' state: With this option enabled, you will enable the fourth state of content: Passed. Clicking an item will change it from "new" to "in progress", then to "done", and if clicked again, it will change to "passed".
From version 2.0 of Revo KDS.
-
Move to merged order: With this option enabled, when a modification is sent to an open order, the KDS will display the merged order and emit a sound.
-
Group contents: Enable this option to group identical products by default. If disabled, they will be displayed individually and can be marked separately.
Example: If you send 2 Burger Shark, they will appear as 2 Burger Shark and not as 1 Burger Shark and 1 Burger Shark. This means if products are marked as completed, they must be marked when both are done. -
Close automatically on completion: Select Yes so that when all dishes in an order are marked as completed, the order automatically closes without notification.
Example: In configurations where a resend is done, and you want the order to close not only in your KDS but also in others. -
Auto-notify Revo XEF on order close: Enable this for the KDS to notify the Revo XEF app when an order is ready.
-
Menu display: Three options available.
-
Standard: Displayed as in Revo XEF.
Recommended when menus are used in Revo XEF with quick entry disabled. Menu item orders do not appear. -
Show dish orders: Display dish orders (starters, mains, desserts, etc.) highlighted in yellow.
Recommended when menus are used in Revo XEF with quick entry enabled, and you want to emphasize dish order. -
Normal products: Display menu items alongside à la carte items. Menu items are marked with [M] for differentiation.
Recommended for businesses offering customers the option to order both set menus and à la carte in the same service.
-
Standard: Displayed as in Revo XEF.
-
Auto-print individually marked products: With this option enabled, marking a product as completed automatically prints an individual ticket.
This option disables printing of the general ticket. -
Notify ready products to third parties: Enable to notify third parties when a content is ready. Requires creation of a kds.contentsReady webhook in Revo XEF. Useful option for online orders
CONFIGURATION
-
Presence control: Enable this option to clock your entry and exit times on the KDS with the icon.
Ensure you are registered in the Revo XEF back-office. More info here.
-
Printer: Select a printer from the list to print passage tickets on the KDS. You can create a new one by pressing . More information here.
-
Track preparation times: Enable this option to track the time from receiving a product on the KDS to marking it as 'Done' and to save a report on preparation times in the back-office.
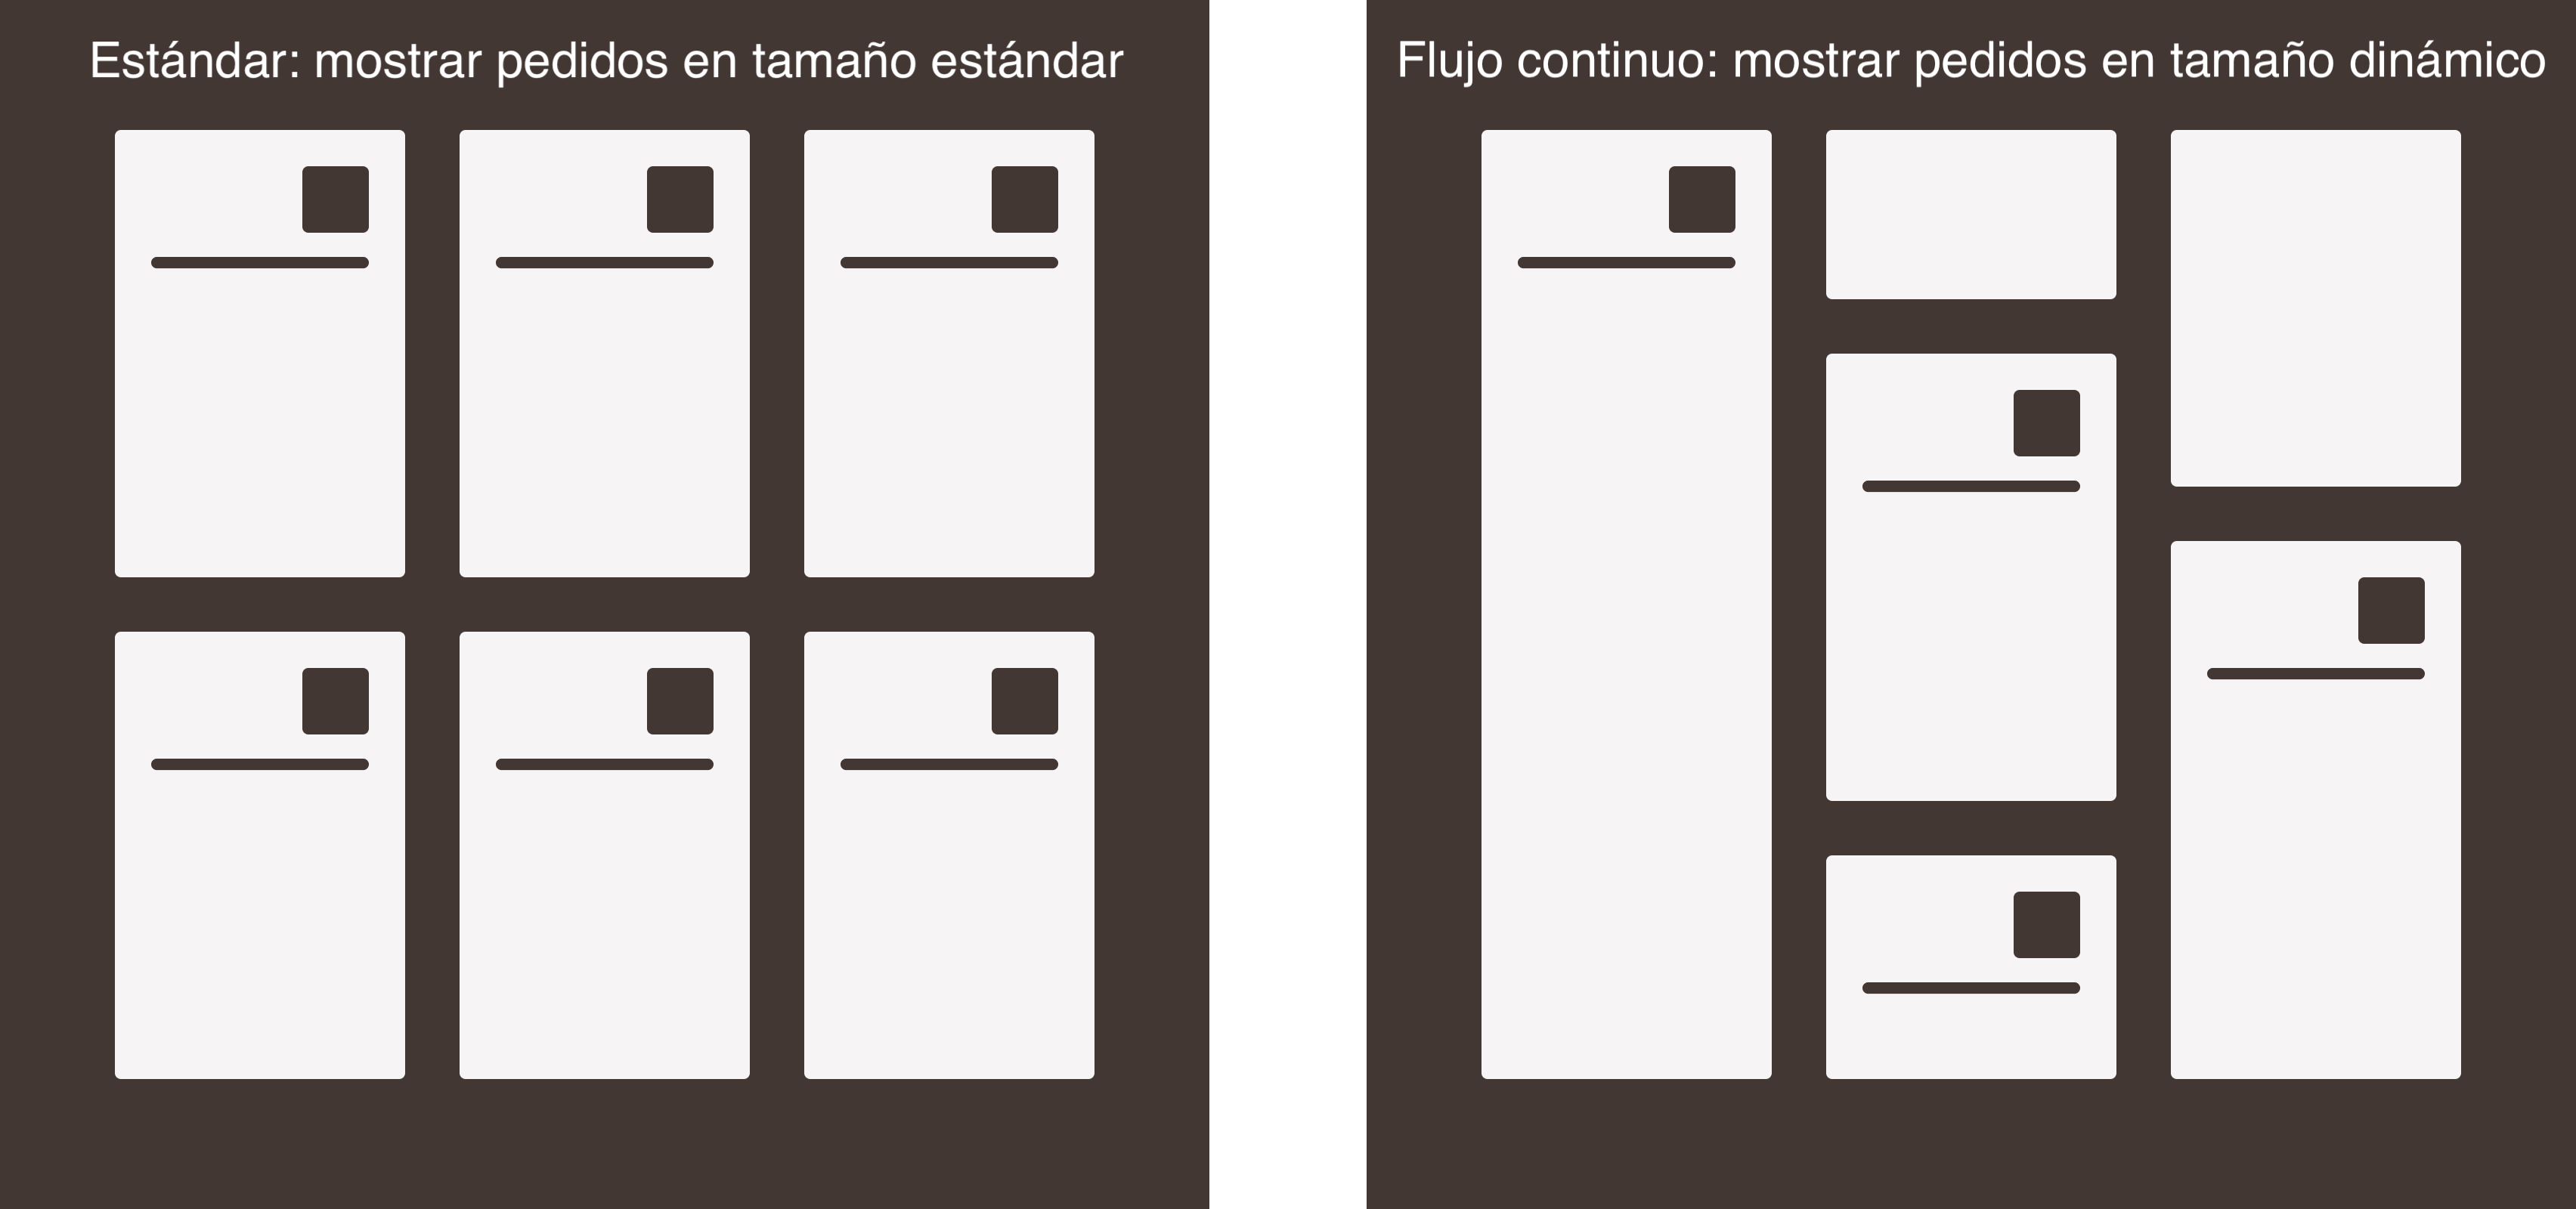
APPEARANCE
- Display Type: Choose between Standard or Continuous Flow.
-
Keep Completed Products: Enable to display completed products in colour. Disable to hide them.
-
Ticket Rows: Define how many rows of tickets to display in the KDS.
-
Font Size: Choose Large or Standard for the font size in the KDS.
-
Order Subtitle: Choose what information to display on the orange order button.
- Counter: Displays the general counter.
- Account: Displays the account name.
-
None: No subtitles displayed.
-
Sound: Choose the sound for new orders received in the KDS. Here is a list of available sounds.
Air Horn:
Desk Bell:
Door Bell:
Japanese Bell:
Metal Gong:
Ship Bell:
FORWARDING
-
Enable forwarding: Enable this option to allow secondary KDSs to send information to the Master or Central KDS.
Example: Different KDSs each receiving their batch of an order and forwarding this information to the KDS Master managed by the chef. It can also receive notifications when items are marked as completed from the secondary KDSs. -
Forwarding IP: Add the IP address of the device to which you want to forward information from this iPad. You can add multiple IP addresses by separating them with commas.
Example: 10.0.1.20, 10.0.1.21, etc.In the previous example of the KDS Master with several secondary KDSs, only the latter should enable forwarding by adding the static IP of the KDS Master.
-
Forward only checks: Activate this option to send notifications only when items are marked as completed.
-
Forward on close: Activate this option to send information when an order is completed.
SECONDARY SCREEN
-
Second screen view: Select how you want to view information on the second screen connected via HDMI.
- Duplicate: Duplicates the KDS screen.
- Second screen view: Displays pending dishes.
- Tickets on second screen: Displays all orders organized by ticket rows.
-
State summary: Displays the status of dishes.
-
Summary size: Sets the text size on the second screen.
Recommended:
- iPad Pro 12.9 = 25
- iPad 10.5 = 50. -
Ticket rows on second screen: Determines how many ticket rows to display on the second screen of the KDS.
3. OPERATION OF THE KDS
Once your iPad is set up and options are customized in the back-office, follow these steps to use the KDS:
Open the app and enter your username and password for Revo XEF.
3.1. HEADER

1. Tap the r to access the menu and actions of the KDS.
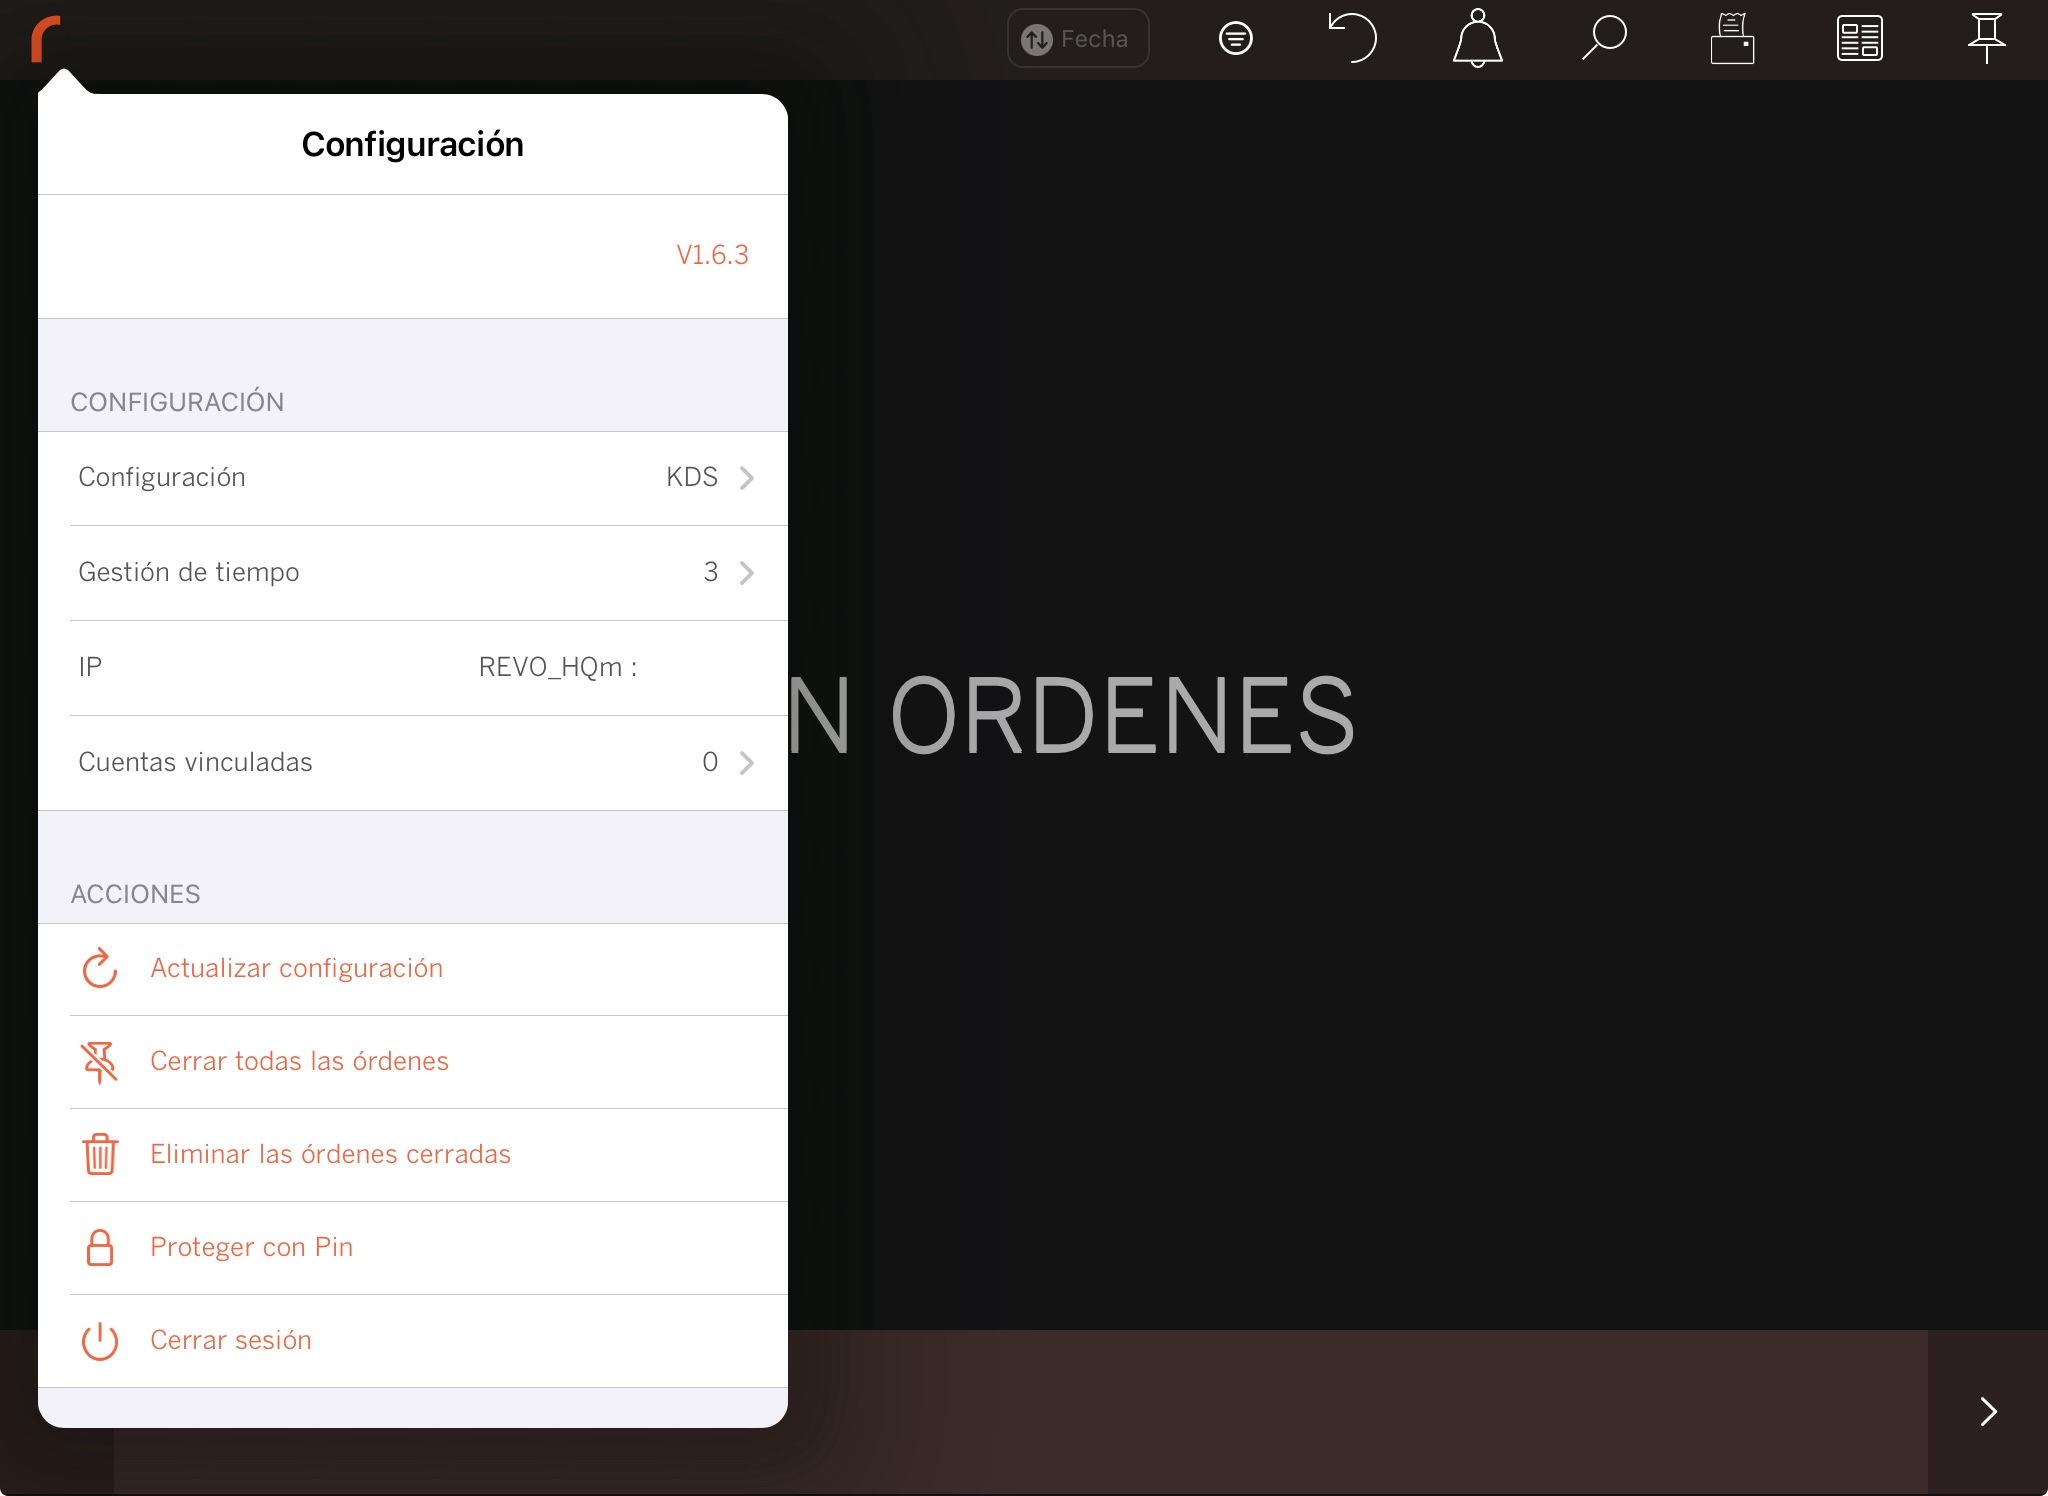
- Account: Your Revo XEF account.
- Version: Version of Revo KDS you are using.
CONFIGURATION
- Profile: Select the profile from the back-office.
- Timings: Displays the configured timings.
- IP: Displays the current IP address of the iPad.
- Accounts: Access your accounts.
ACTIONS
-
Update configuration: Apply changes from the back-office.
Sometimes, it may be necessary to log out for changes to take effect.
-
Close all orders: Closes all open orders.
-
Delete closed orders: Clears orders from the closed orders list.
-
Protect with PIN: Adds PIN protection.
-
Log out: Logs you out of your account.
2. Filters: By default, orders arriving at the KDS are sorted by arrival order.
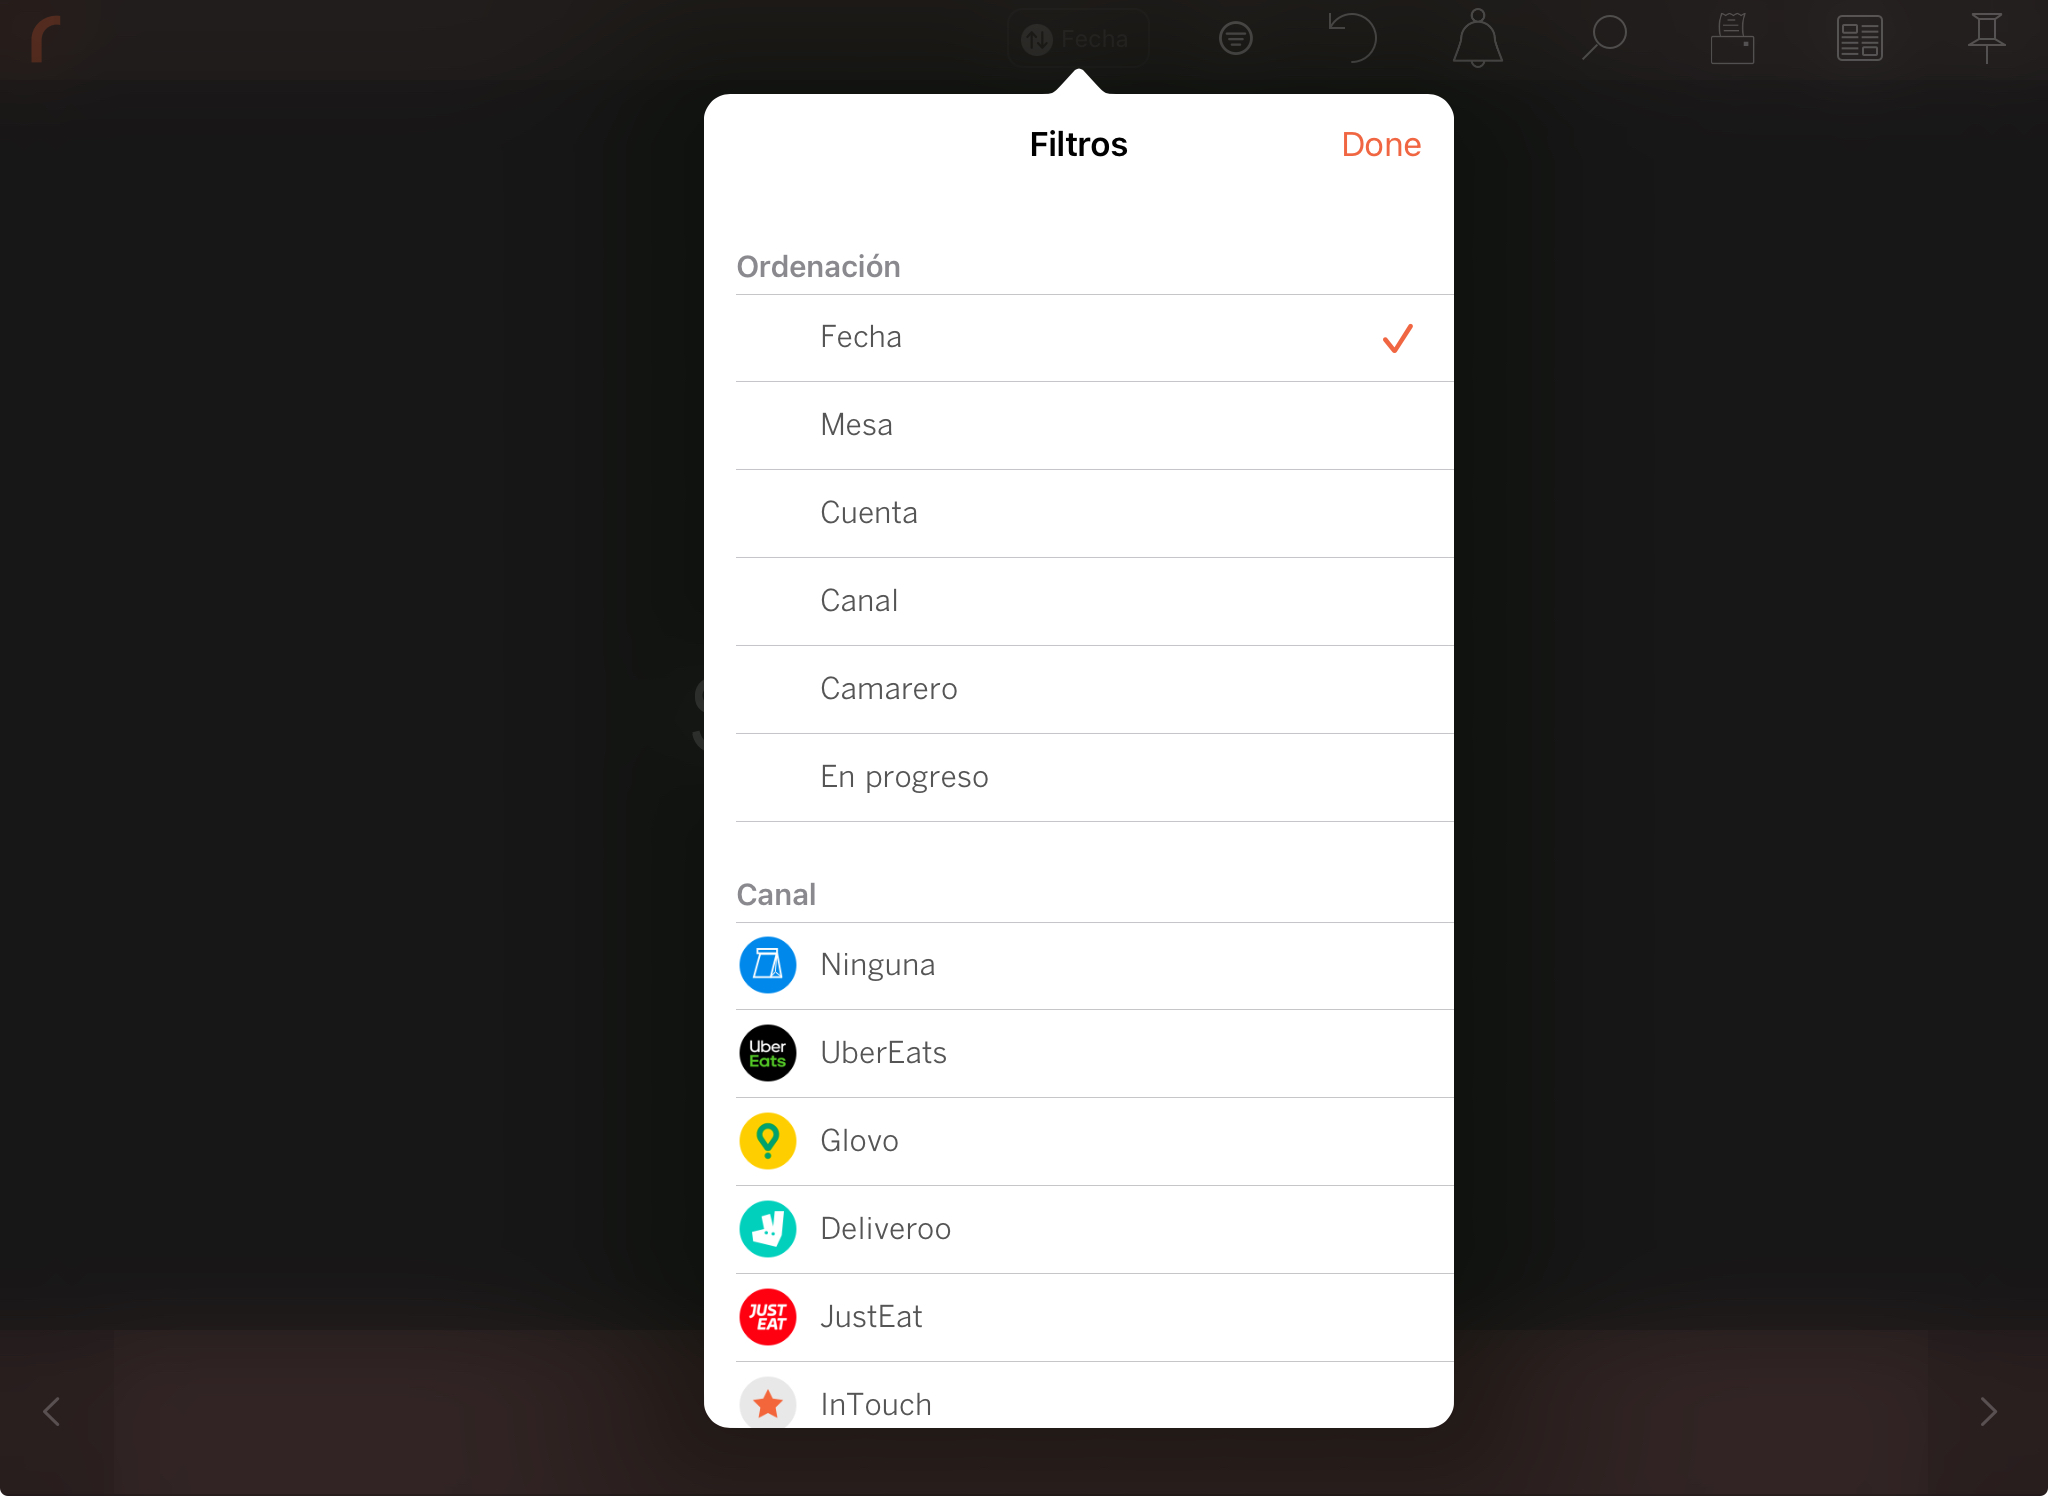
- Sorting: By Date, Table, Account, Channel, Server, or In Progress.
- Account: In case orders arrive from multiple accounts.
- Channel: Uber Eats, Glovo, Deliveroo, JustEat, etc.
3. Undo: Reverts the last change made.
Example: a ticket was closed by mistake, or a dish was marked as "done".
4. Presence: Registers employee check-in and check-out.
5. Search: Finds orders by number, table name, etc.
6. Print: Prints the pass ticket.
Example: You receive an order with starters and main courses, mark them as done, and want to print the pass ticket. Steps:
- Receive the order.
- Mark the dishes as done. They will turn yellow.
- Press the icon.
-
Collect the printed pass ticket and place it next to the dishes.
This way, the waiter will know which table the dishes belong to without asking the chef.
It is essential to have a printer selected in the KDS configuration.
7. Summary: Displays a summary of all items not marked as done, sorted by quantity.
8. Closed Orders: Shows a list of all orders closed in the last 24 hours. You can view their contents and reopen them to send them back to the main screen.
3.2. ORDER ACTIONS
Here are the actions you can perform with orders:
-
Mark dishes: Tap on the products to mark them in yellow. When all products in an order are marked, the KDS will ask if you want to close the order.
-
Swipe through orders: Swipe left to right to view all received orders.
-
Close order: There are two ways:
- By marking all dishes.
- By tapping on without marking the dishes.
These options appear when you tap on the order header:
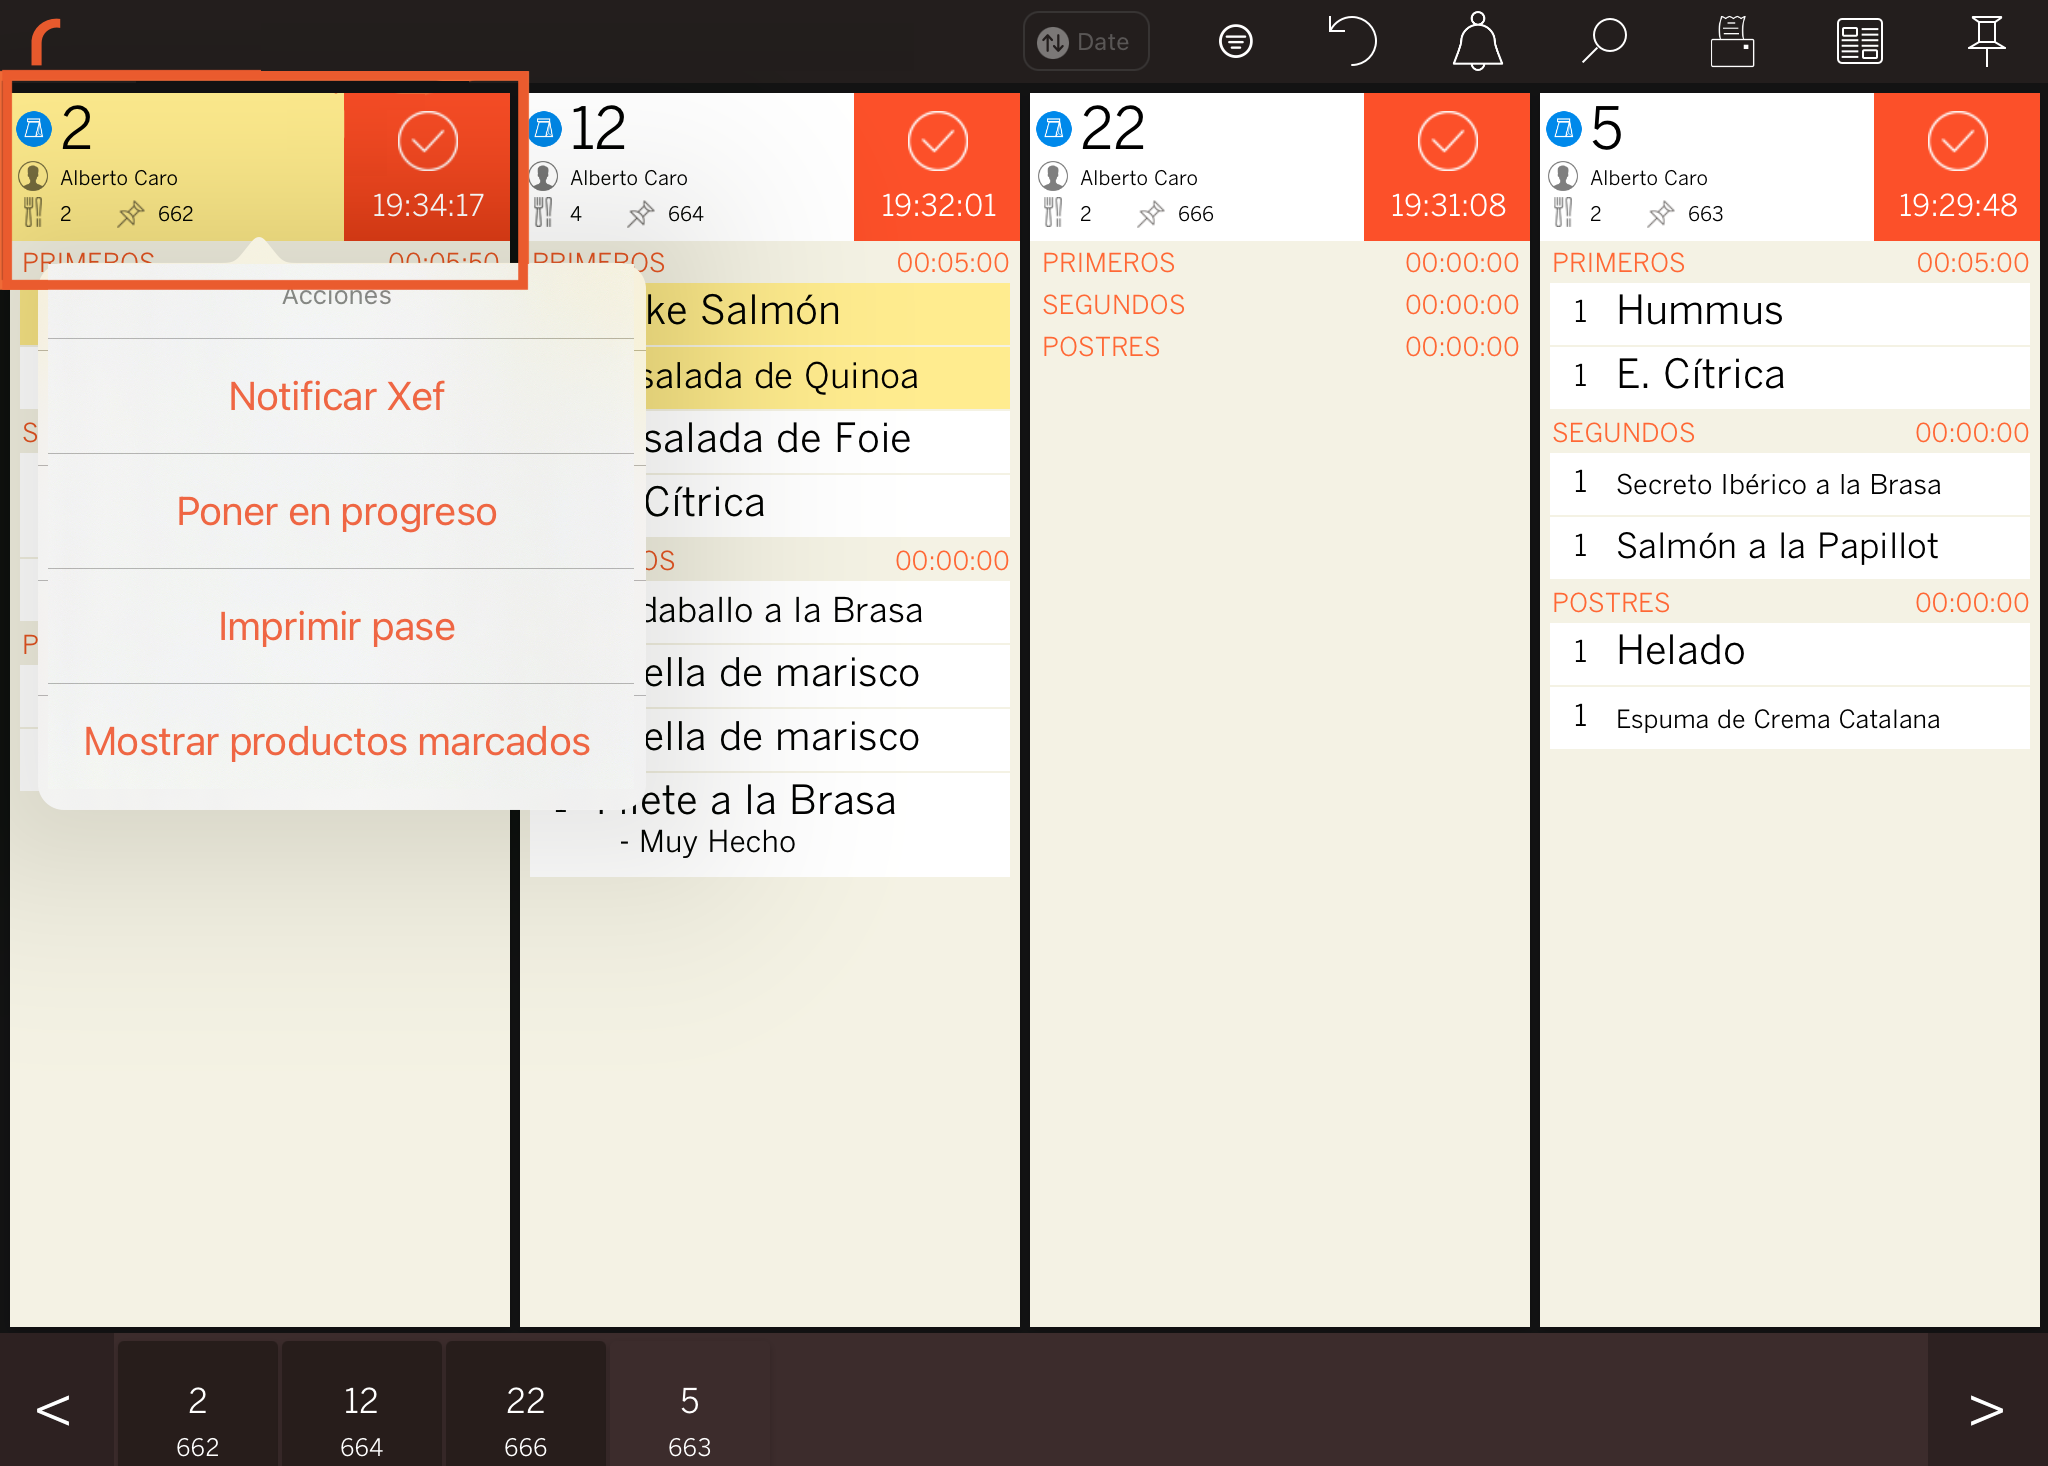
-
Notify XEF: Send a notification to Revo XEF indicating that dishes are ready to be collected. Tap the order header to send the notification. The header changes to grey. In Revo XEF, a "chef's hat" symbol appears in the top left corner of the table.
-
Set in progress: Mark the order header in yellow, indicating it is in progress. Other KDS units in the kitchen can see which orders are active.
-
Print pass ticket: Print the pass ticket for the selected order.
-
Show/Hide marked products: Show or hide marked products if you have activated this option.
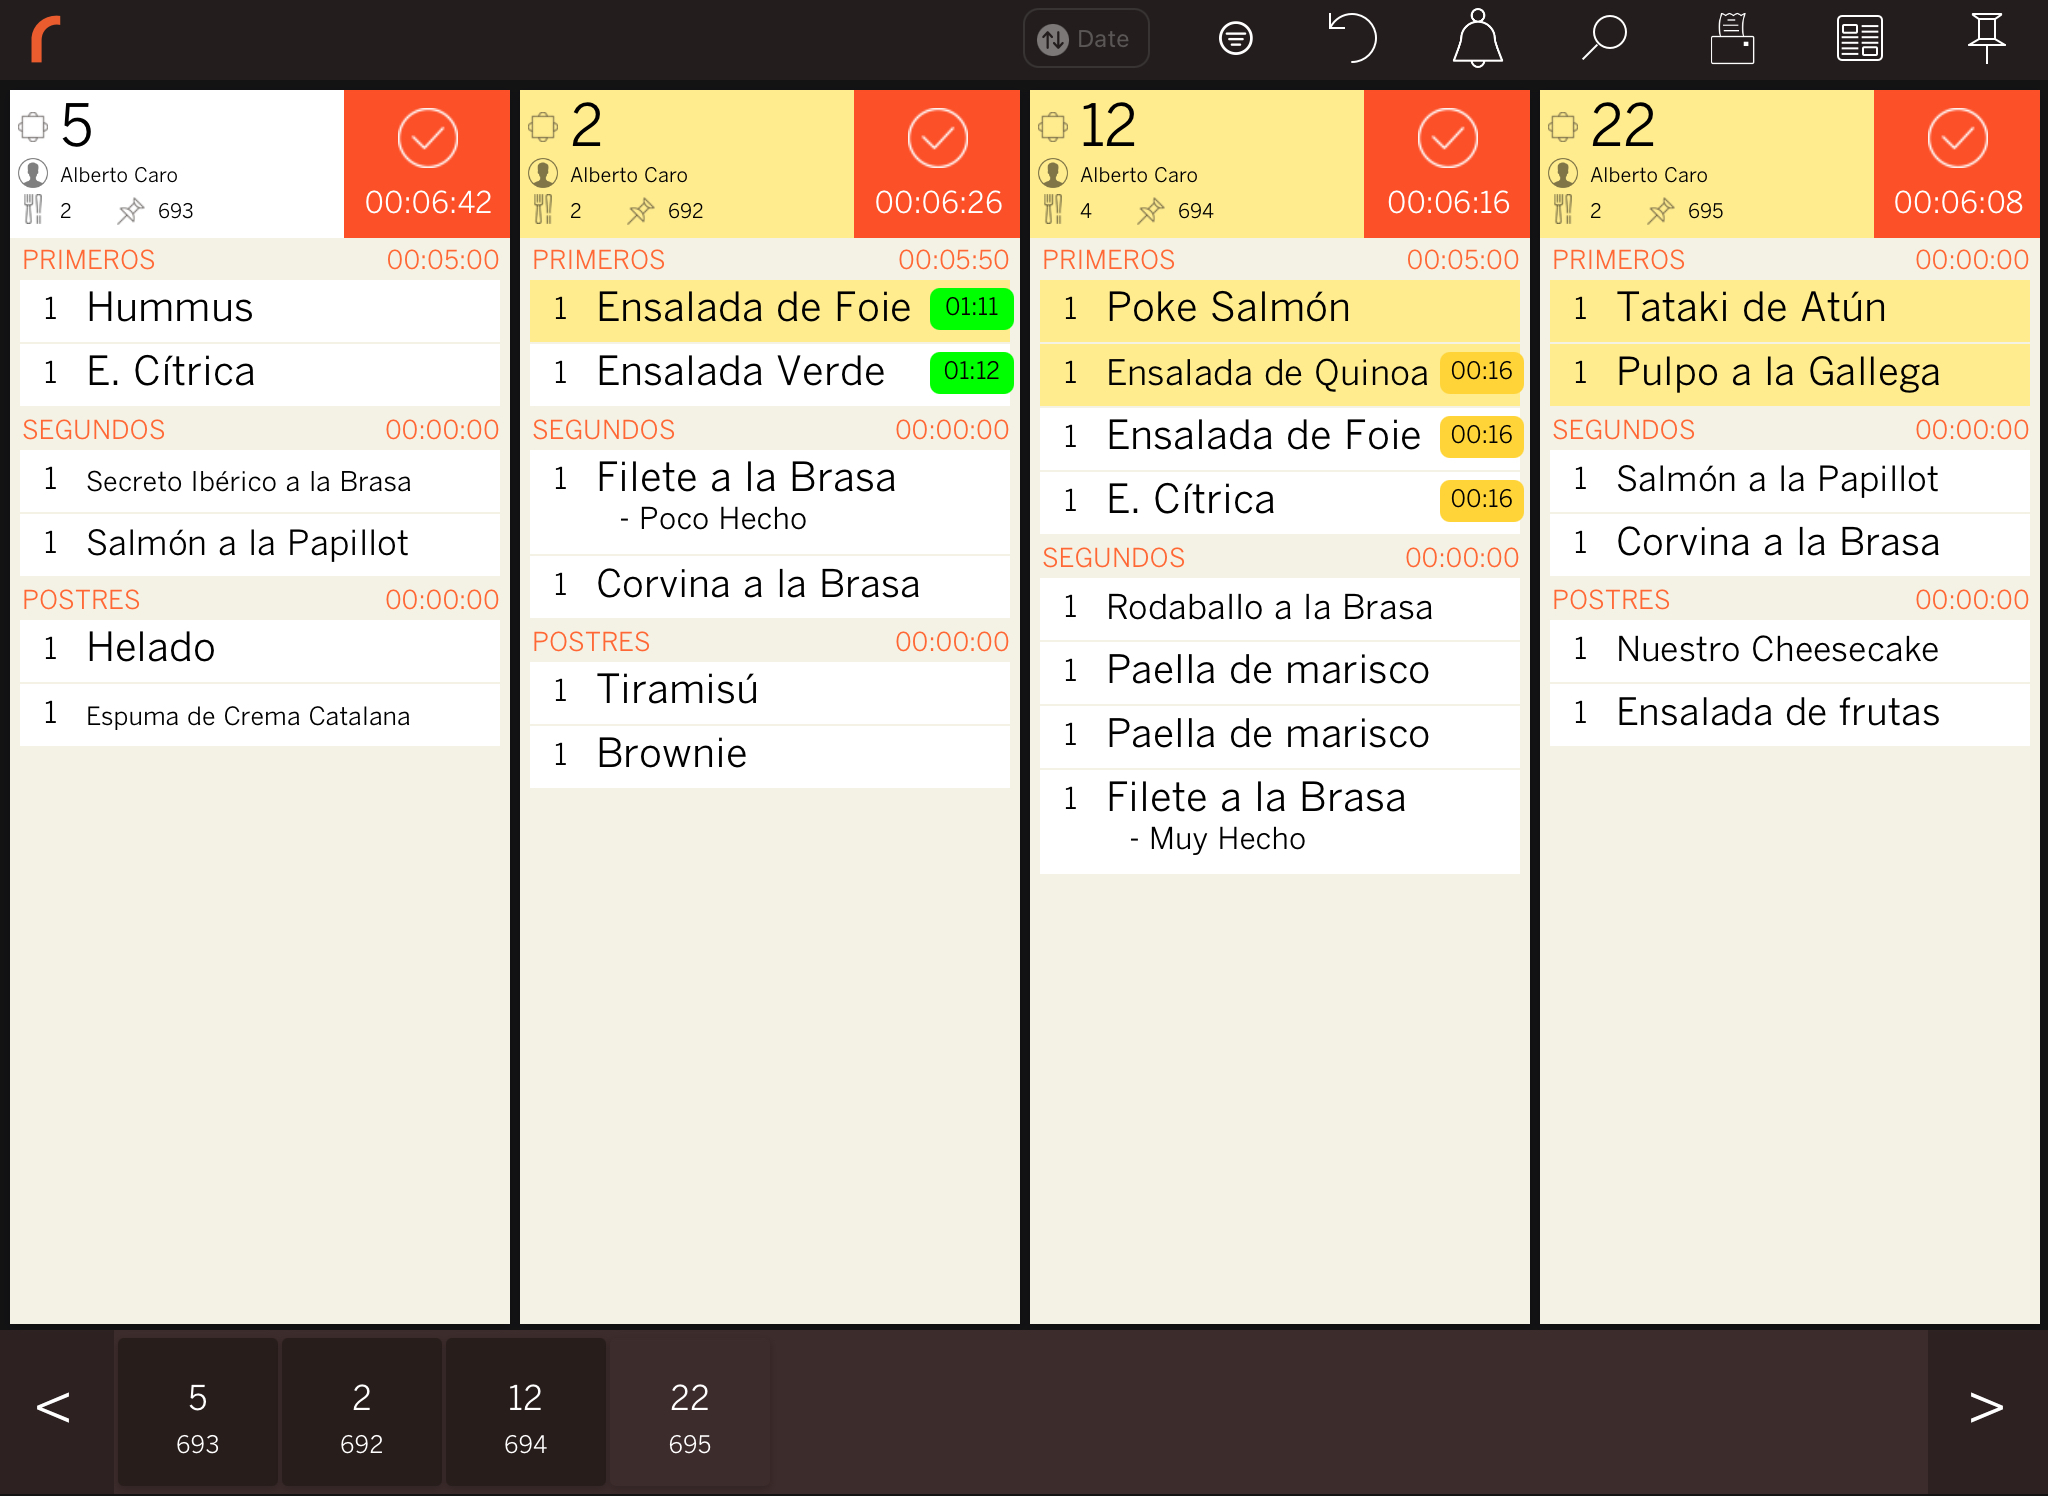
3.3. ORDERS
The following information is displayed on open orders:
- Table name.
- Employee who sent the order.
- Number of diners.
- Order number.
- Button to close the order.
3.4. FOOTER
At the bottom of the KDS, all open orders are displayed in a grid. You can tap on one to centre it on the screen, or use the buttons to scroll.