1. VENDORS 2. PURCHASE ORDERS 3. PRODUCTS 4. UNITS
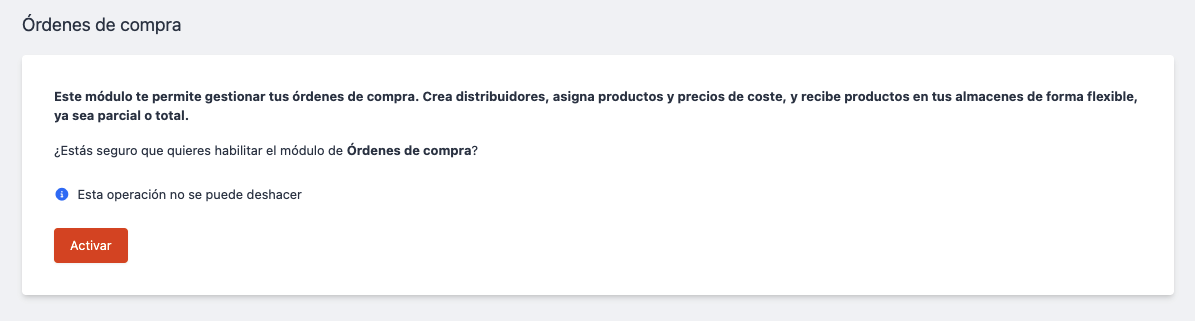
The purchase management feature in Revo XEF helps you complete the inventory cycle, from placing a purchase order to receive it, adding it to stock, and then selling it or using it for cooking.
You can manage purchase orders from the back-office or Revo STOCK, after activating the module.
1. VENDORS
OVERVIEW
1. Go to the back-office.
2. Select Purchase Orders / VENDORS
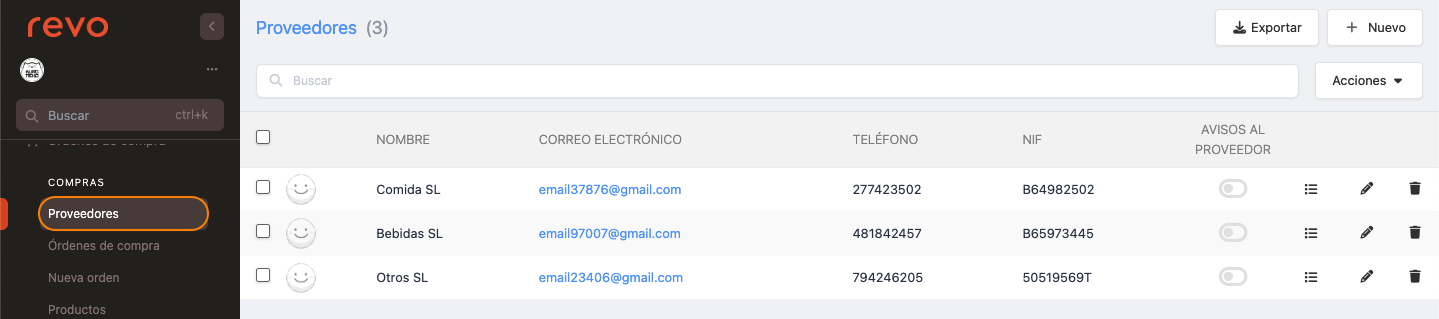
- : Export the list.
- + New: Create a vendor.
- : Search for a vendor.
- Actions: Delete selected vendors.
- : Select vendors.
- Name: Vendor name.
- Email: Vendor’s email.
- Phone: Vendor’s phone number.
- NIF: Vendor’s NIF.
- Vendor notifications: Notifications enabled or disabled .
- : Vendor’s products.
- : Edit the vendor.
- : Delete the vendor.
CREATE VENDORS
1. Click + New and fill in the details.
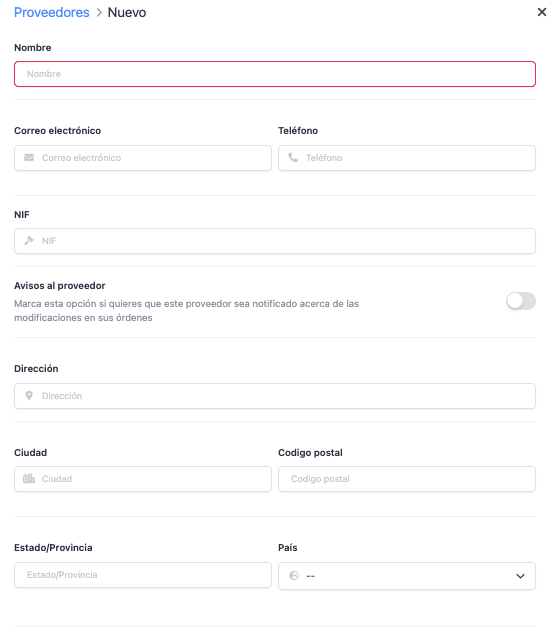
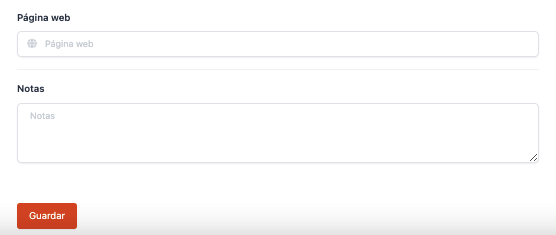
Name, NIF, and address are required fields.
2. Click Save.
ADDING PRODUCTS TO VENDORS
Once a vendor is created, add the products they supply. You can do this in two ways:
FROM VENDORS
1. Click the icon.
- Modify cost prices: Edit the "Last cost price" column to update prices without opening each product.
2. Click + Add and fill in the details.
- Product: Select the product.
- Reference: Vendor’s reference.
- Units: Unit for stock control.
- Cost price: Product cost price.
- Pack: Units per pack. For example, 20 if it’s a box of 20, or 1 if it’s a single item.
- Tax: Purchase tax.
3. Click Add.
FROM THE PRODUCT SHEET
This option is useful when creating a product for the first time and assigning a vendor.
1. Select the product.
2. Go to the Inventory tab.
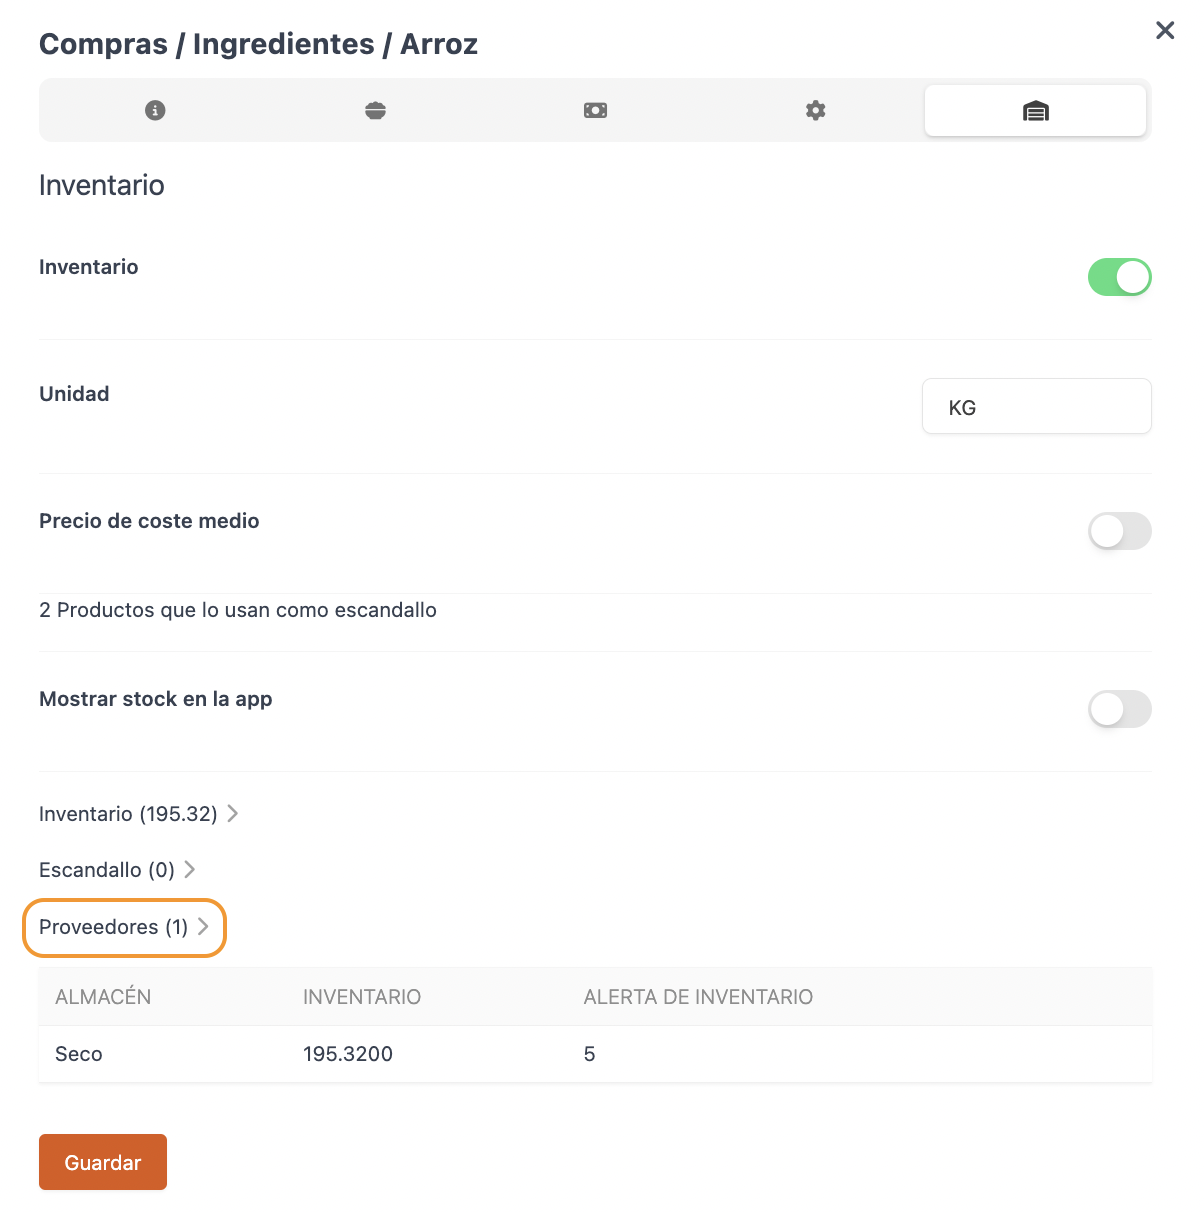
3. Go to Vendors.

4. Click Add and fill in the details.
- Vendor: Select the vendor.
- Reference: Vendor’s reference.
- Units: Unit for stock control.
- Cost price: Product cost price.
- Pack: Units per pack. For example, 20 if it’s a box of 20, or 1 if it’s a single item.
- Tax: Purchase tax.
5. Click Add.
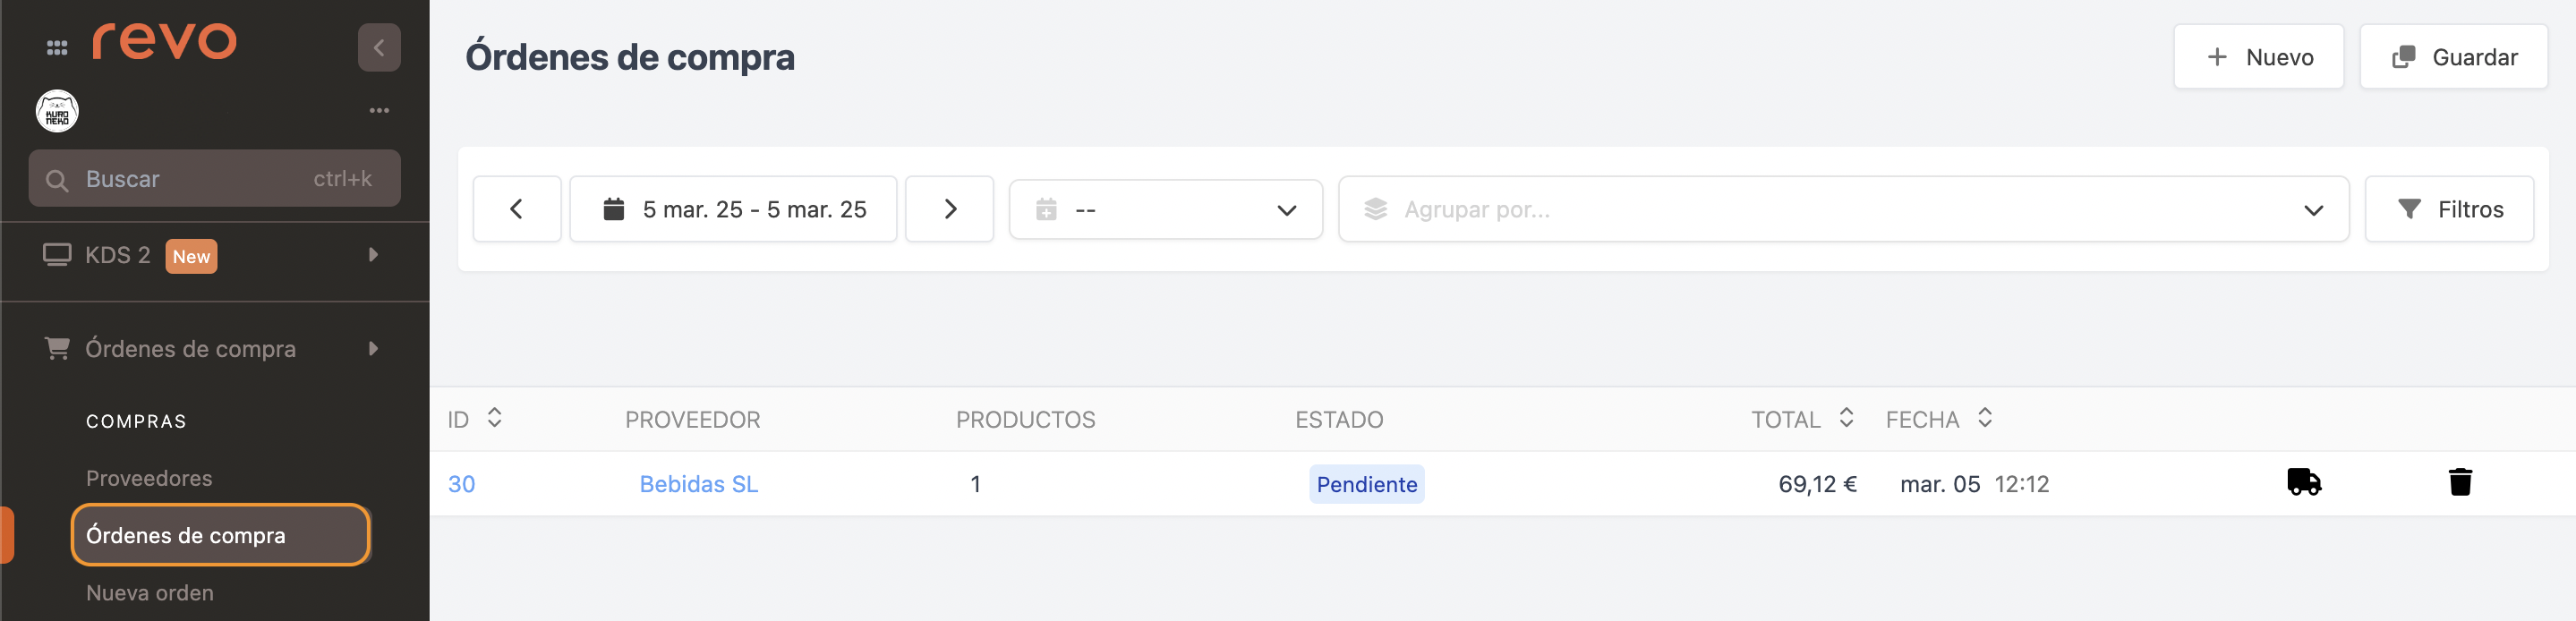
2. PURCHASE ORDERS
In PURCHASE ORDERS, all the delivery notes for the orders sent to vendors will appear.
- + New: Create a new purchase order.
- : Save the list with custom filters.
- Date range: Select the date to view.
- Date: Select from the dropdown how to display the date.
- Group by: Vendor.
- : Filter by vendor, products, status, and/or date.
- ID: Order ID.
- Vendor: Name of the vendor.
- Products: Number of products in the purchase order.
- Status: Order status: pending, partially completed, or completed.
- Total: Total value of the order.
- Date: Date the order was created.
- : Receive the order.
- : Delete the order.
NEW PURCHASE ORDER
You can create a new order from the PURCHASE ORDERS section by clicking + New or directly from NEW ORDER.

1. Complete the information:
-
Vendor: Select the vendor from the dropdown menu.
-
Warehouse: Select the warehouse from the dropdown menu.
-
Auto: You can automatically fill an order quickly and easily, as long as the products have the default field correctly configured. For example, Coca-Cola product, where the actual stock is 40 and by default, we want to have 100. If we press the Auto button, it will add the product to the purchase order with 60 units, which is the result of comparing the actual stock with the stock we want to have by default.
Learn more in the inventory control article. -
Product: Select the product to add to the order from the dropdown.
-
Units: Enter the number of units to order from the vendor.
If a pack is configured, it will multiply by the added units. In the previous example of boxes of 20, if we indicate 5 when creating the order, 100 units will be added.
2. Save options:
- Save draft: Save the purchase order as a draft.
- Save: Create the purchase order.
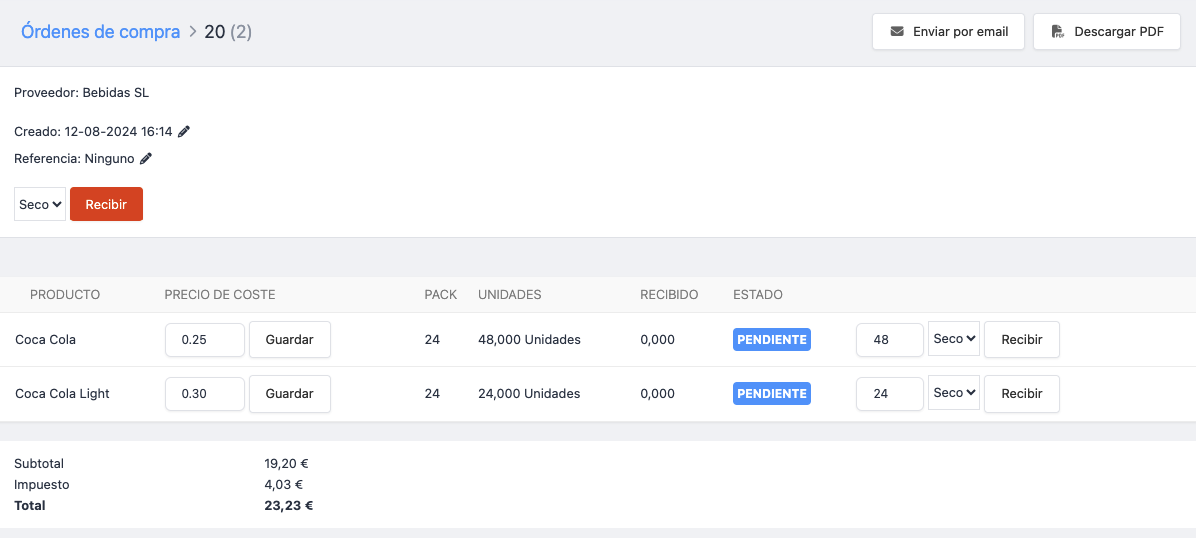
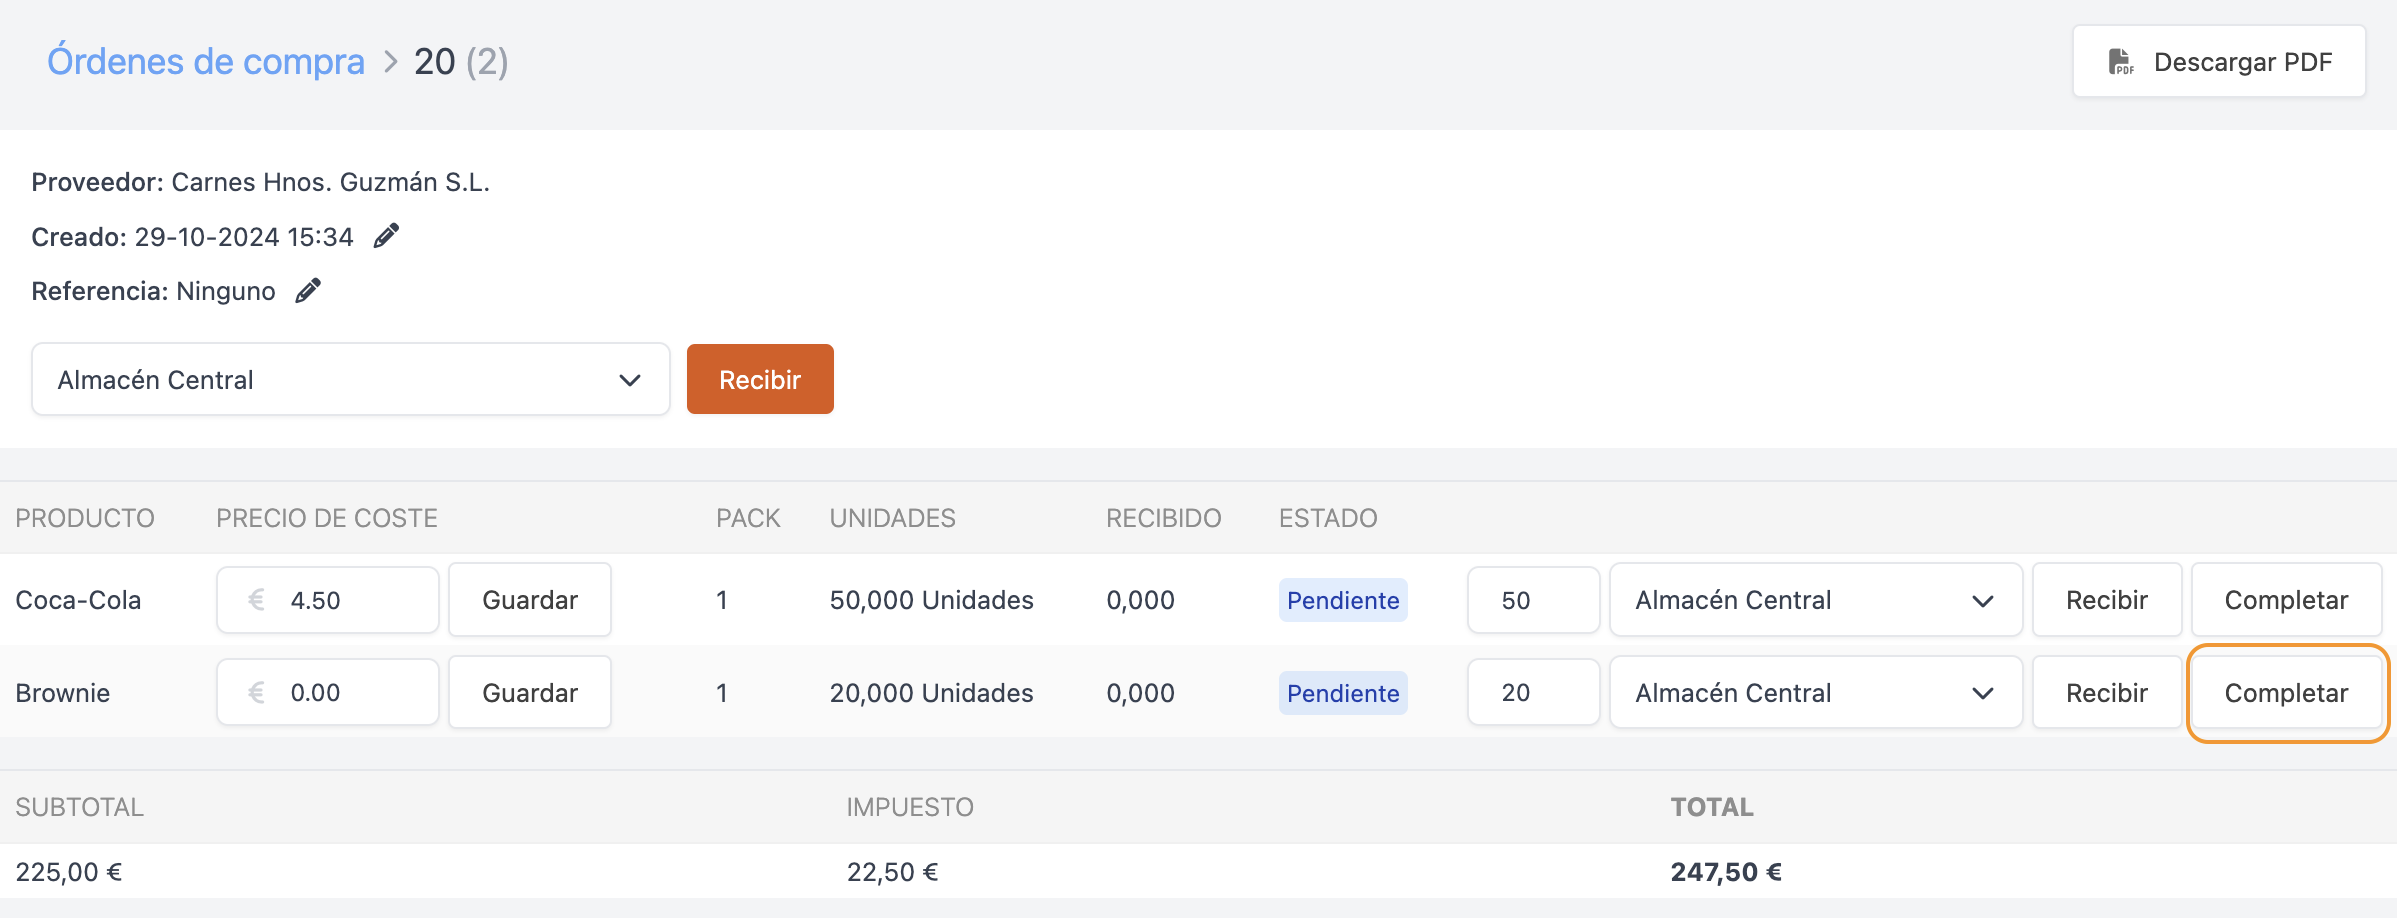
RECEIVING PRODUCTS
Click on the order number to manage it.
-
Send by email: Send the order to the vendor.
-
Download PDF: Download the order as a PDF.
-
: Edit the order date and reference.
-
Warehouse: Select the warehouse for the products.
-
Receive: Receive the entire order.
You can also do this from Revo STOCK if you don't have access to the back-office.
-
Product line
- Cost price: Edit the cost price and save.
- Units to receive: Enter the quantity received, if different.
- Warehouse: Select the warehouse for the products.
- Receive: Receive only those products.
- Complete: Complete the product line.
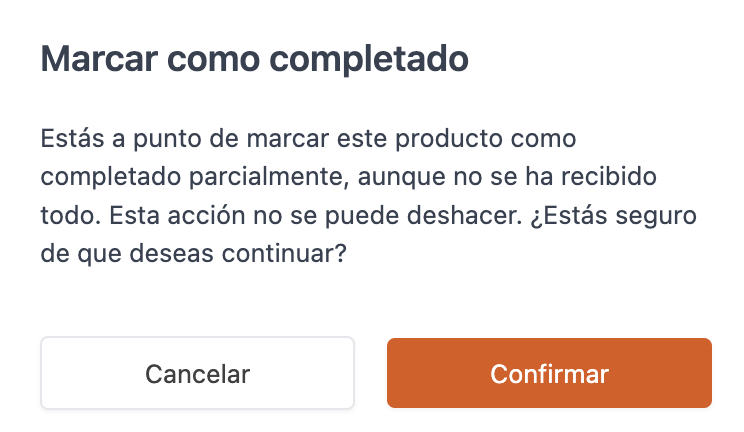
How do I indicate that I haven’t received some products?
If the supplier hasn’t delivered some of the products, you can easily indicate it.
1. In the product line, press Complete without indicating any units.
2. A confirmation message will appear.
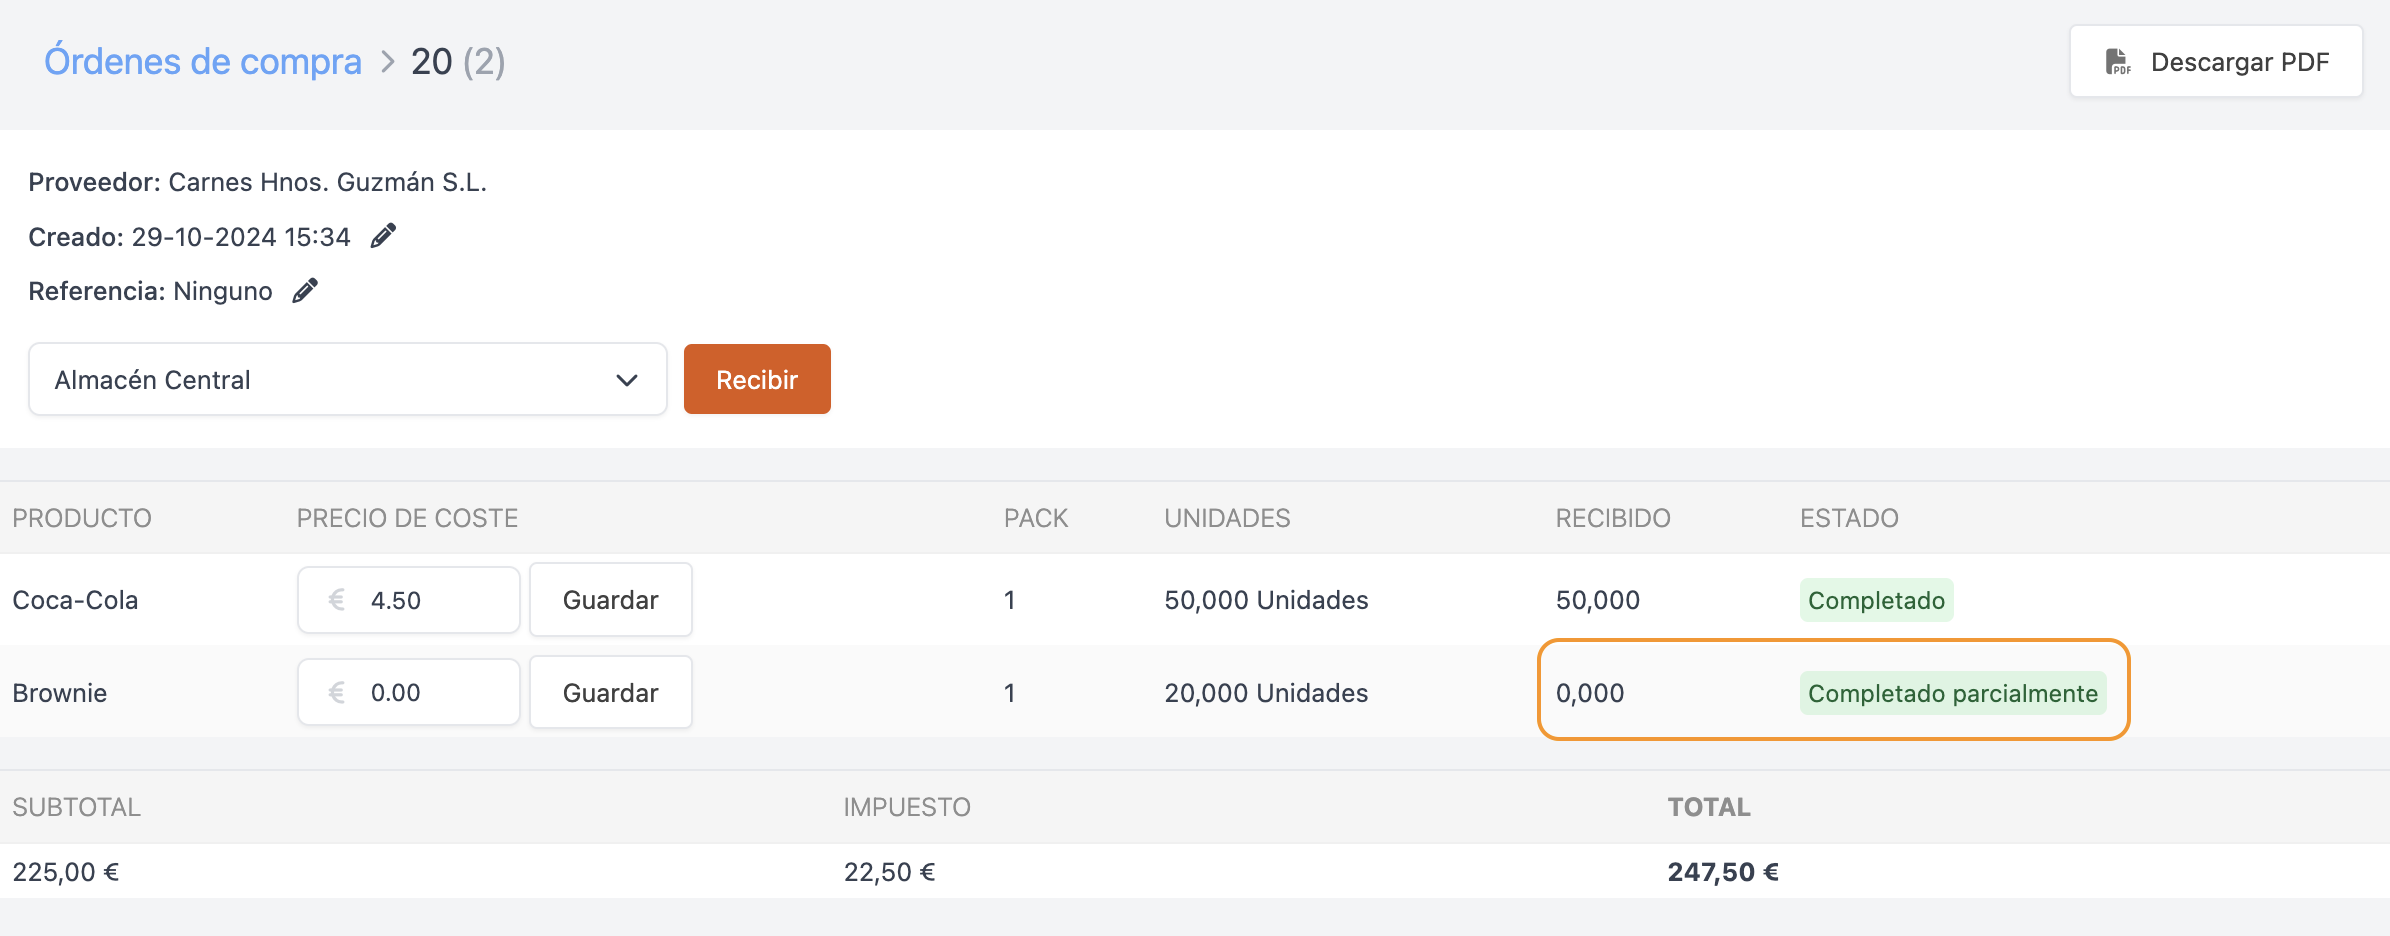
3. The status will reflect that it is partially completed, showing "0 units" as "received."
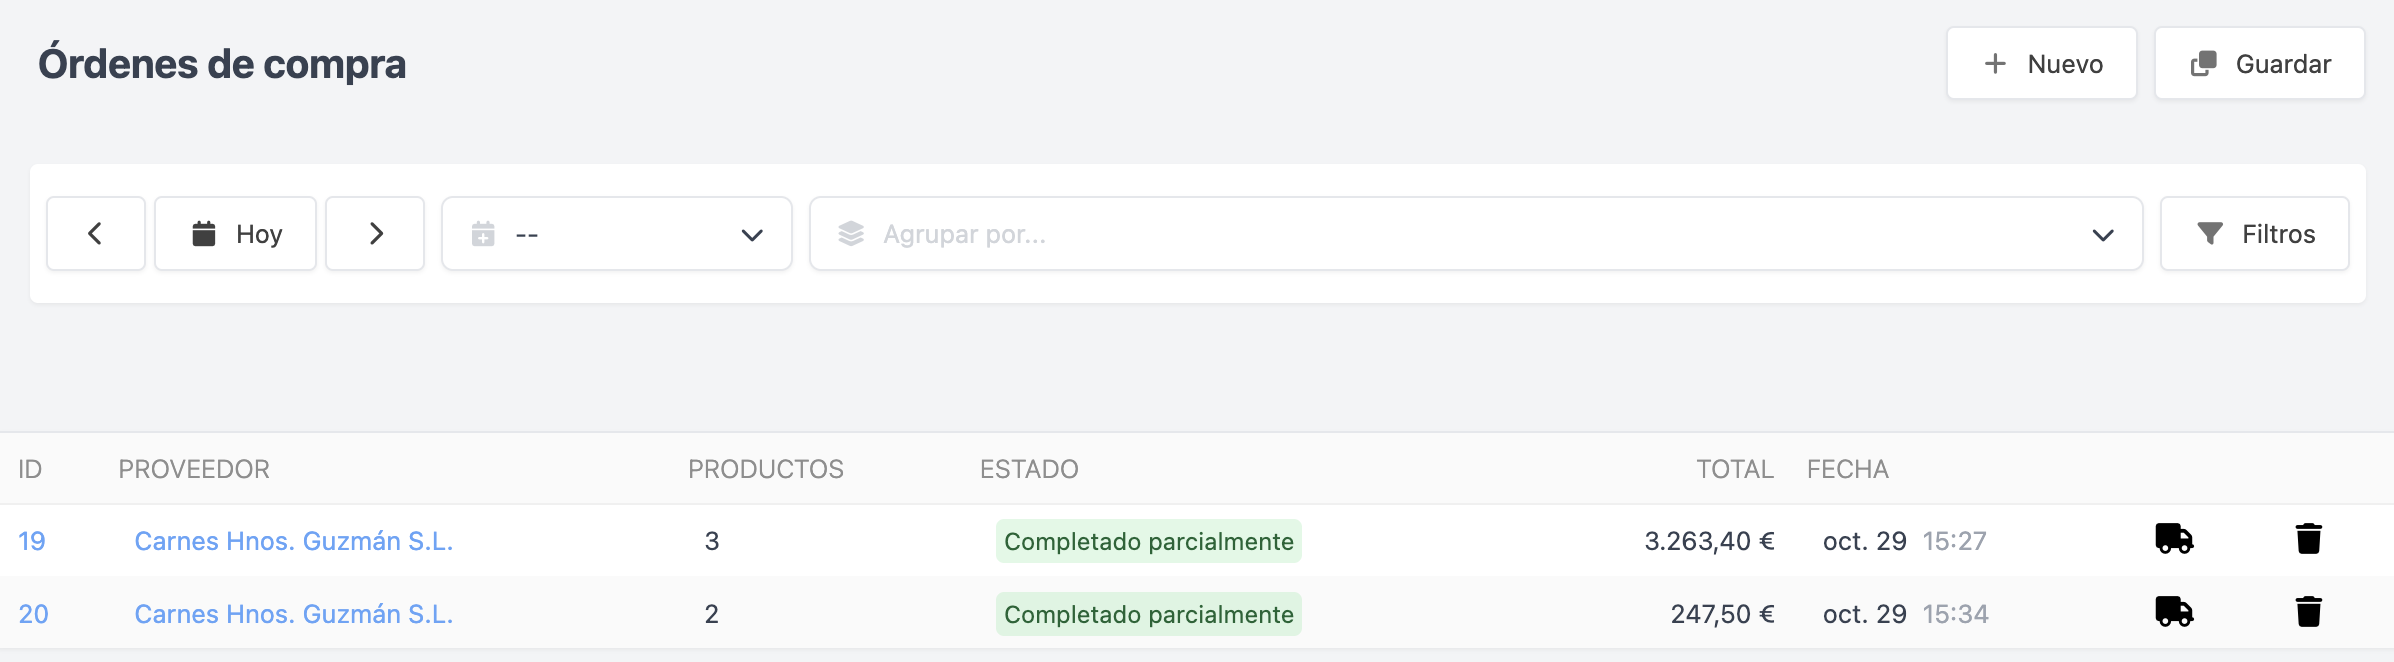
4. When you partially complete the order, you’ll be able to see it in the list:
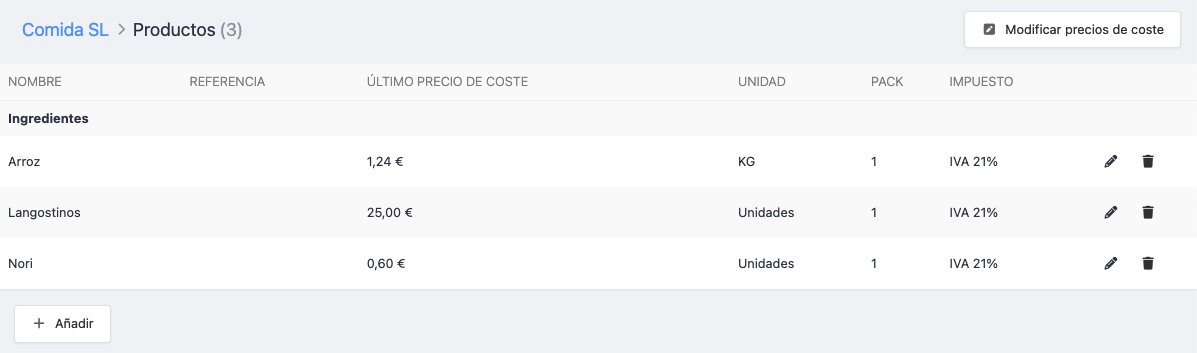
3. PRODUCTS
In PRODUCTS, you will see a list of products along with their vendor.
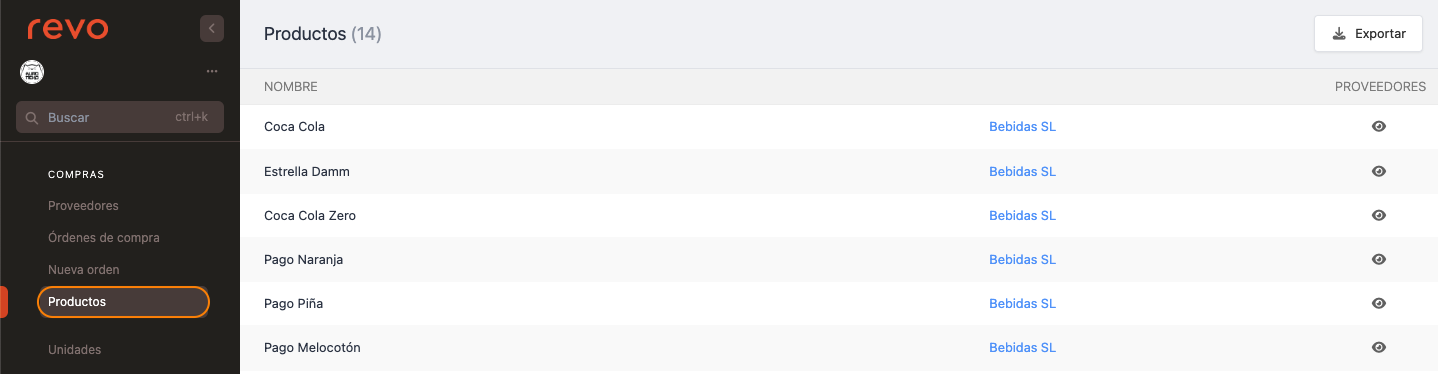
You can export this list, view the products provided by a vendor by clicking on their name, or access the product sheet by clicking the .
4. UNITS
Create custom units to better manage inventory.
For example, if you want to control wine bottles in litres, create a unit called Wine bottle 75 cl.
1. Go to UNITS.
2. Click on + New and complete the information.
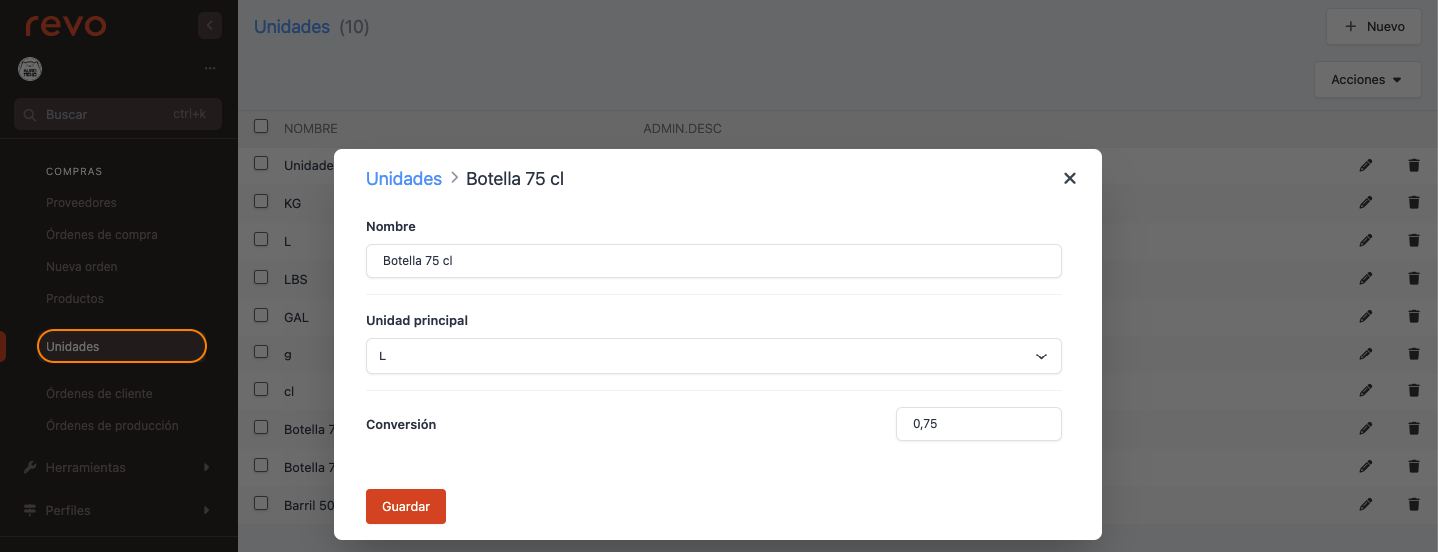
- Name: Enter a name. Example: Bottle.
- Main unit: Select the main unit. Example: L.
- Conversion: Indicate the conversion. Example: 0.75.
3. Click on Save.