
- STATUS: ACTIVE
1. WHAT IS GLORY? 2. MODELS COMPATIBLE WITH REVO 3. CONFIGURATION IN REVO 4. CASH DRAWER CONFIGURATION 5. PAYMENT WITH GLORY 6. GLORY MENU OPTIONS
1. WHAT IS GLORY?
Managing cash flow in any retail environment can be costly and affect the efficiency of your employees and business. Regardless of the size of your business, you need a cash management solution that is flexible and successfully addresses your specific challenges and goals.
Glory cash drawers eliminate the need for employees to handle cash at the point of sale. When integrated into an existing POS system, the Glory cash machine securely automates cash handling at the checkout, reducing the risk of errors and shrinkage, increasing employee productivity, and improving customer service.
2. MODELS COMPATIBLE WITH REVO
- CI-5
- CI-10
- CI-15
3. CONFIGURATION IN REVO
CREATION OF GLORY CASH MACHINE
To create our Glory cash machine in REVO, we must:
1. Access the back-office of Revo XEF.
2. In the Configuration section / Cash Machines.
3. Click on +New to add the cash machine.
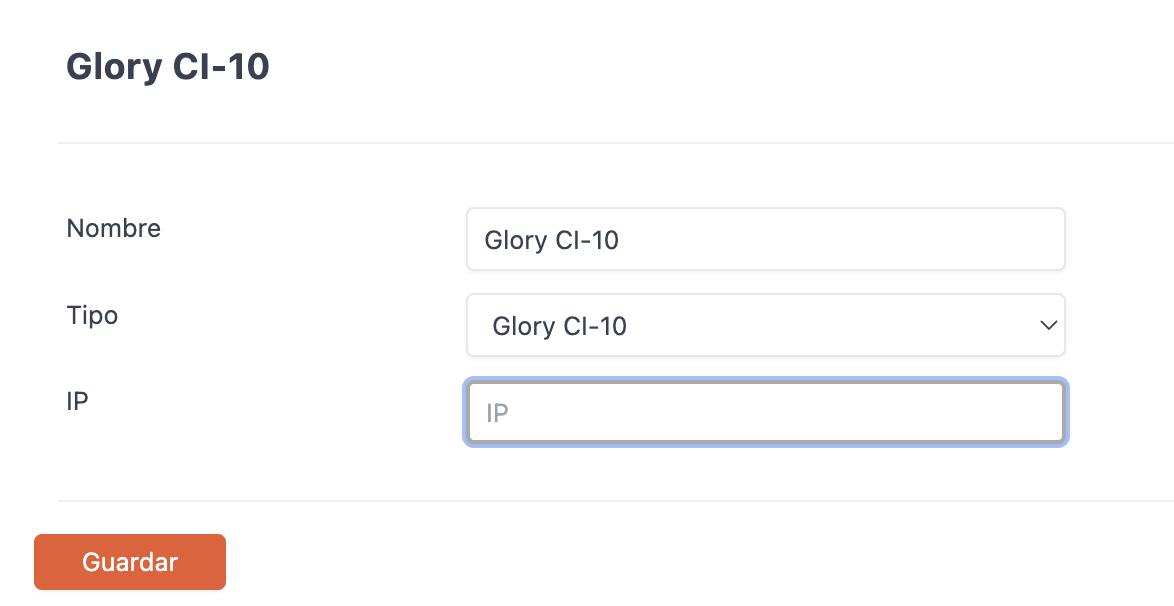
Fill in the following information:
-
Name: Identifying name for the cash machine.
-
Type: Glory-CI-5 or Glory CI-10 (If you have a Glory CI-15, you should configure the driver type as "Glory CI-10").
-
IP: IP address.
ASSIGNMENT OF GLORY CASH MACHINE TO CASHIER
2. Once the Glory cash machine is created in the Revo XEF back office, we need to assign it to a cashier.
To do this, within the Configuration section, go to the Cashiers section.
2. Edit an existing cashier or create a new one.
3. In Cash Machine, assign the cash machine created earlier.
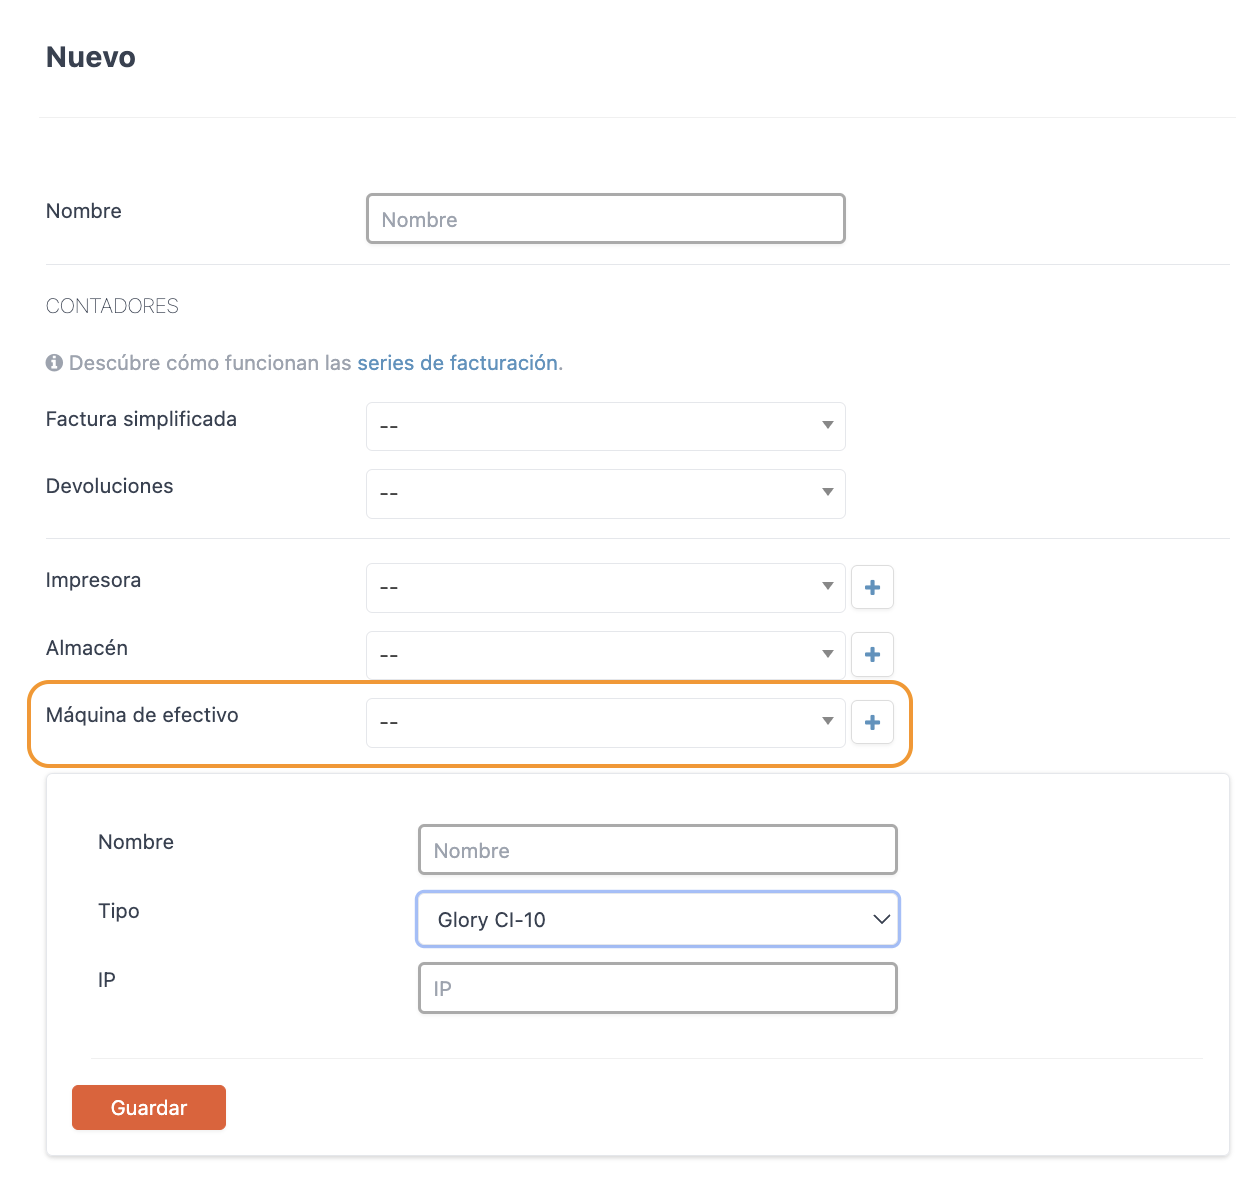
Note: You can also create the cash machine within the configuration of a cashier by clicking on the + button.
APP PRIVILEGES REQUIRED FOR EMPLOYEES
Keep in mind that for an employee to work correctly with the cash machine, certain privileges must be activated in the Revo XEF back office, App Privileges.
There are two cash machine privileges:
-
Cash Machine: Allows access to the cash machine configuration.
-
Empty Cash Machine: Allows emptying the cash machine.
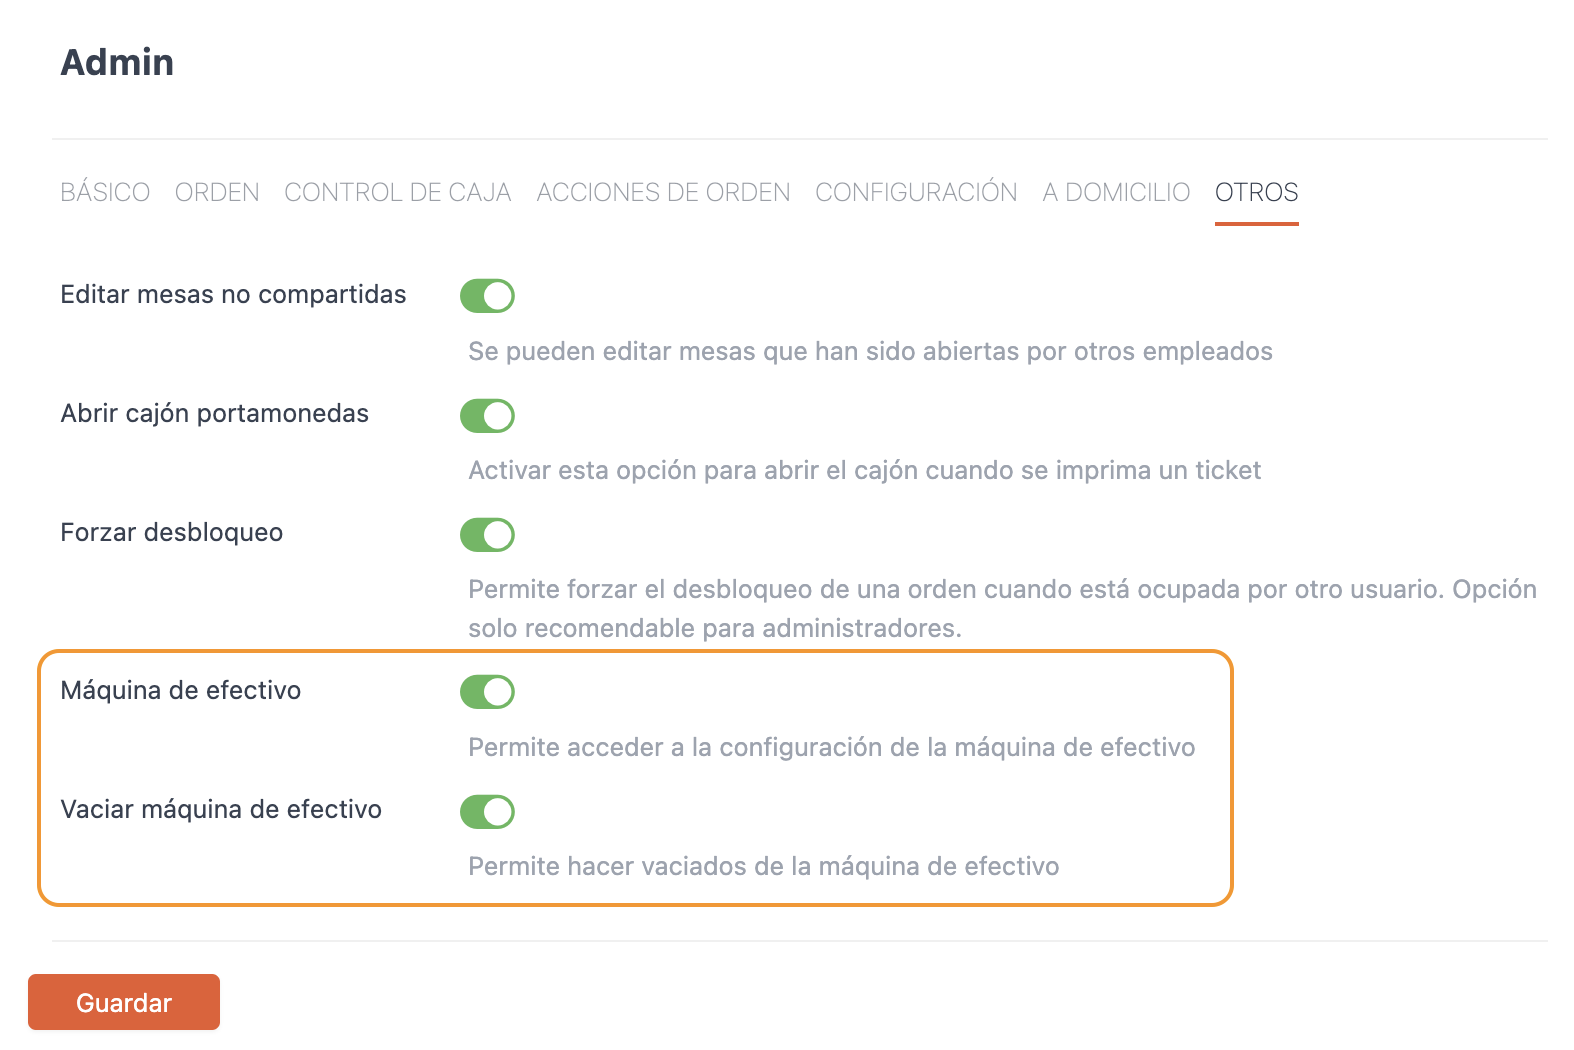
Note: Once the desired checks are activated, you must associate the app privilege created with the corresponding employee in the Employees section.
4. CASH DRAWER CONFIGURATION
For the proper functioning of the Glory cash machine, the cash drawer must be configured.
To do this:
1. In the Revo XEF back office, in the Configuration section, click on: Cash Machines
2. Locate the cash machine created earlier and click on the Cash Drawer button.

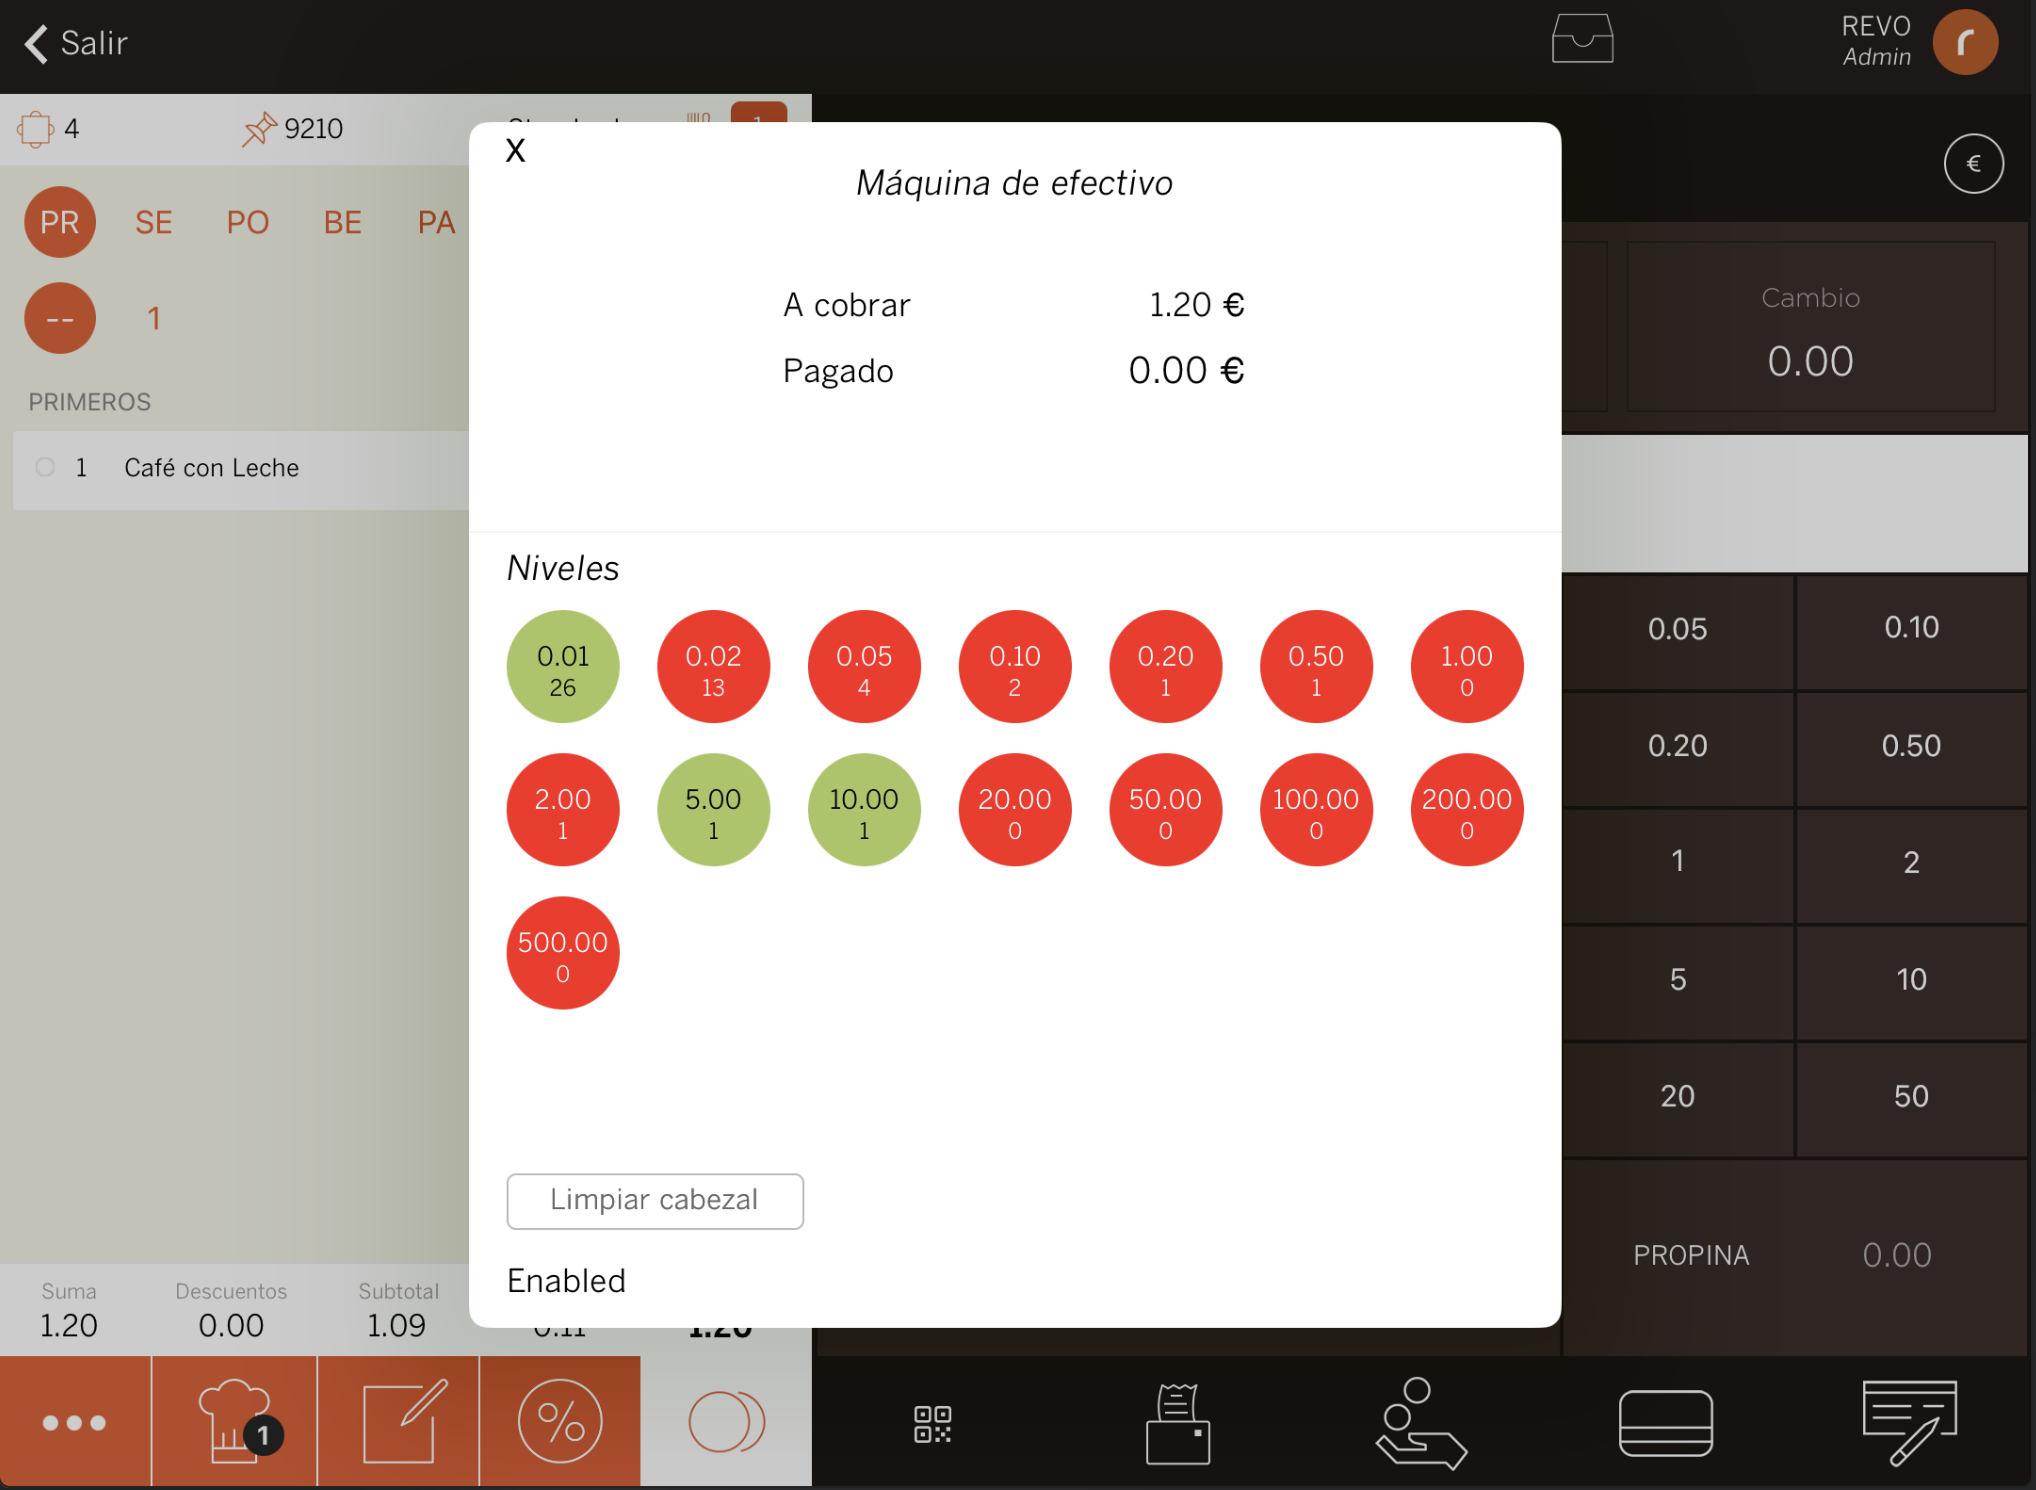
3. Next, you will see the following screen:
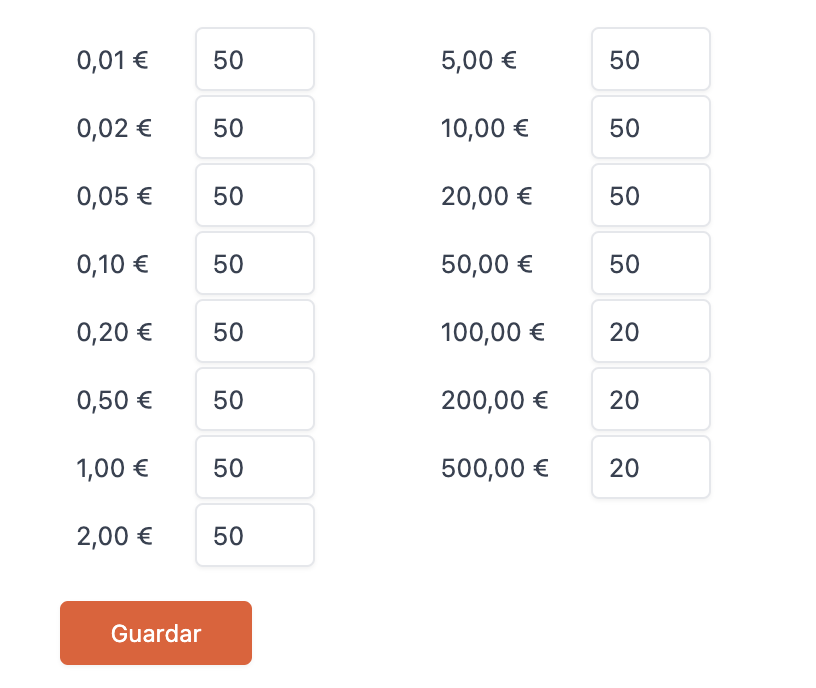
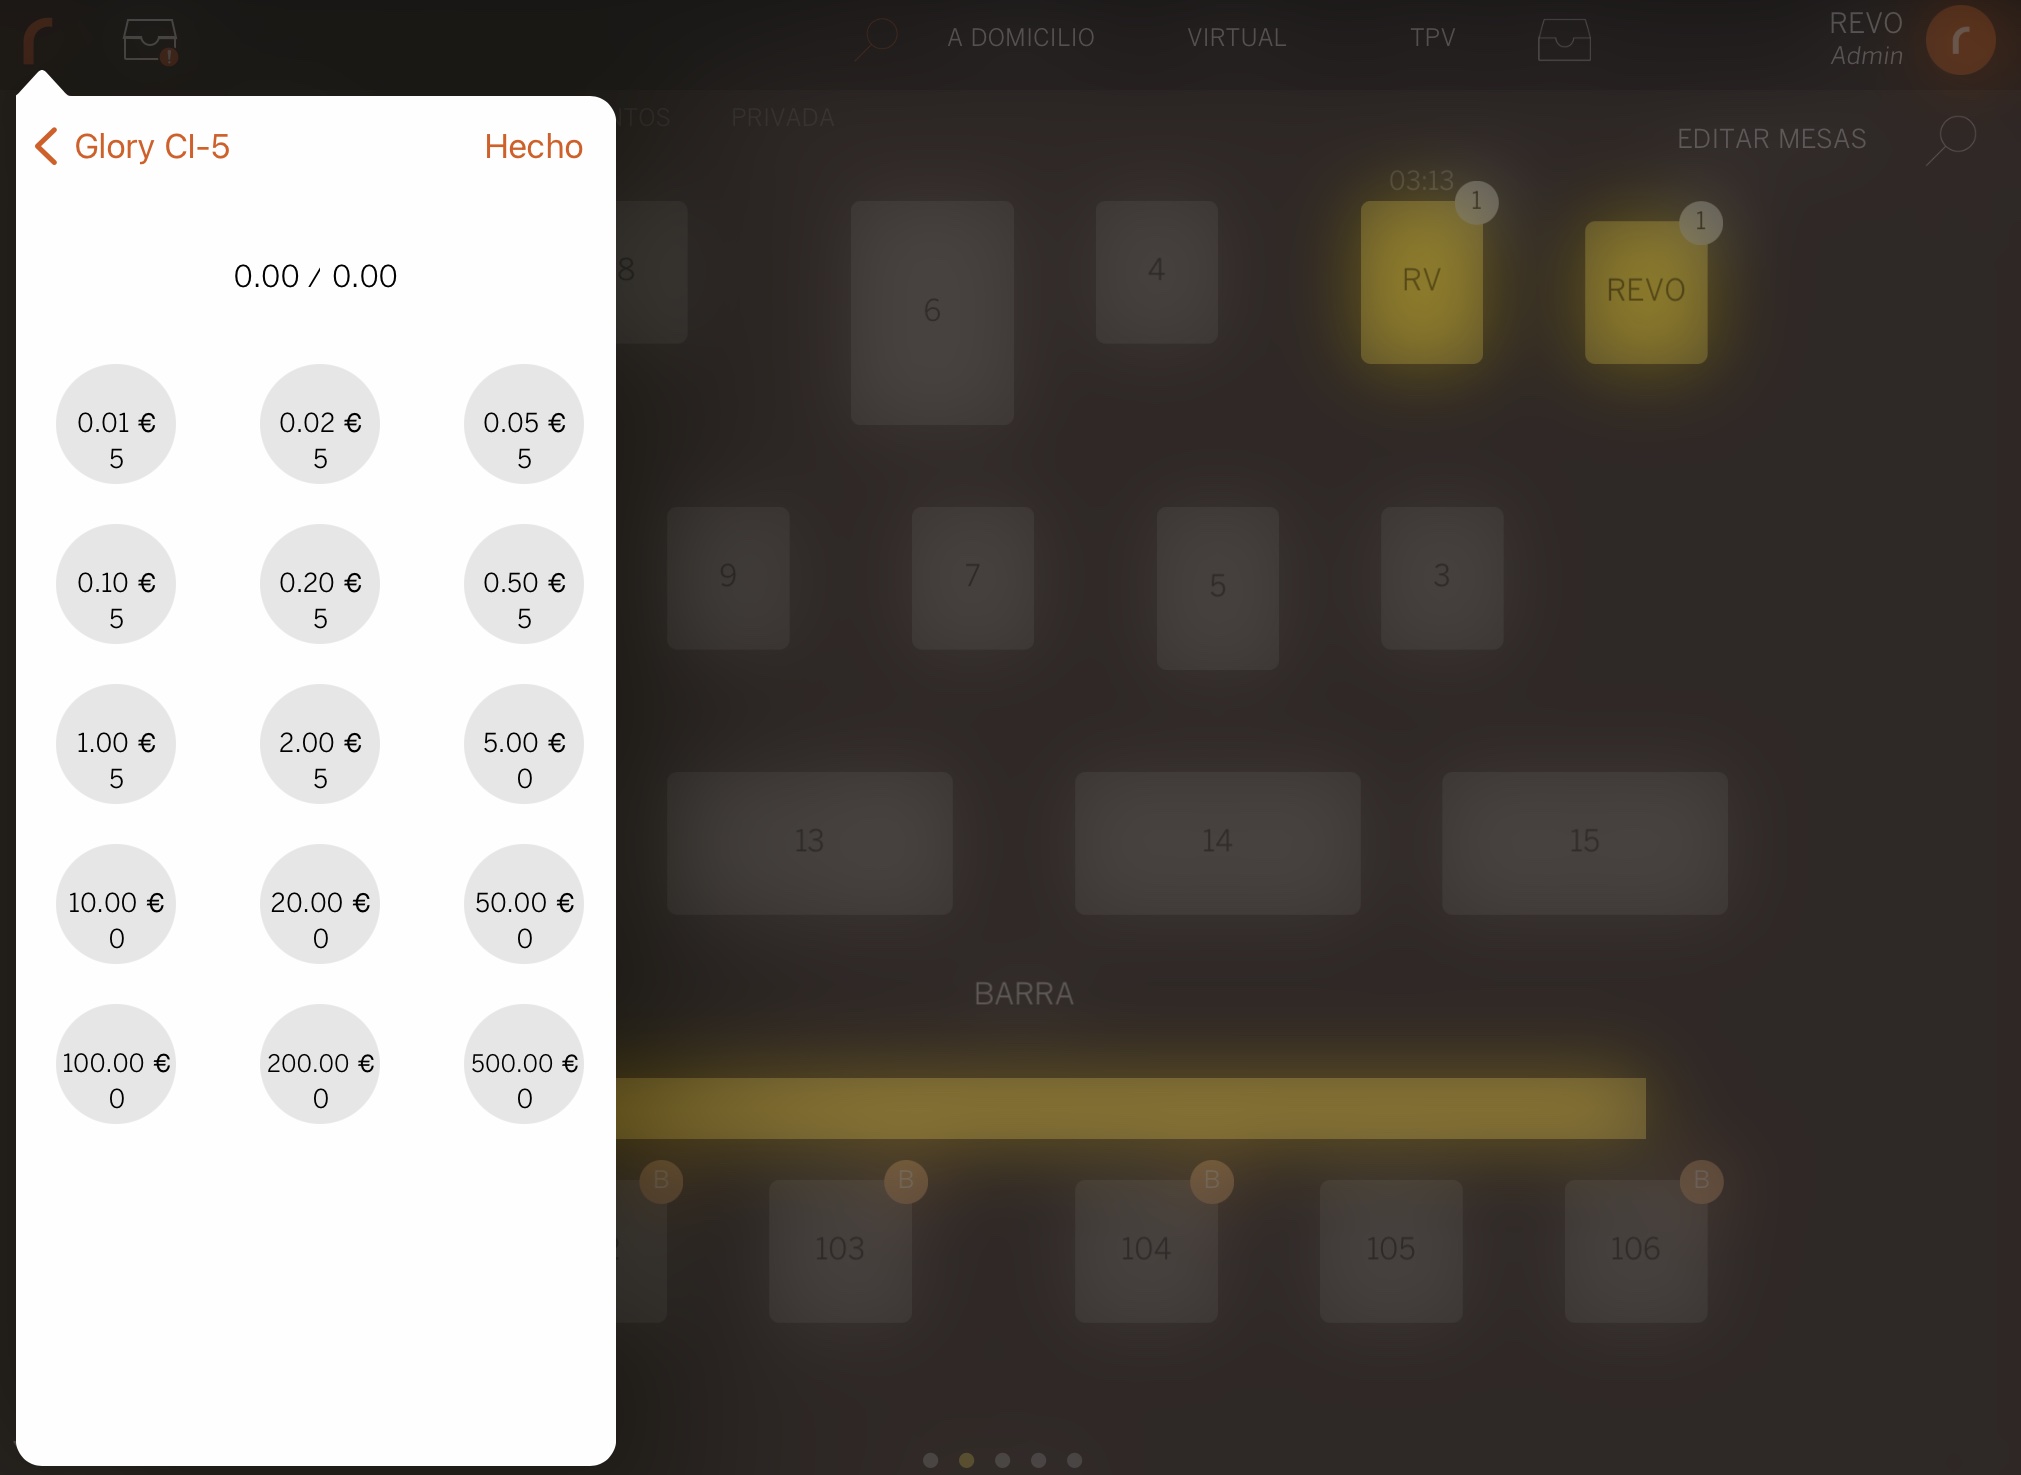
In this screen, you must indicate the amount of coins you want the machine to keep.
That is, when you need to close a shift, the Revo XEF app will ask if you want to empty the cash machine. If you click on YES, it will return all the coins through the coin slot, storing only the amounts of each coin you specified in the cash drawer configuration.
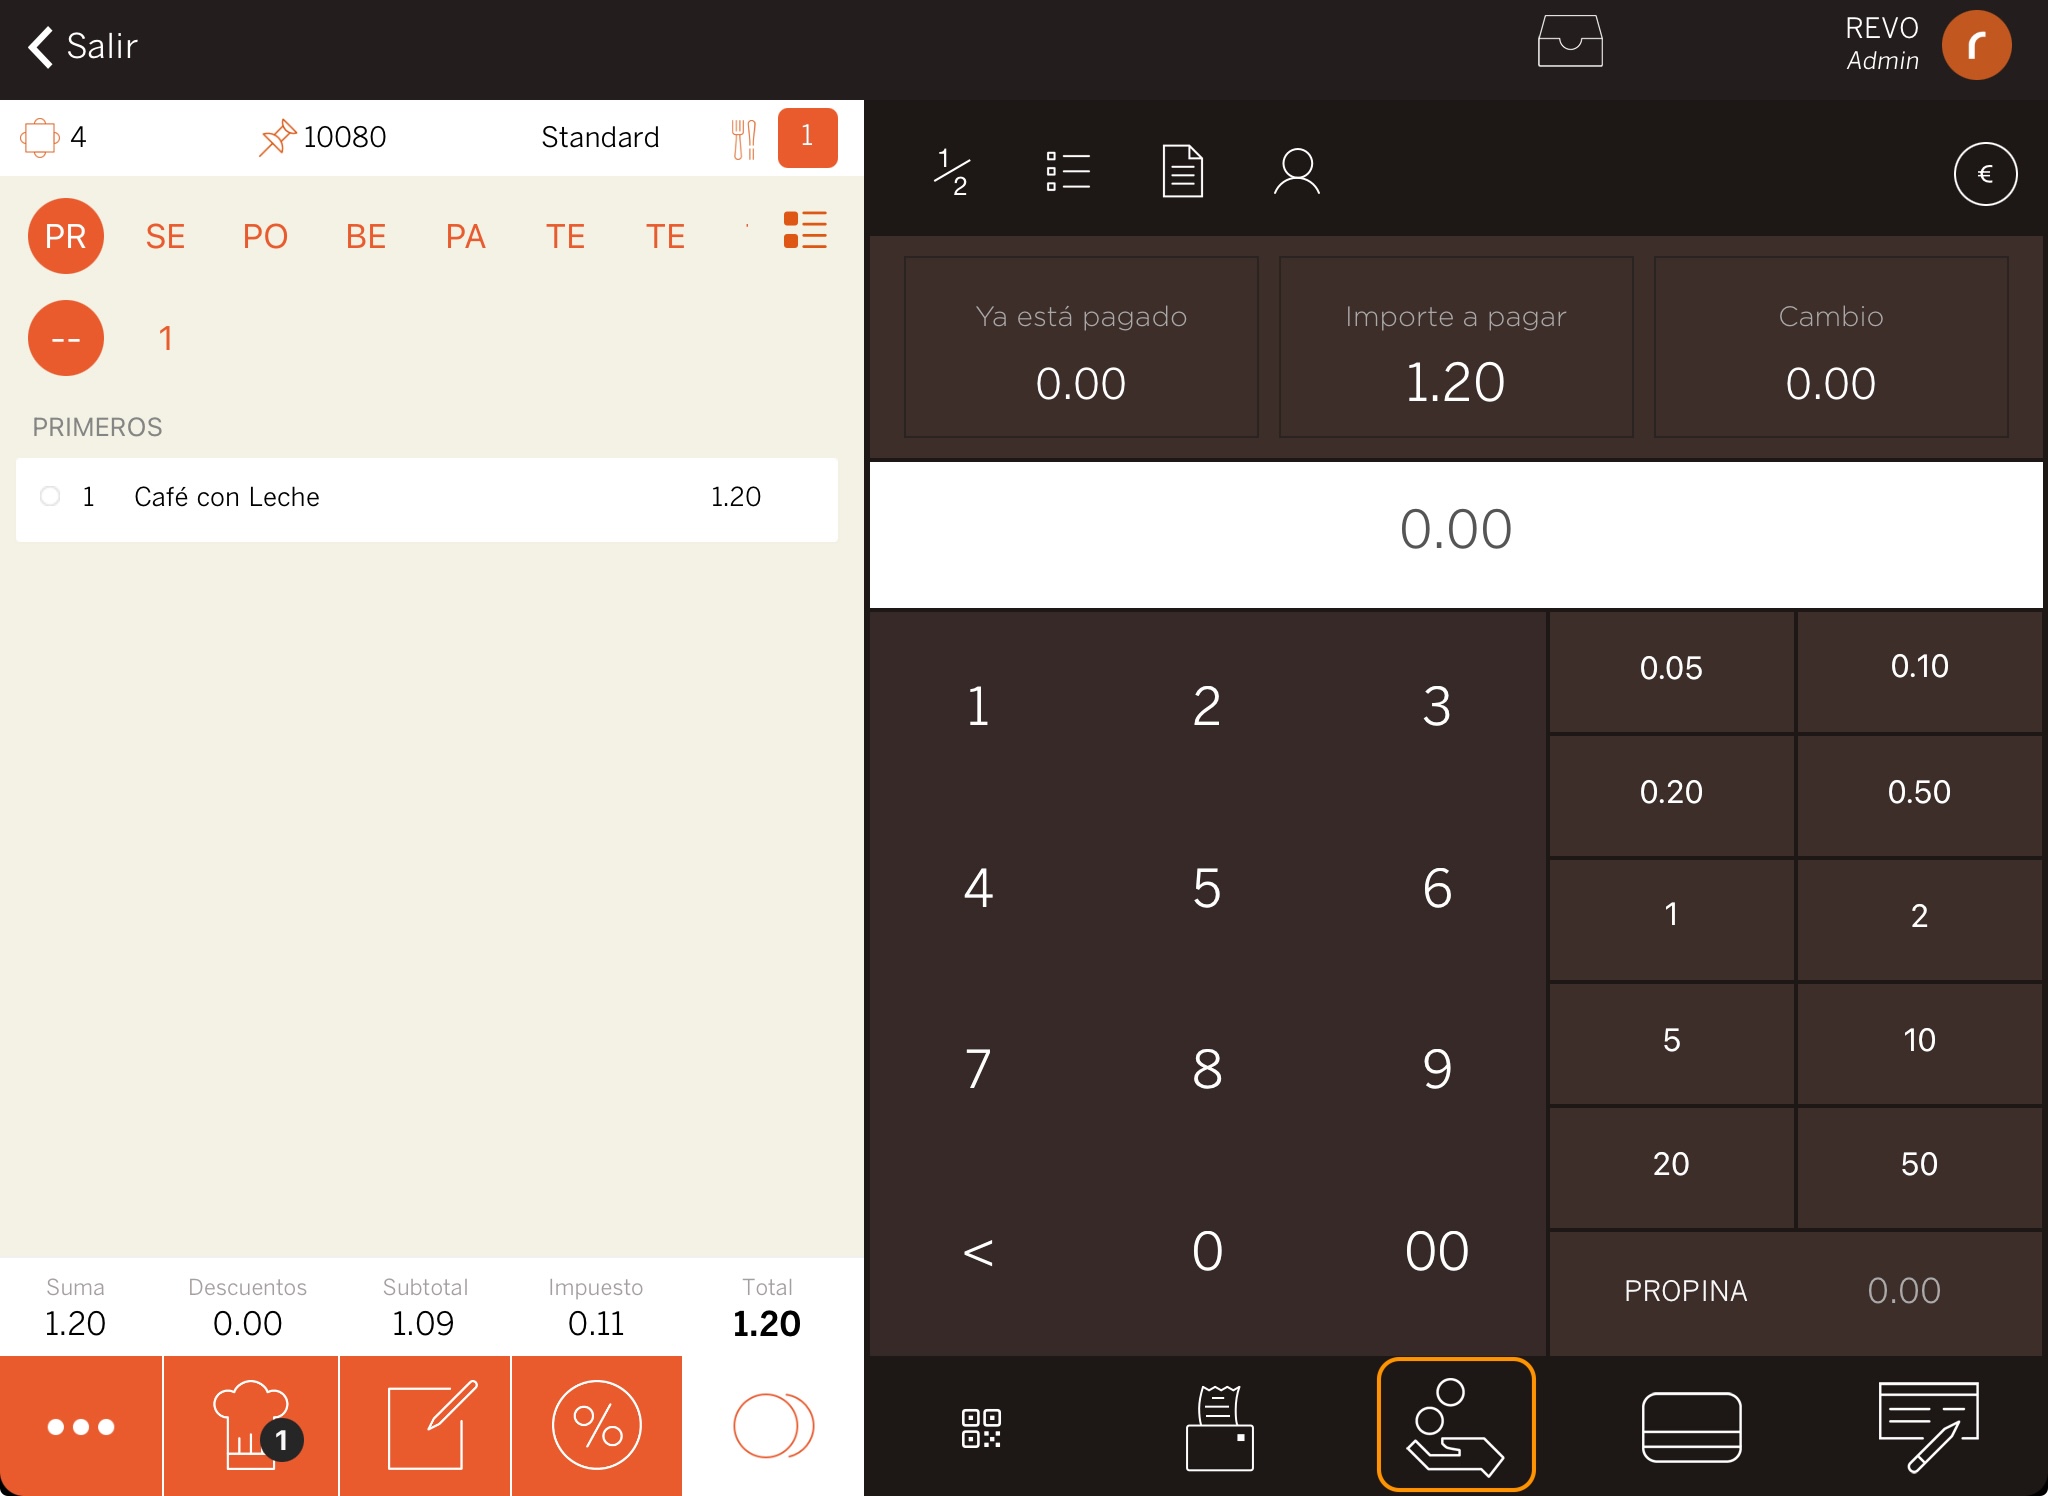
5. PAYMENT WITH GLORY
From this moment on, in the Revo XEF app, when you click on the cash payment icon to close and collect an order, REVO will connect to the Glory cash machine to manage the payment. Once the transaction is completed, REVO will close the order.
6. GLORY MENU OPTIONS
When you have a Glory cash machine and work with the Revo XEF app, you have a series of options that allow you to interact with the machine.
To access them, follow these steps:
1. Go to the r section of REVO.
2. In the CASH CONTROL section, enter the Cash Machine menu.
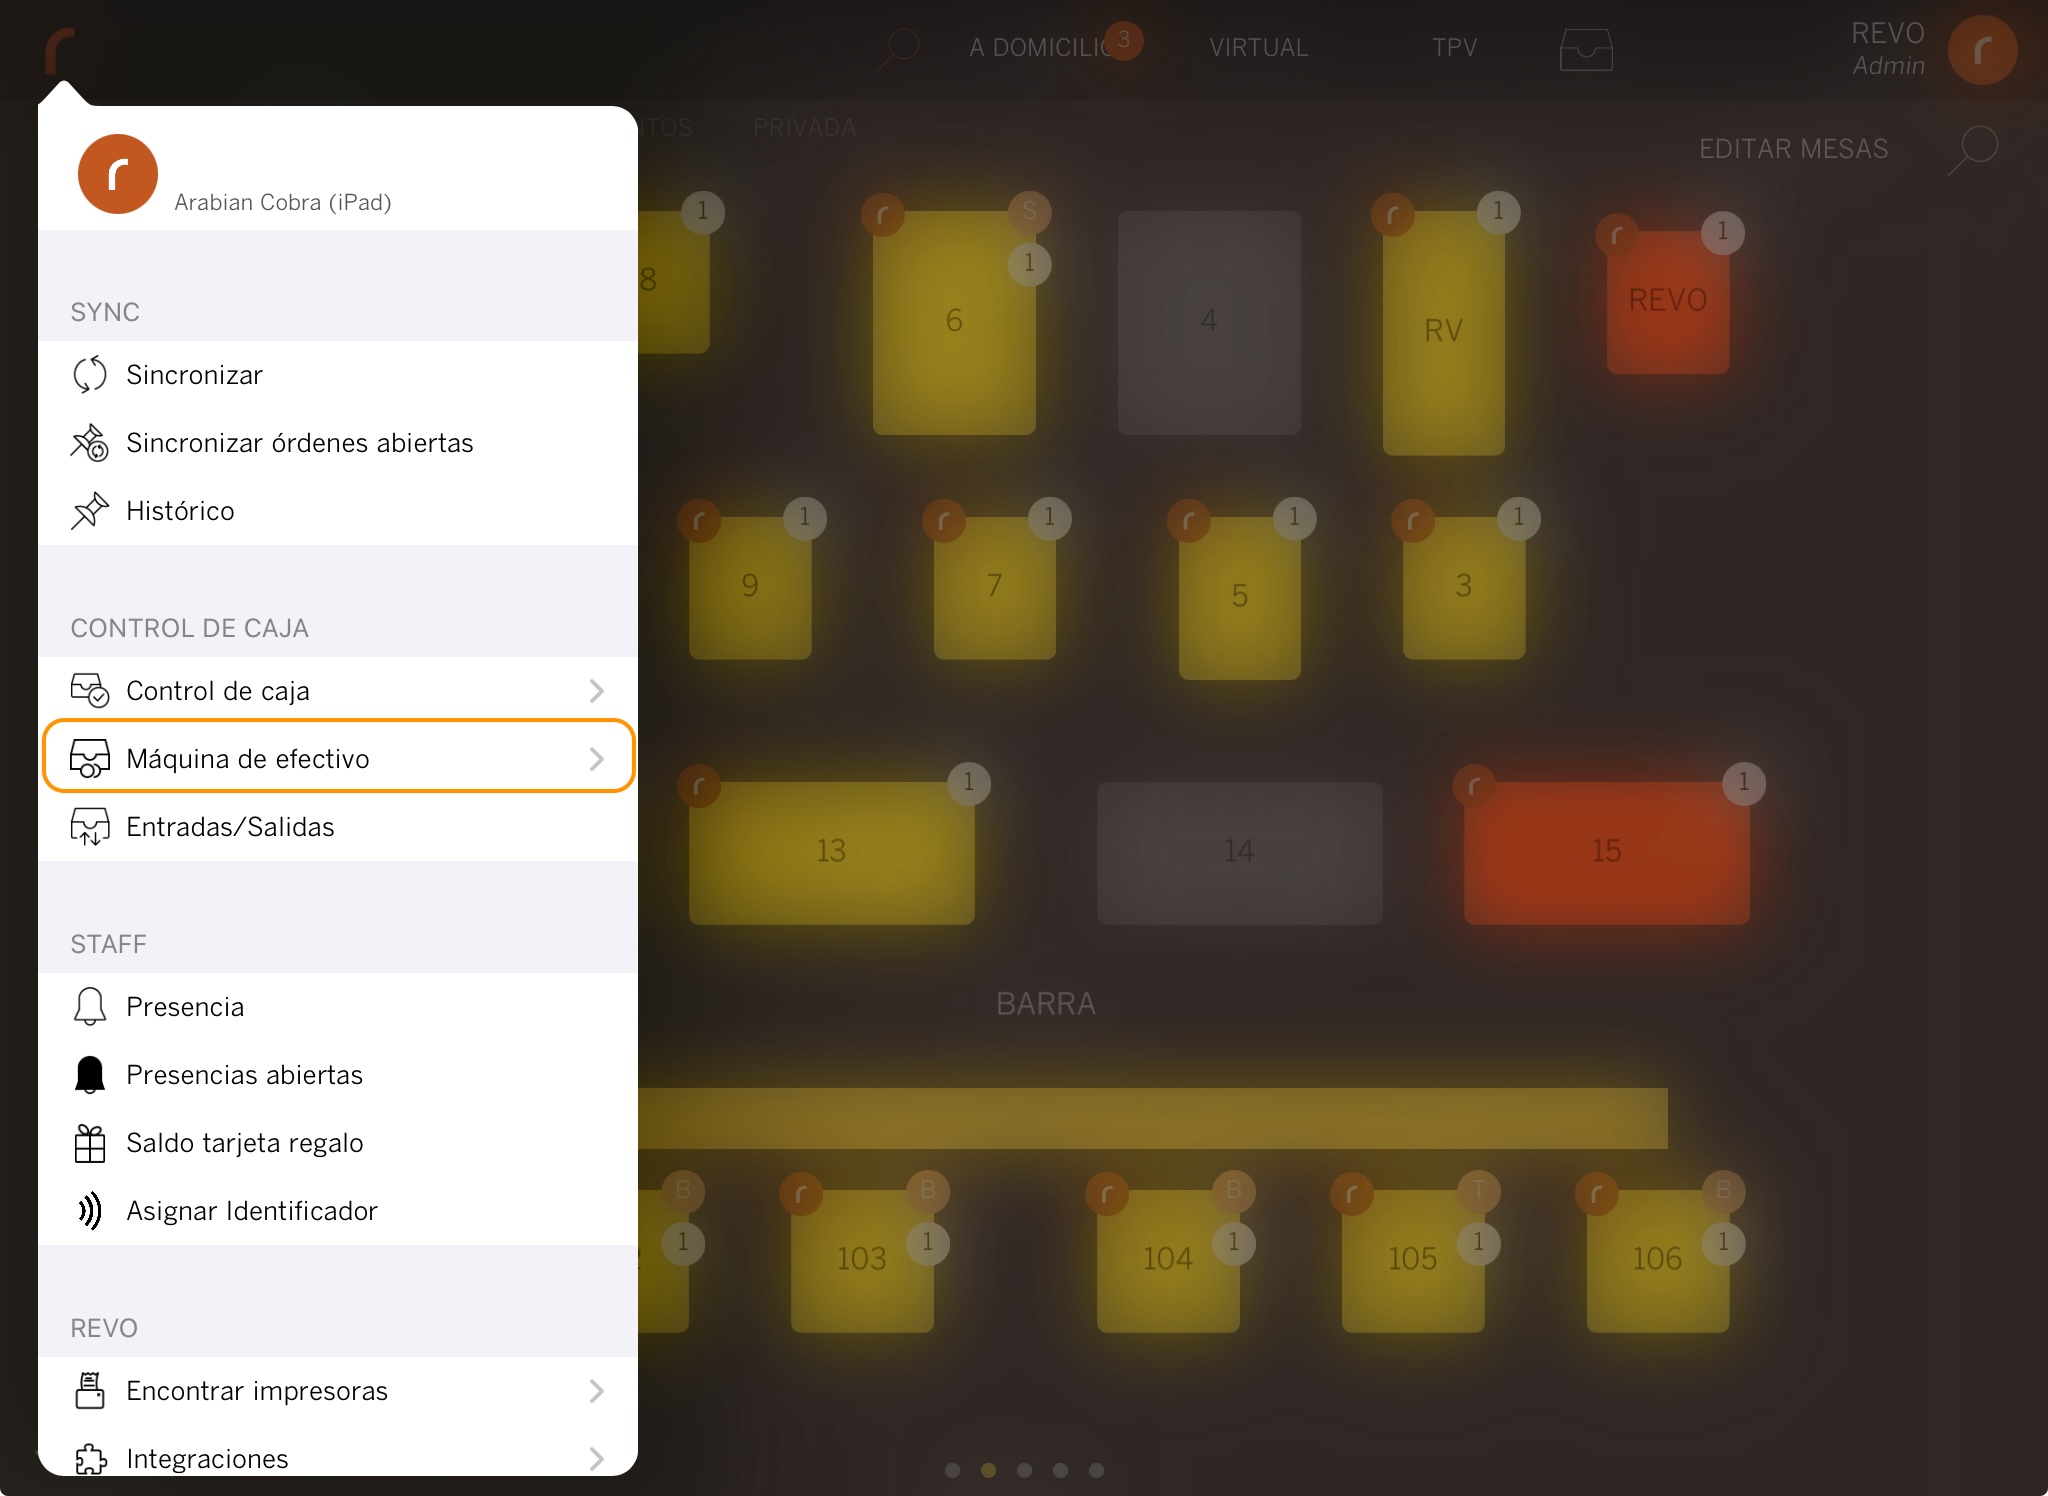
3. Once you have successfully accessed, you can perform the following actions:
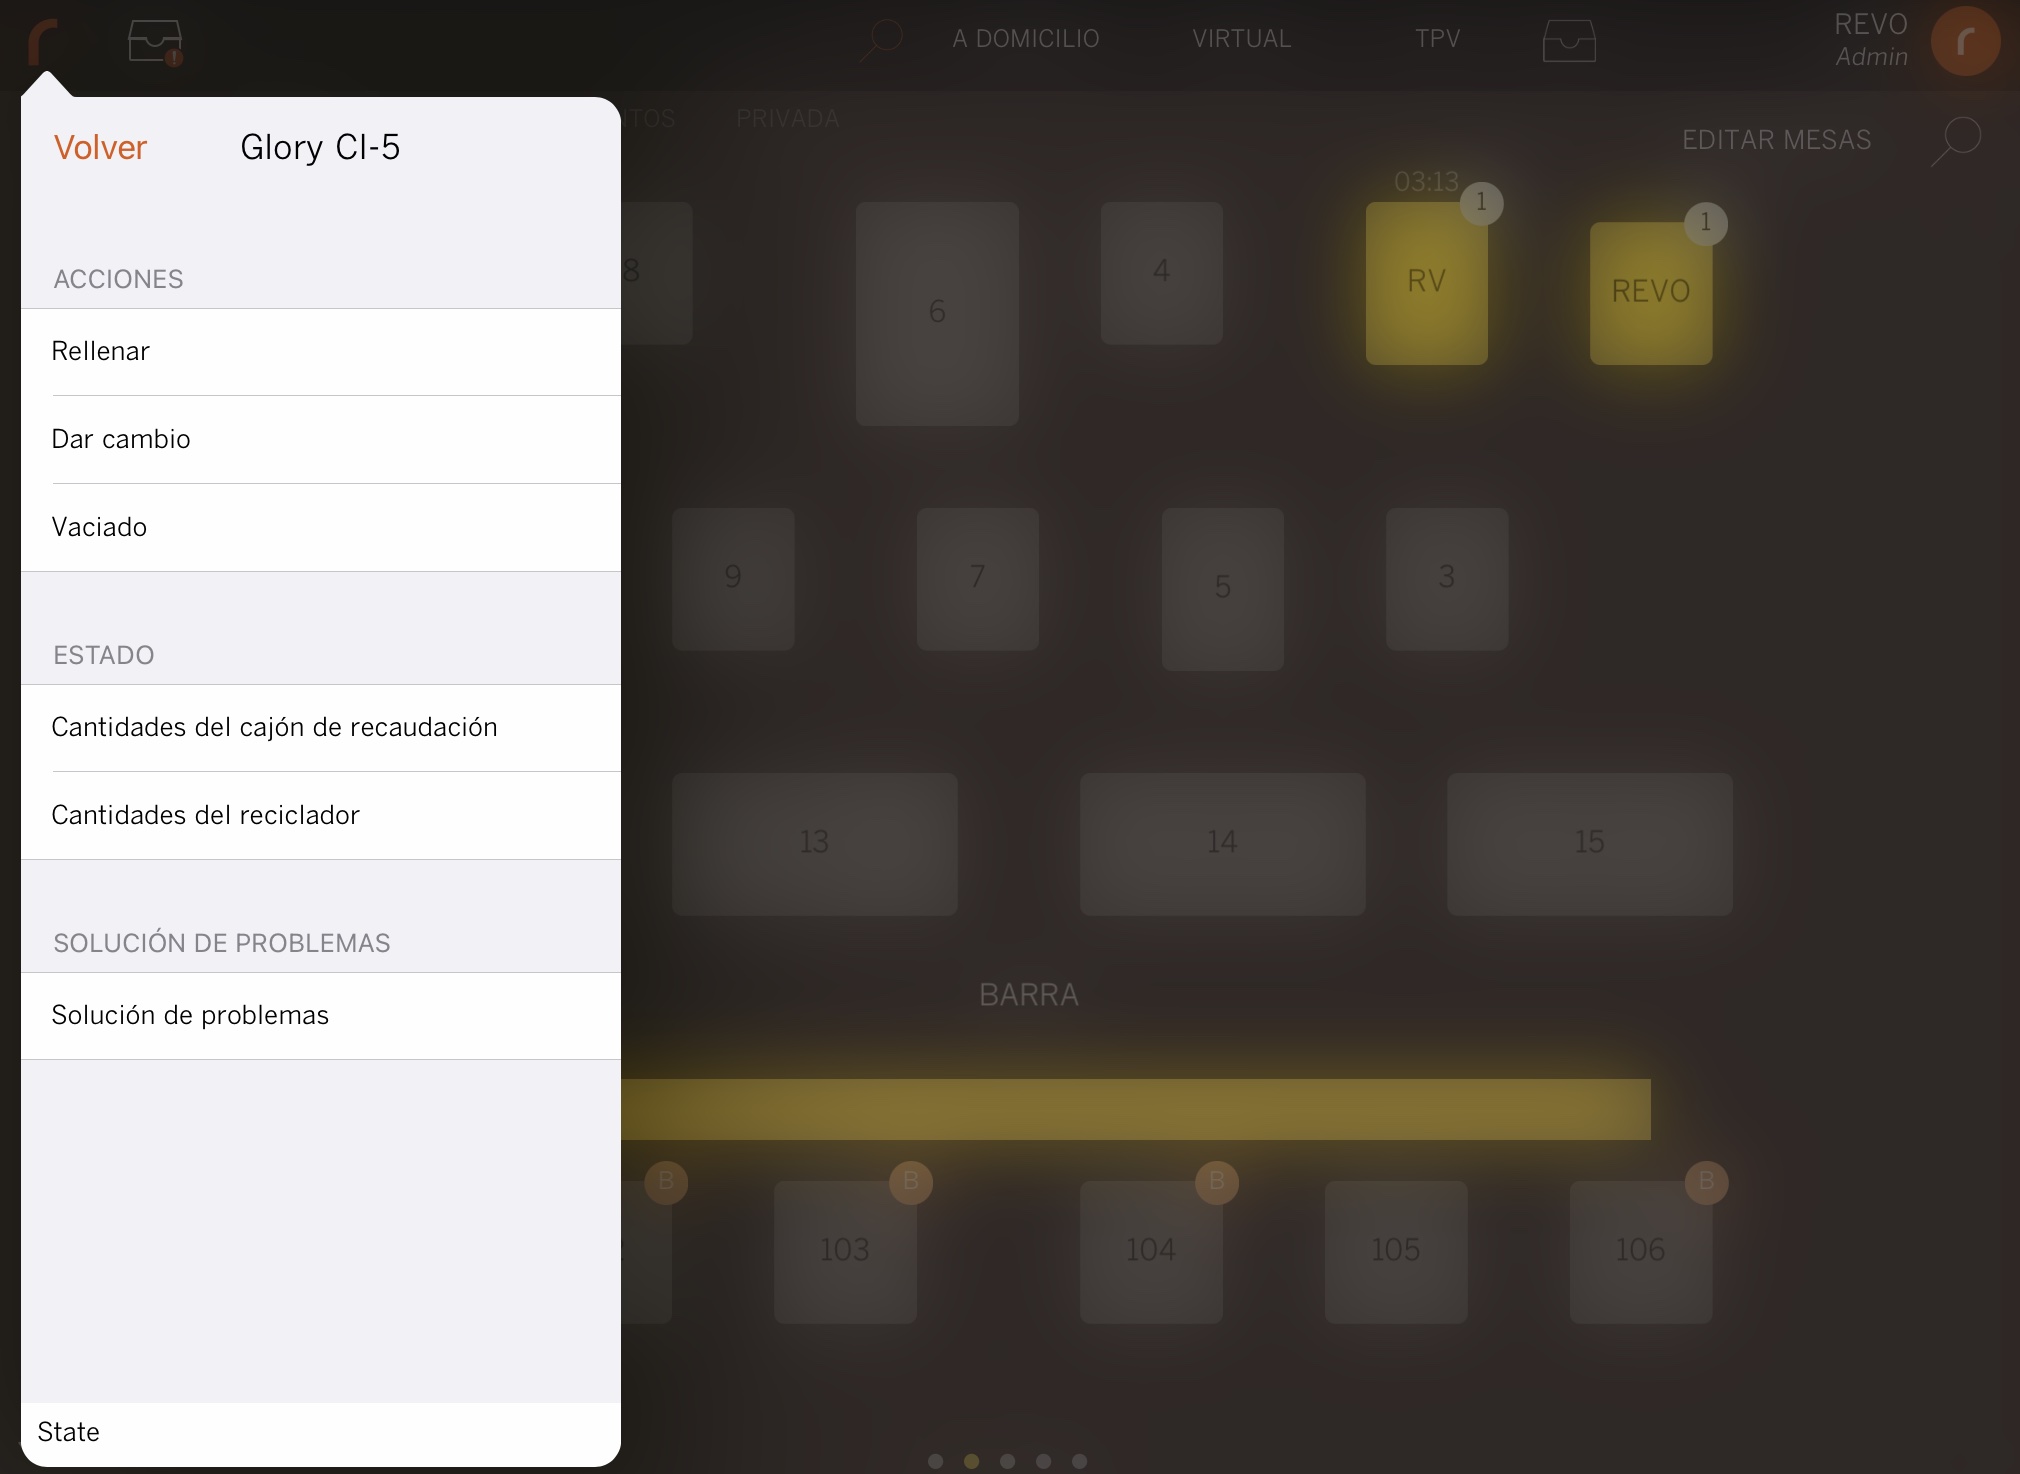
-
Refill: Allows you to introduce cash (coins and/or bills) into the machine.
-
Give Change: Allows you to manage the desired change based on the amount entered into the machine.
-
Empty: Allows you to perform cash emptying.
There are the following types of emptying: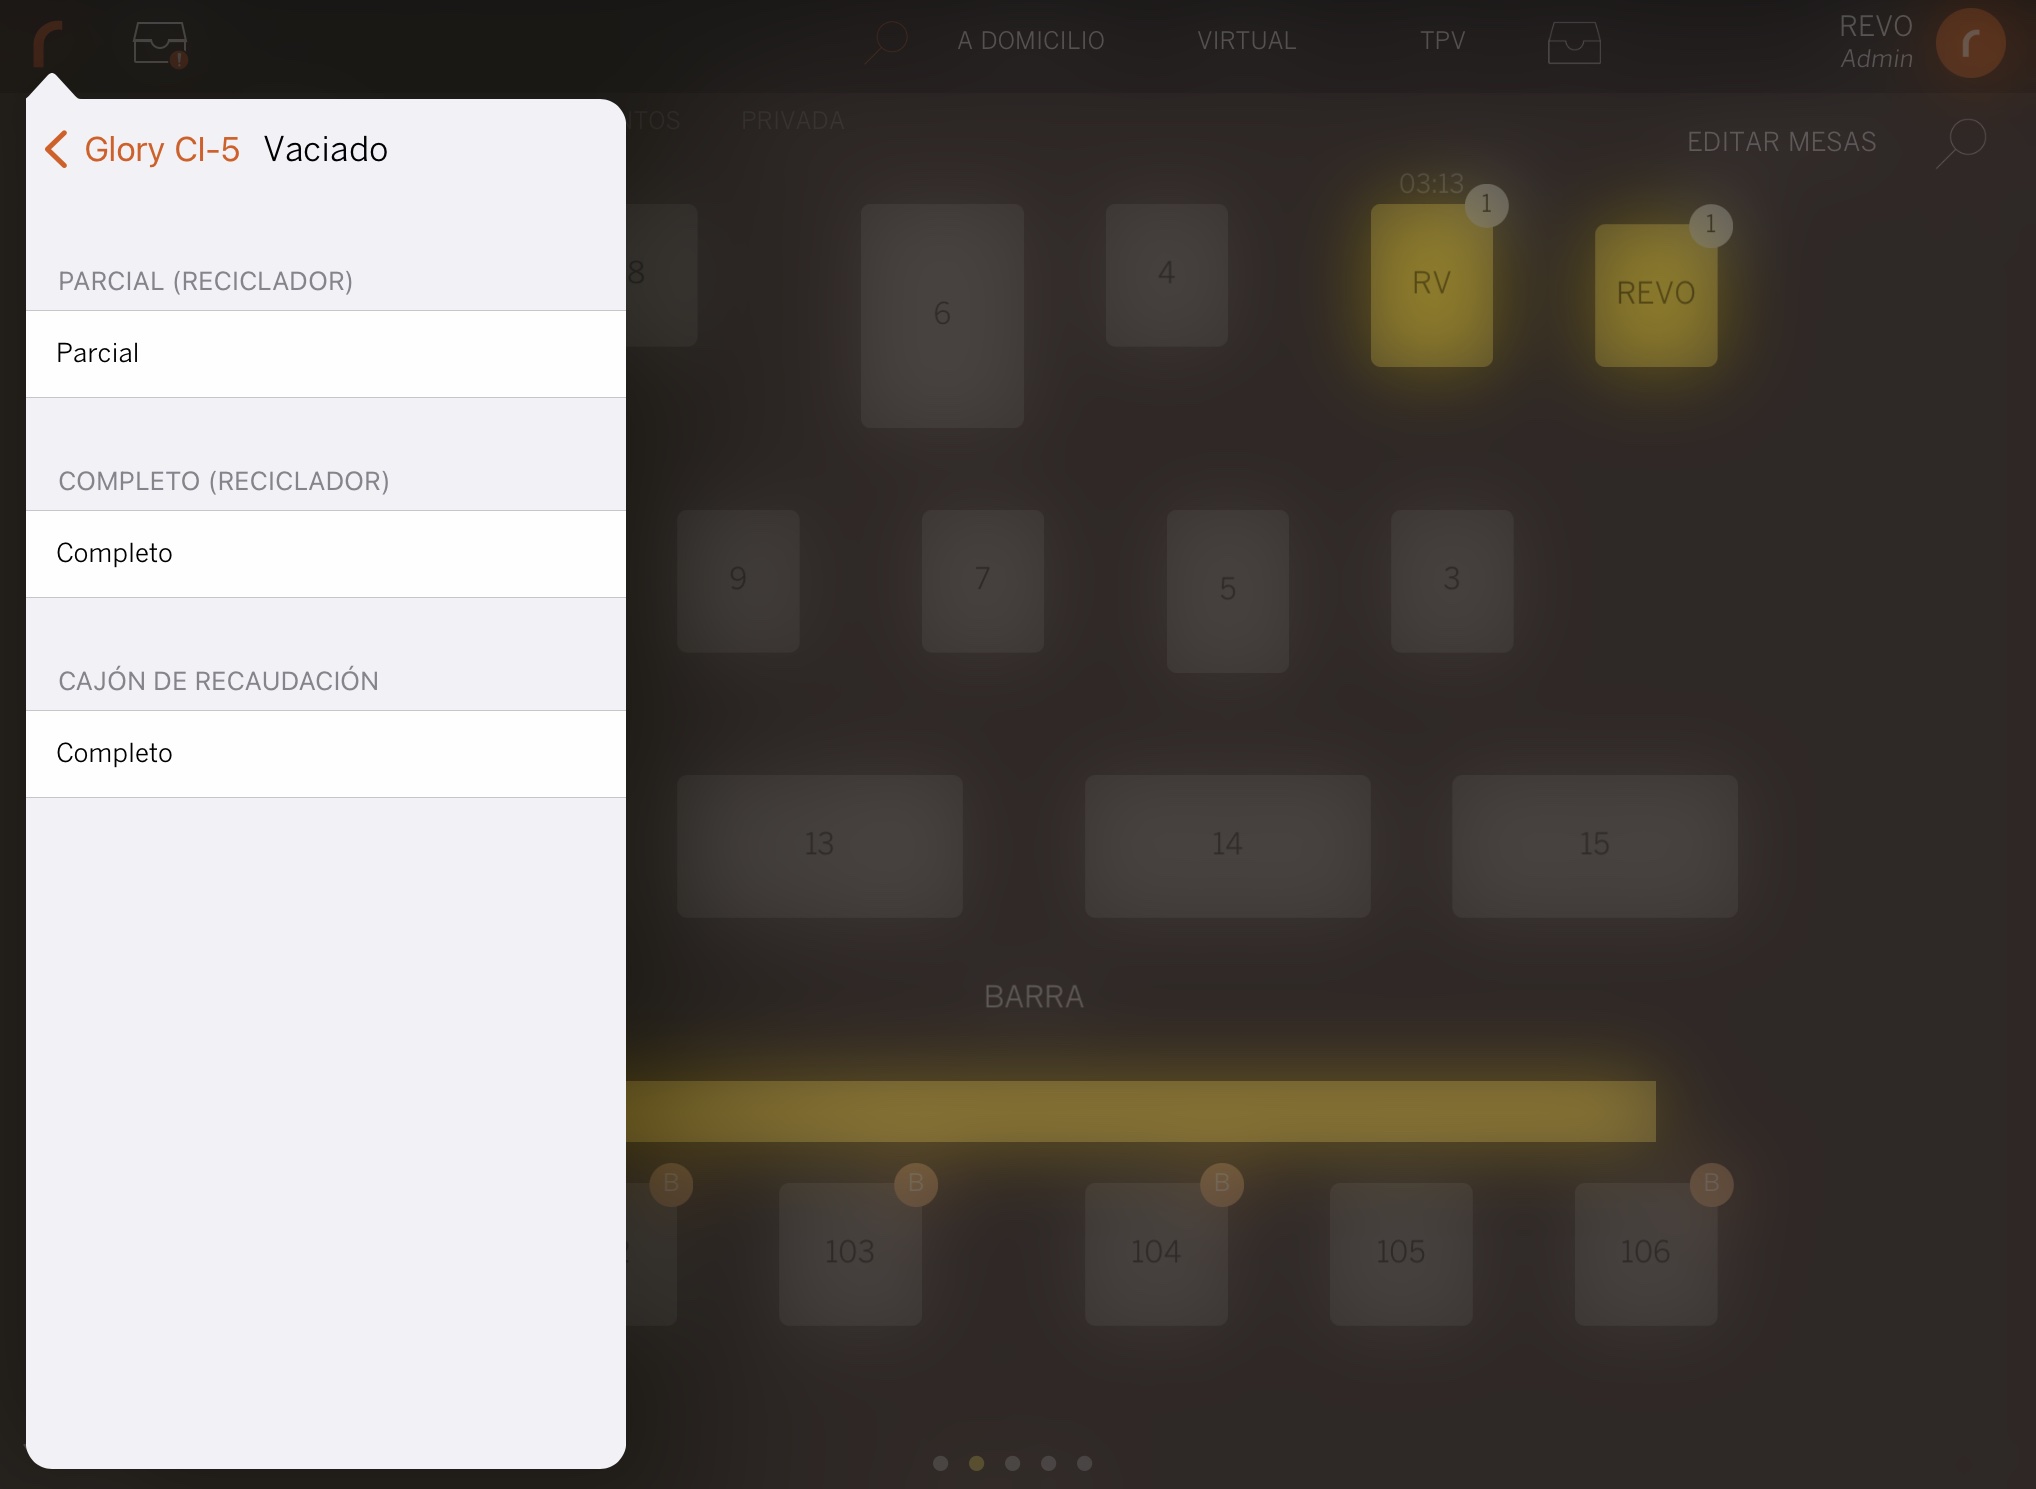
-
Partial (RECYCLER): When performing a partial emptying, you must specify the amount of coins/bills of each type that you want to store in the recycler, and the remaining amount will be returned through the coin slot.
Example: If it indicates that there are 100 €1 coins in the machine, and you only want to withdraw 20 coins, you should specify 80, as that is the number of coins you want the machine to store, and therefore, the partial emptying will be performed, returning 20 €1 coins through the coin slot. -
Complete (RECYCLER): The complete emptying of the recycler expels all coins and bills, automatically sending the bills to the cash recycler (Stacker).
-
Complete (CASH RECORDER): The complete emptying of the cash recorder allows you to perform a complete emptying of bills from the machine. In other words, it allows you to withdraw/empty all the bills in the cash recorder (Stacker). For the Glory CI-10 model, for security reasons, within the complete emptying of the cash recorder, you will find the following buttons:
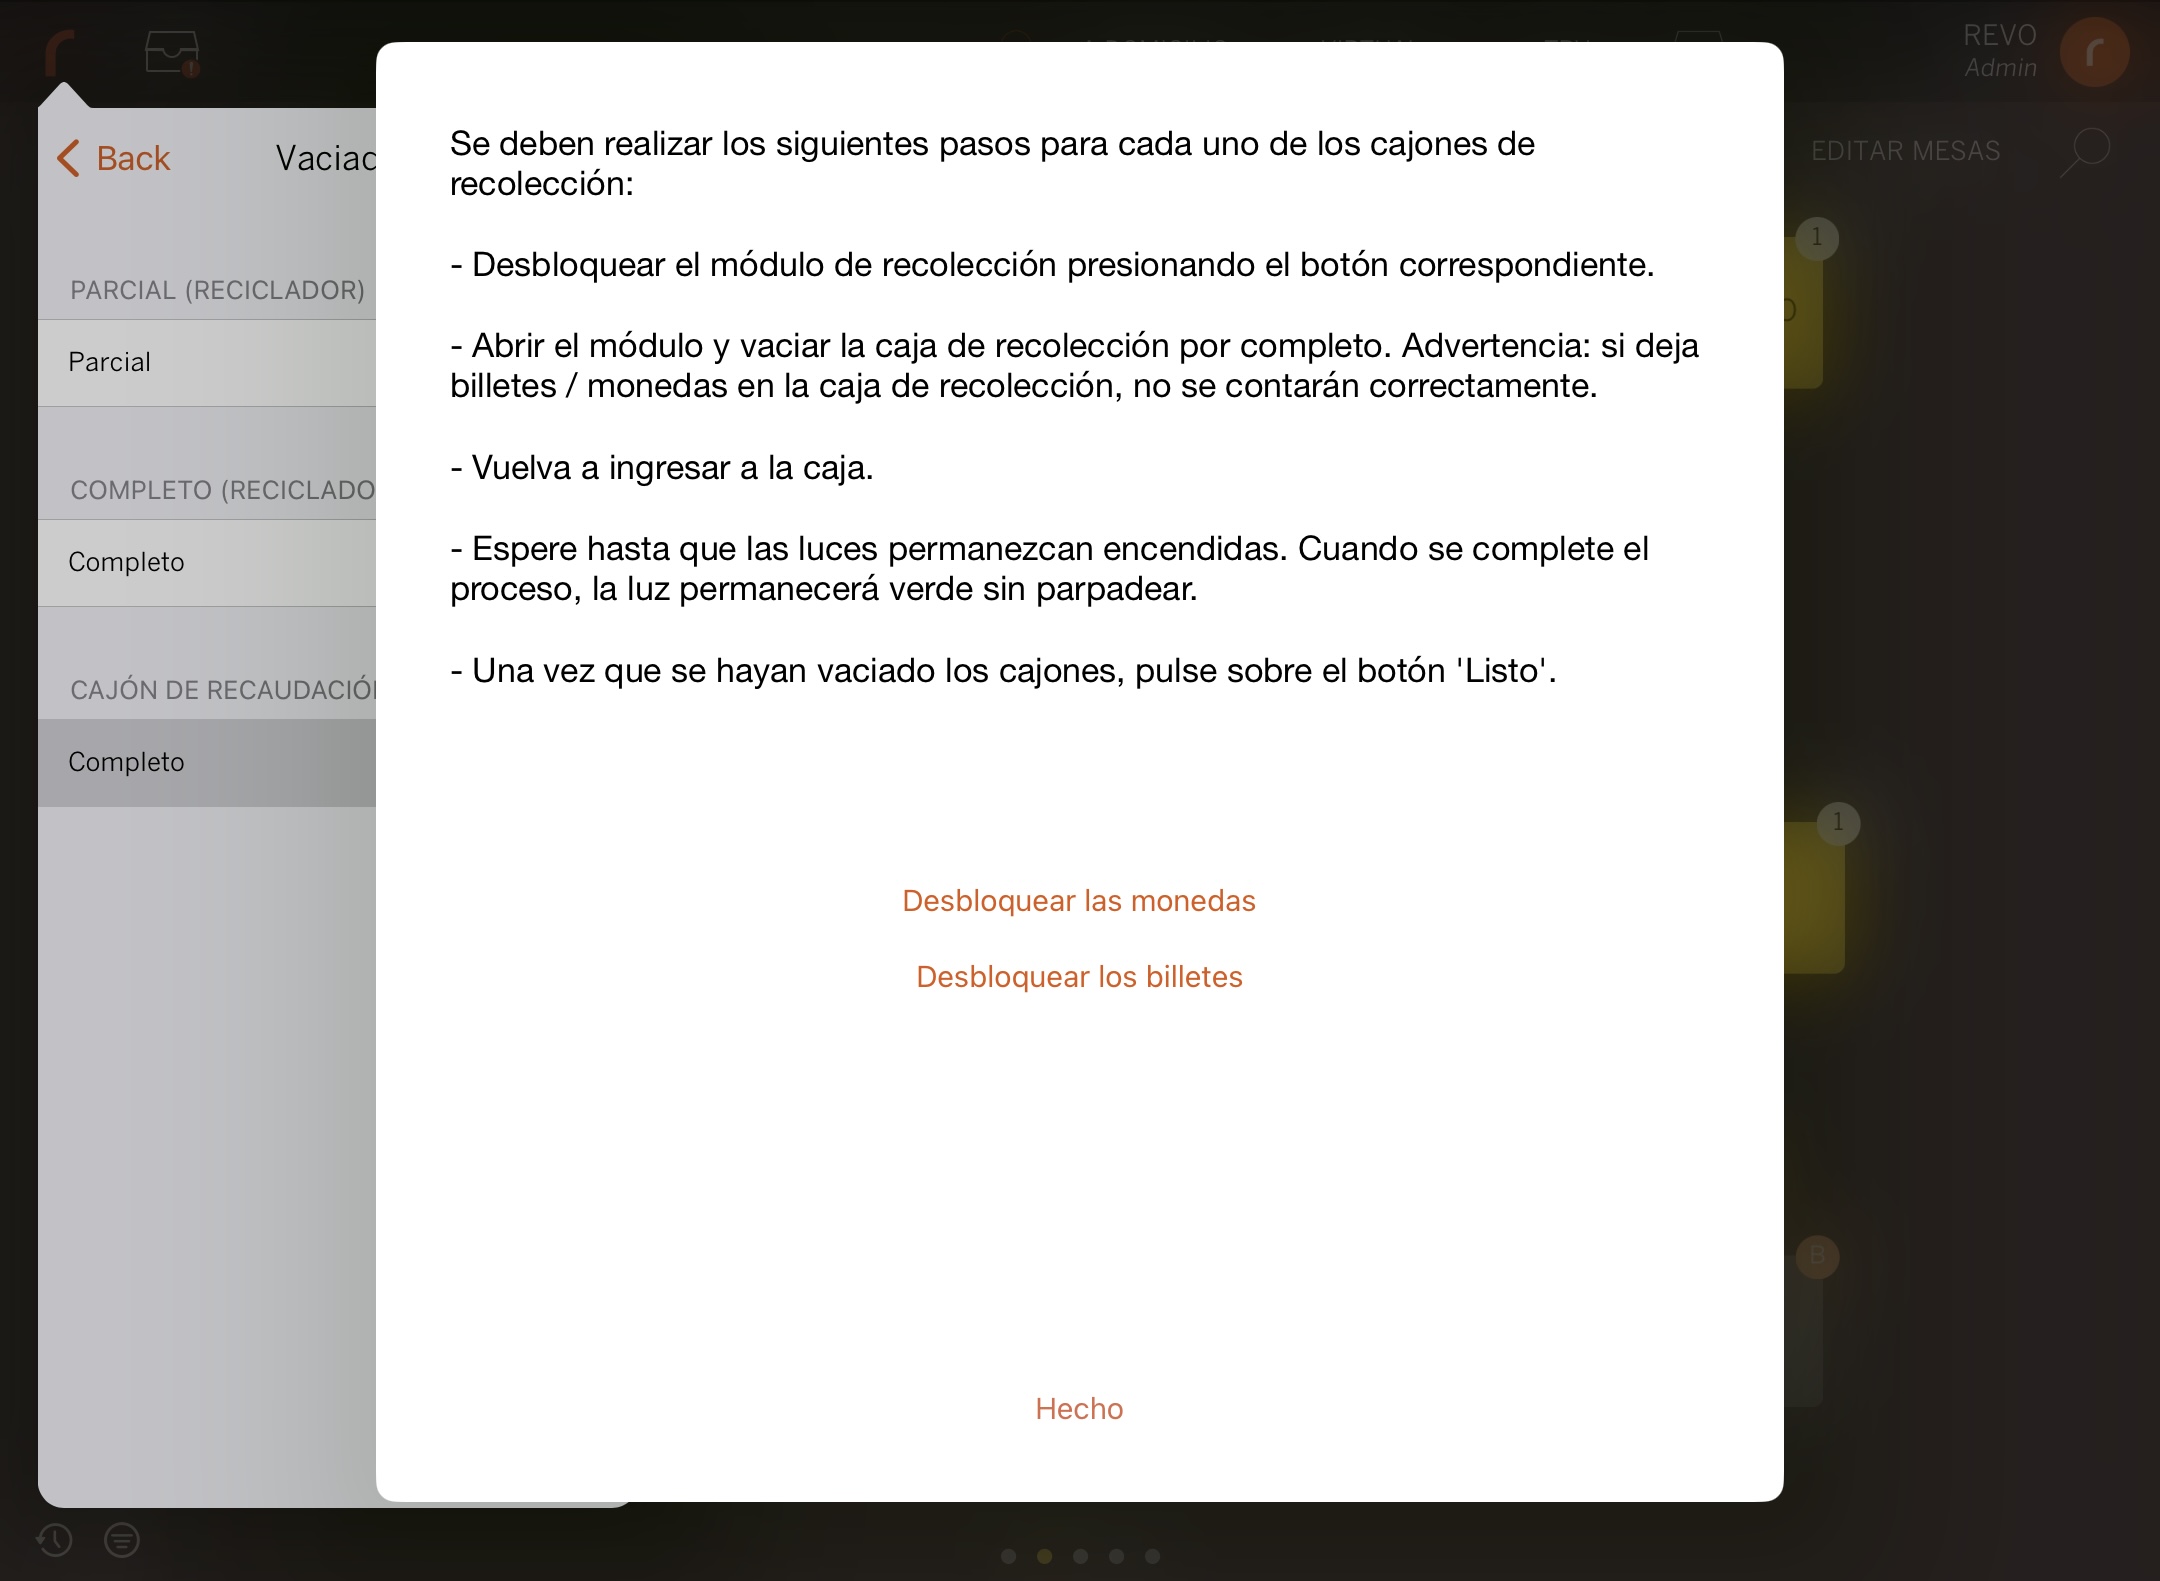
-
Unlock Coins: Unlocks the coin door to perform a complete emptying of the cash recorder.
-
Unlock Bills: Unlocks the bill door to perform a complete emptying of the cash recorder.
Note: To correctly remove coins and bills from the cash recorder, having the key to open the drawer is not sufficient. You also need to use the Unlock Coins and Unlock Bills options.
-
-
-
Amounts in the cash recorder: Indicates the amounts of coins/bills inside the cash recorder.
-
Amounts in the recycler: Indicates the amounts of coins/bills inside the recycler.
-
Troubleshooting (Glory CI-5): In the troubleshooting section for the Glory CI-5 model, you will find the following options:
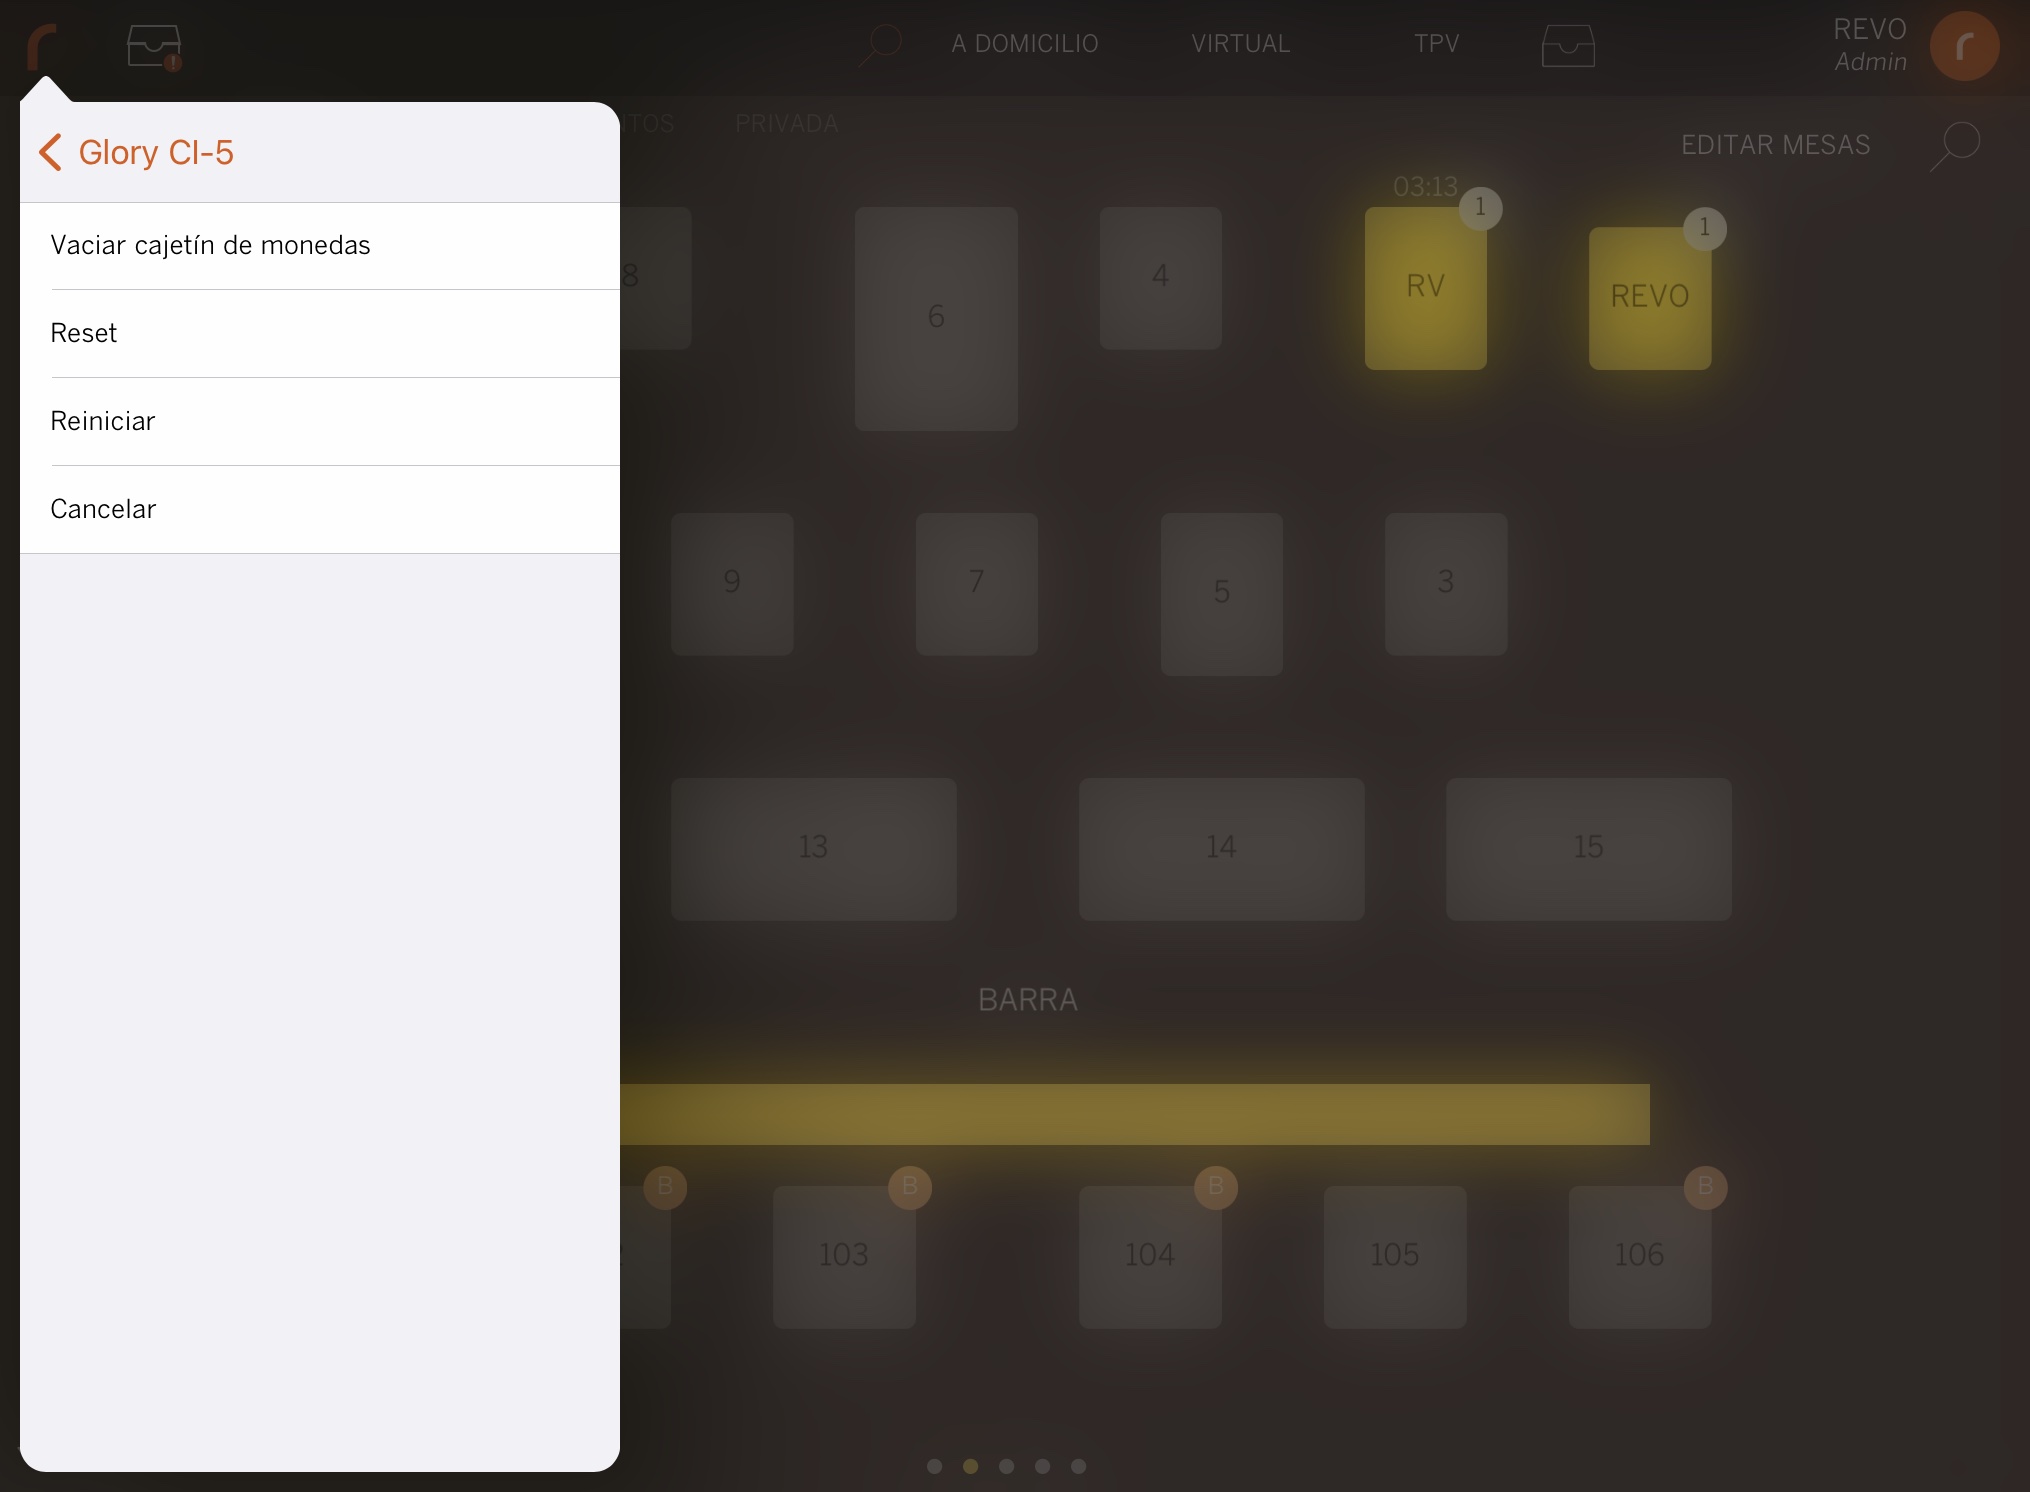
-
Empty Coin Tray: Empties the coin tray (COFT).
-
Reset: Restarts the cash machine, including the internal PC.
-
Restart: Restarts the cash machine.
-
Cancel: Cancels communication with the machine.
-
-
Troubleshooting (Glory CI-10): In the troubleshooting section for the Glory CI-10 model, you will find the following options:
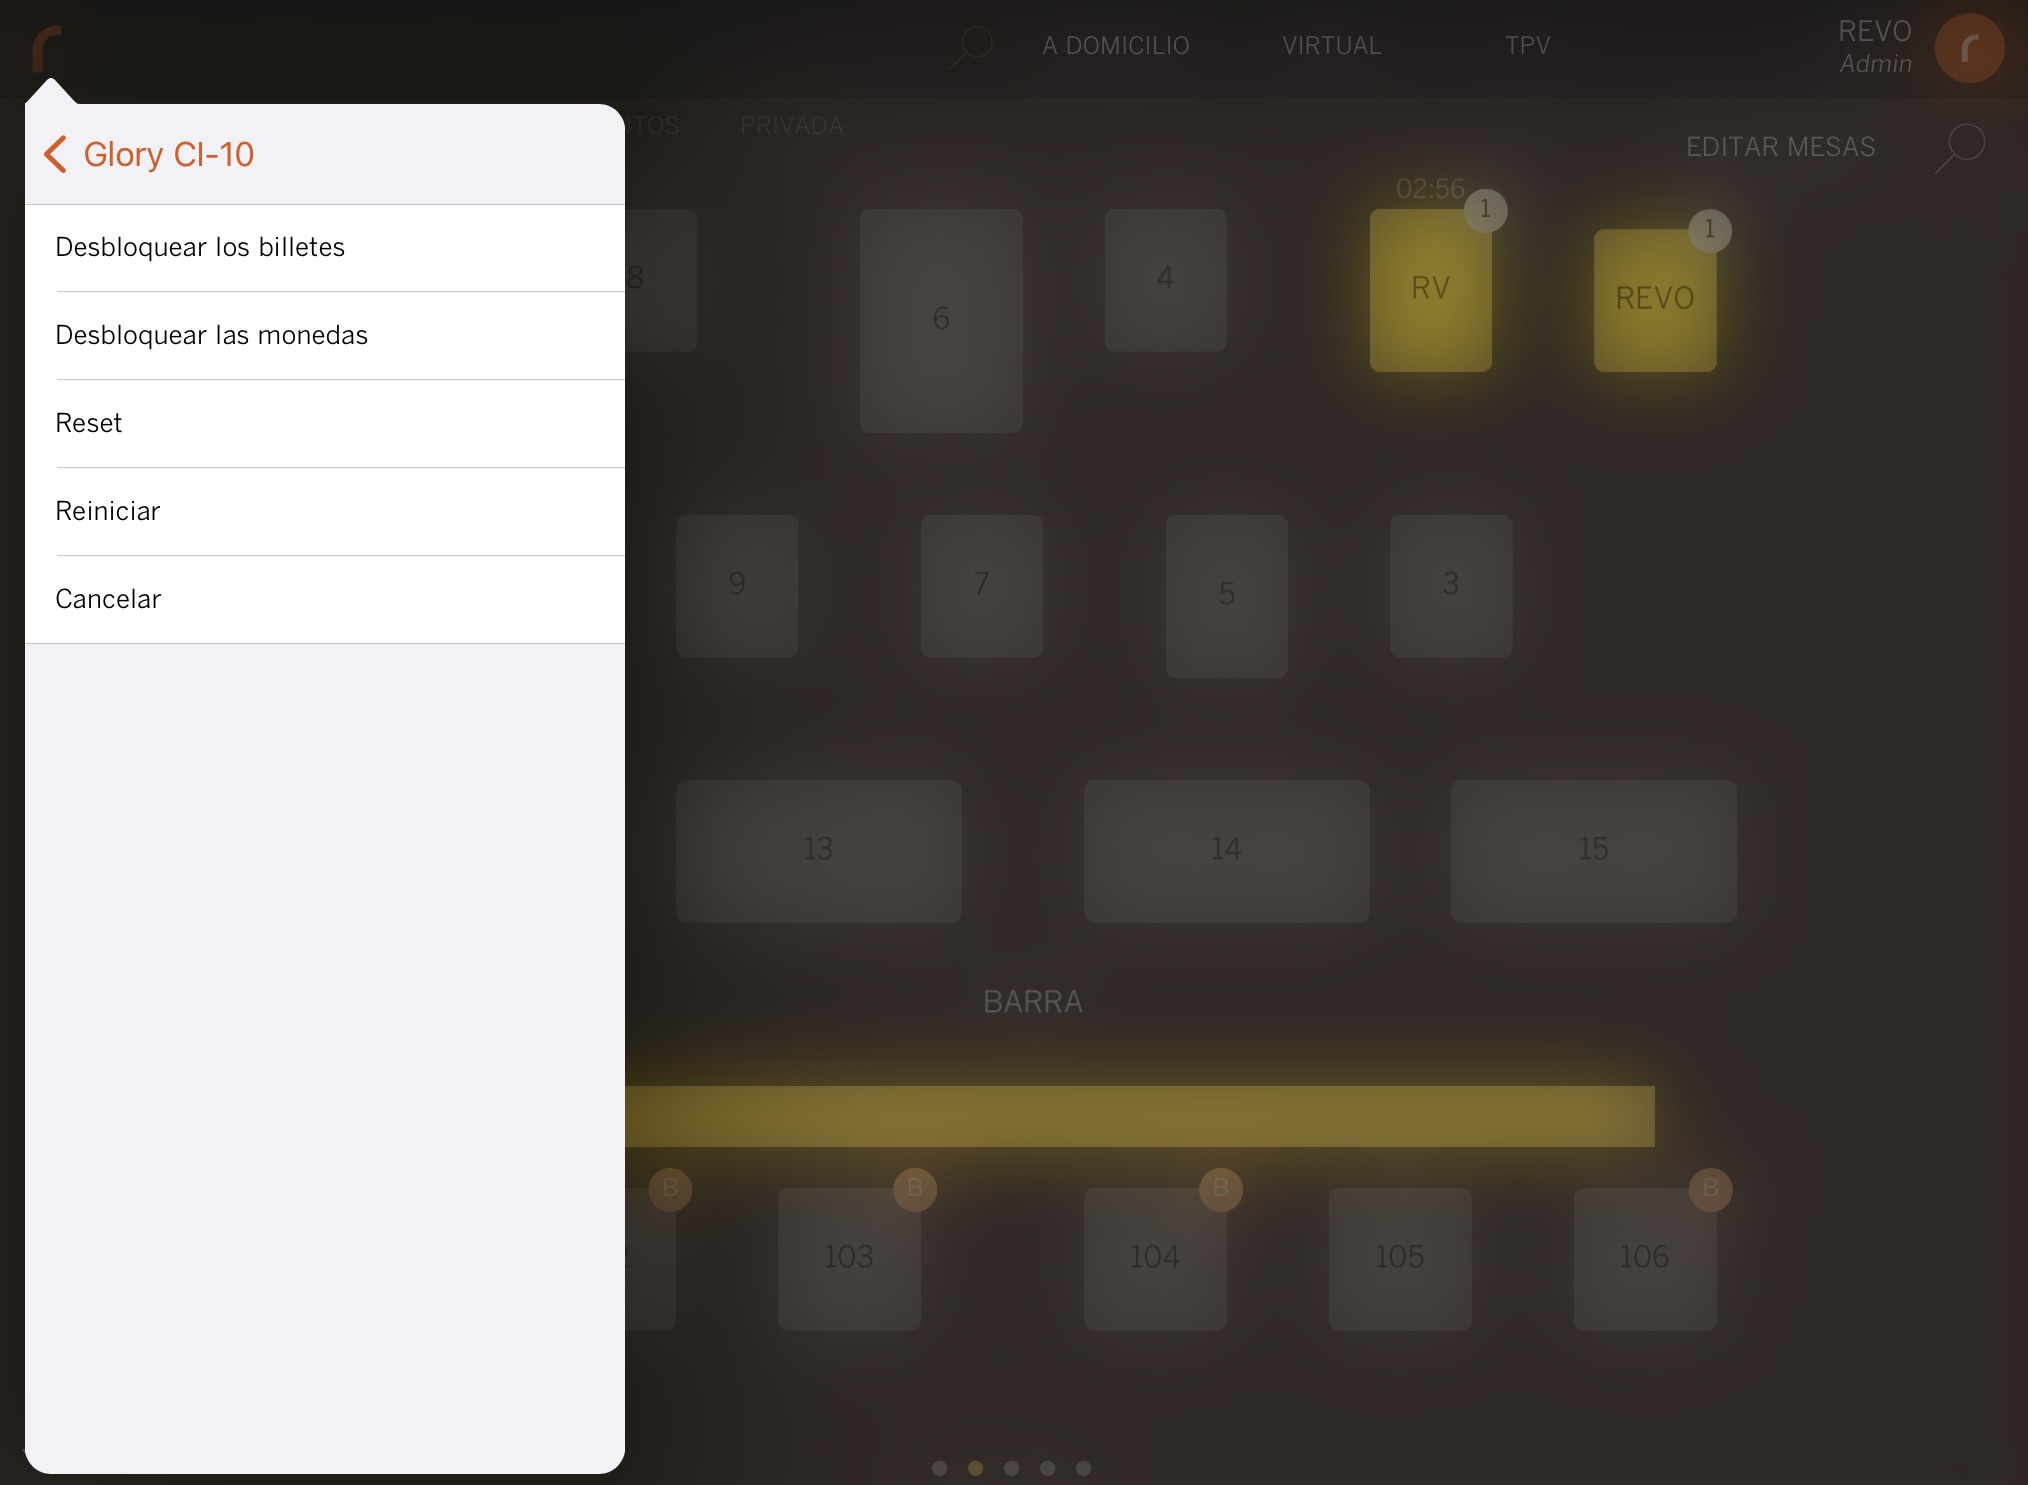
-
Unlock Bills: Unlocks the bill door.
-
Unlock Coins: Unlocks the coin door.
-
Reset: Restarts the cash machine, including the internal PC.
-
Restart: Restarts the cash machine.
-
Cancel: Cancels communication with the machine.
-