1. IMPORT PRODUCTS 2. UPDATE PRODUCTS 3. CONTAINERS 4. CONTAINER PRODUCTS 5. SALES FORMATS 6. ADD INVENTORY 7. SET/DO INVENTORY 8. MOVE INVENTORY 9. IMPORT SUPPLIERS 10. SUPPLIER PRODUCTS 11. IMPORT CUSTOMERS 12. GIFT CARDS 13. RECHARGE GIFT CARDS 14. RATES 15. EMPLOYEES 16. UPDATE EMPLOYEES
With Revo XEF, you can import CSV files separated by ";". The first row must contain the header with the field names exactly as described below.
To access the import screen, manually enter the URL: https://revoxef.works/tools/import

You can download a template with all the available fields for export. Select the template from the dropdown list and click Template. Delete the first two rows of the template and create a single header with the mandatory and optional fields you want to import.
1. IMPORT PRODUCTS (products):
Option to import products and configure them via a CSV file.
Mandatory fields:
These fields are essential to create new products via import. Without them, an error will appear.
- category_id: Category ID. Before importing, manually create the structure (groups and categories) in the back-office. Click on the link to see how to create groups and categories.
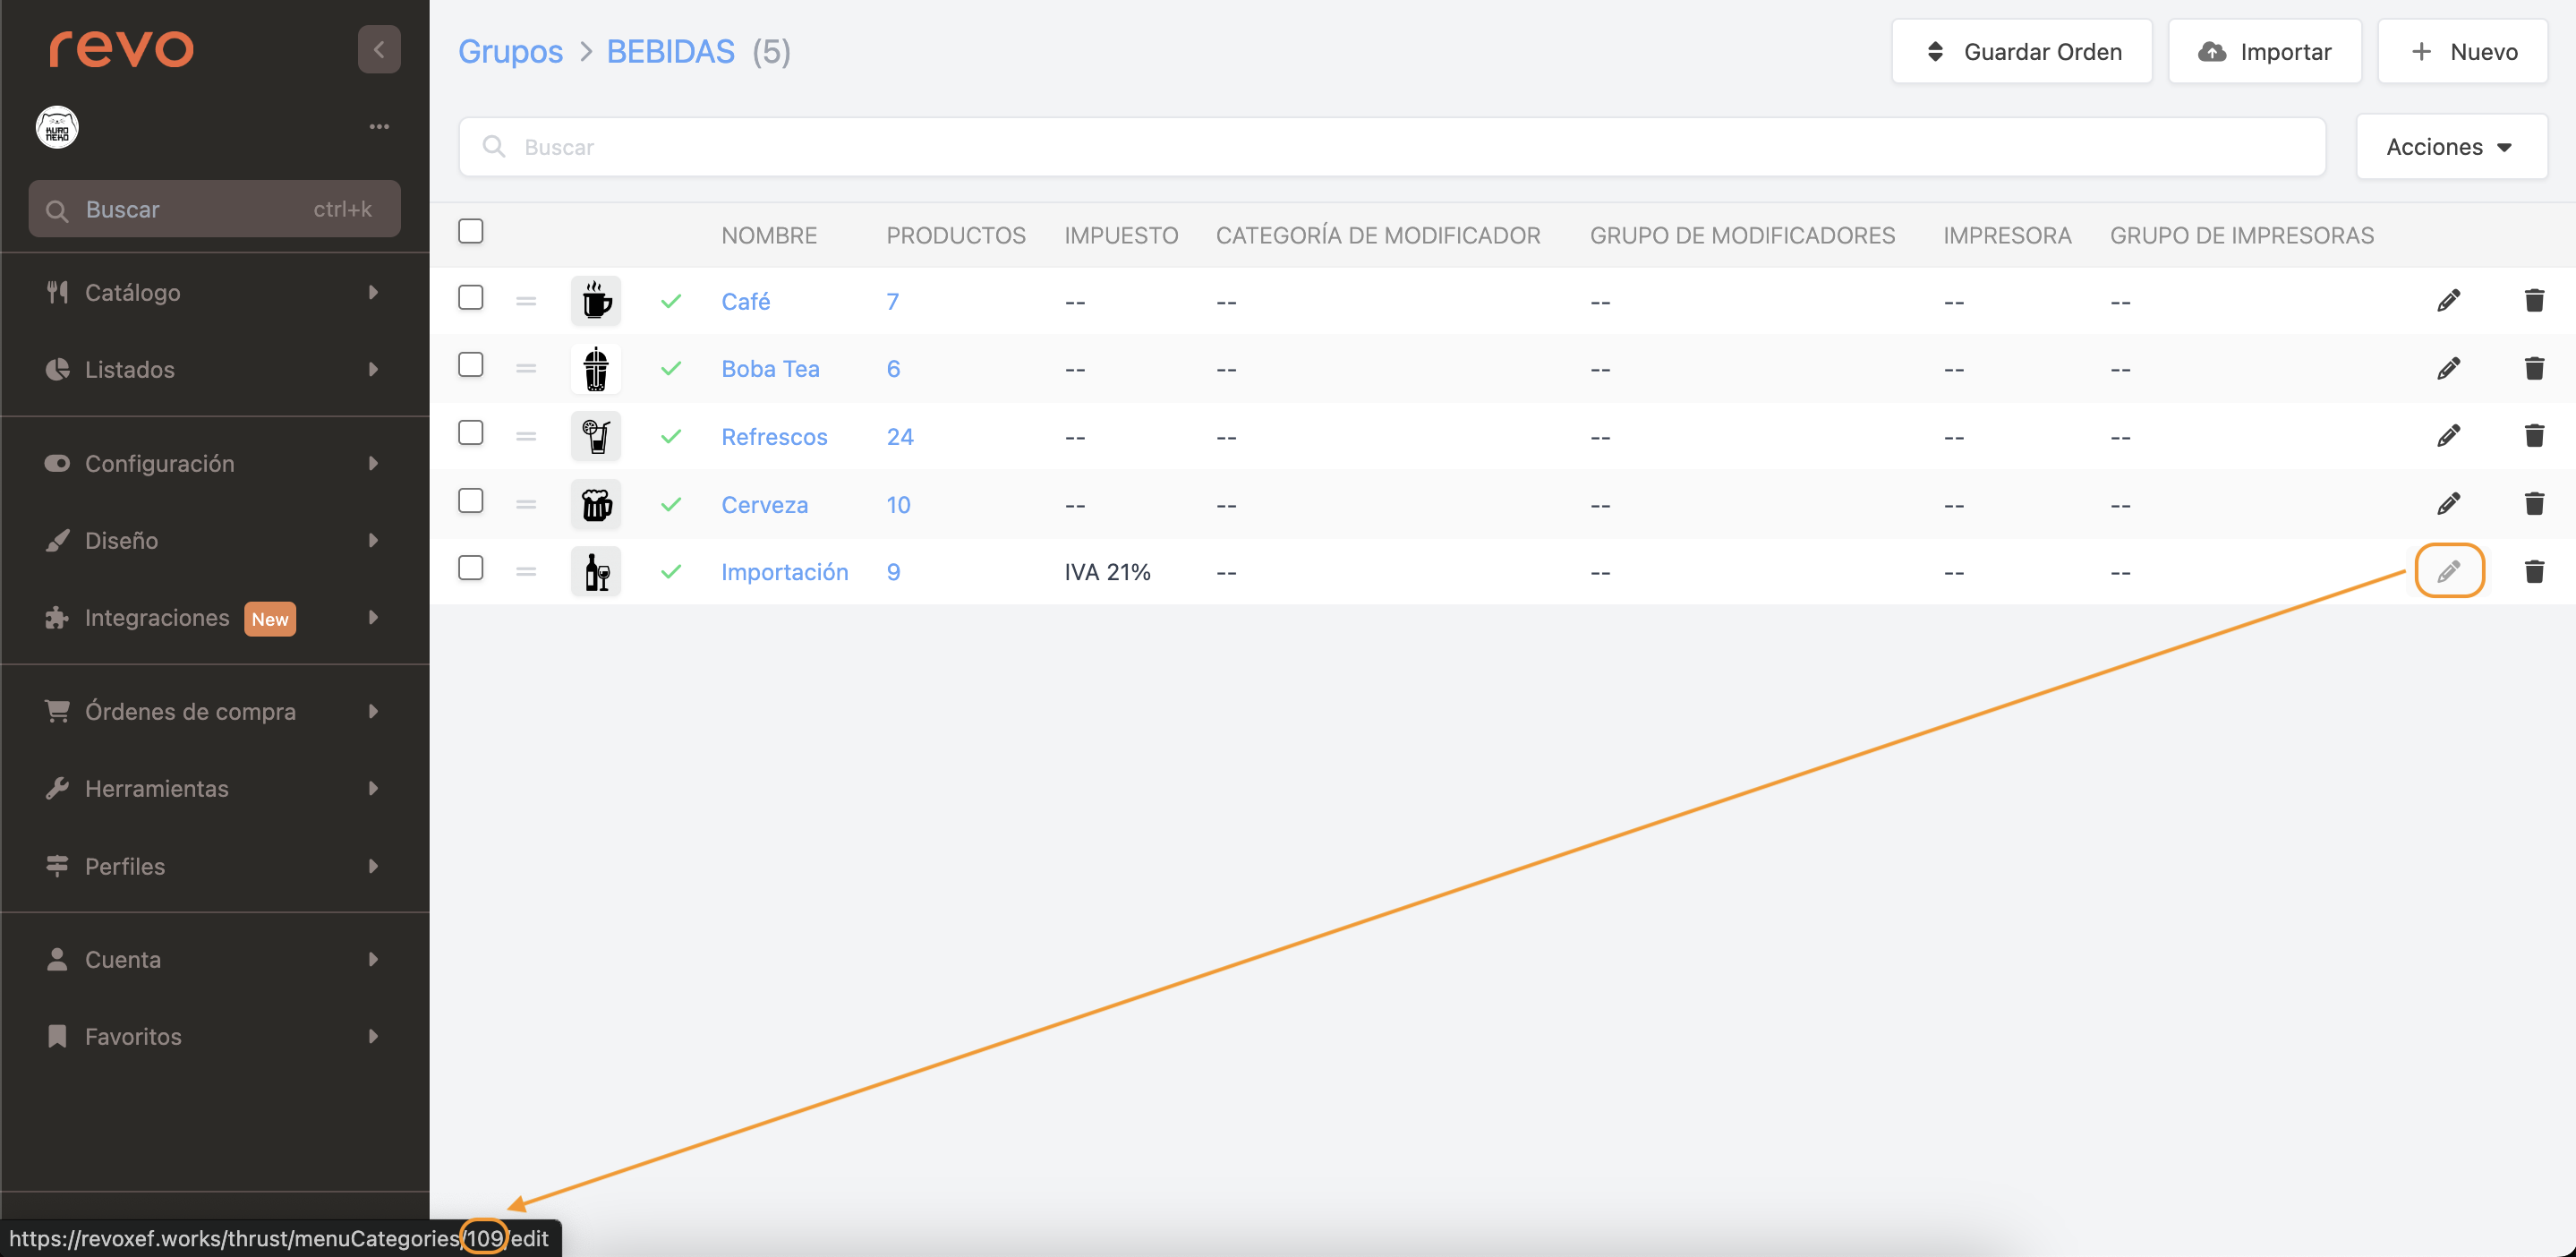
How to find the category ID? Once the product structure is created, find the category IDs by hovering the mouse over the category. The ID will appear in the URL. In the image, the category ID is 109.
- name: Product name (minimum 3 characters).
Optional fields:
-
price: Price with a point for decimals. Example: 10.20
-
photo: Photo file name. Example: apple.jpg. After importing, contact support to upload the photo folder.
-
order: Display order within the category. If not specified, the order will be as added in the imported list. To specify, use numbers: 1, 2, 3, 4, 5, etc.
-
active: 0 inactive, 1 active. If not specified, all products will be activated by default.
-
info: Product description. You can include information such as ingredients, etc.
-
type: Product type: 0 Product - 1 Menu - 2 Container Product - 3 Entry - 4 Product with sales format - 5 Gift card - 6 Management-only product - 7 Kit
-
hasInventory: 0 without inventory control, 1 with inventory control.
-
usesWeight: 0 does not use weight, 1 uses weight.
-
tax_id: Select the default tax for the product. Find the ID by hovering the mouse over the icon of each of the taxes.
-
printer_id: Select the default printer for the product. Find the ID by hovering the mouse over the icon of each of the printers.
-
printer_group_id: Indicates the default printer group for the products if applicable.
It is important to note that configuring the printer or printer group directly on the products, rather than on the category or group, can cause future issues when changing the settings. If set per product, you will need to change it one by one or import a new CSV file. However, if the settings are in the category or group, it can be modified with a few clicks.
-
modifier_group_id: Assigns the modifier group directly to the products. Find the ID by hovering the mouse over the icon of each of the modifier groups.
-
modifier_category_id: Assigns a modifier to the products. Find the ID by hovering the mouse over the icon on the name of the modifier.
As with printers, if you configure the modifiers on the products, you will need to remove them one by one if you no longer want to use them. If you configure them in the category, you only need to remove them from the category and save.
-
isMenu: 0 not a menu, 1 menu type product.
-
shouldAppearInMenuList: To include a product in a menu, it must have the "Show in Menu List" option enabled. This option can also be imported. 0 not enabled, 1 enabled.
-
super_group_id: Also assigns the general group to the product. Find the ID by hovering the mouse over the icon of each of the general groups.
-
isOpen: 0 not an open product, 1 an open product. An open product allows the name and price to be modified in the app.
It is not recommended to enable this option for all products. It is usually advisable to create a "various" product with this option enabled for exceptional cases. If it is a regularly ordered product, it is recommended to create it and not use "various".
-
nameKitchen: Specifies a different name for the preparation tickets, minimum 3 characters. Example: Product called "Beef Carpaccio with Virgin Olive Oil and Foie". Enter a different name for the preparation tickets, such as "Carpaccio".
-
costPrice: Cost price with a point for decimals. Example: 8.2
-
displayInventory: 0 not enabled, 1 enables the option to show product stock in the app.
-
allergies: Indicates allergens for each product. There are 13 types of allergens.
-
dish_order_id: Default dish order of the product, leave empty if none. Find the ID by hovering the mouse over the icon of each of the dish orders.
-
barcode: Barcode.
-
unit_id: ID of the sales unit it uses. Find the ID by hovering the mouse over the icon of each of the units.
-
extra_id: If you have the product linked with Nielsen, you can specify the code here.
-
useAverageCostPrice: 0 not active, 1 activated. Enable this option if you want REVO to calculate the average cost price of this product if you use the purchasing module.
-
cookDuration: If you use product preparation time with the KDS, indicate the total preparation time in seconds.
-
buttonName: If you want this product to display another name in the app.
-
minQuantity: Select the minimum quantity to add this product. If set to 0, no limit will be established.
-
extra_attributes: Indicates the attributes for each product. There are 37 types of attributes.
IMPORTANT: The names of the fields to be imported in the header must be exactly the same as written here. They should not contain initial capital letters, spaces, or the ":" symbol used in this article.
Correct: category_id
Incorrect: Category_id / CATEGORY_ID / category id / -category_id:
EXAMPLE OF IMPORTING PRODUCTS:
Having a base file is a bit complicated when importing products, as each establishment is different and the way of importing changes. Even so, this could be a good example:
| EXAMPLE: | |||||
|---|---|---|---|---|---|
| category_id | name | price | hasInventory | unit_id | type |
| 10 | Espresso | 1.30 | 1 | 2 | 1 |
| 15 | Coca-Cola | 1.80 | 1 | 2 | 1 |
| 17 | Red Wine | 0.00 | 1 | 7 | 4 |
| 18 | White Wine | 0.00 | 1 | 7 | 4 |
| 19 | White Rum | 0.00 | 1 | 4 | 4 |
| 24 | Green Salad | 7.30 | 0 | 2 | 1 |
| 26 | Cheese Fondue | 10.80 | 0 | 2 | 1 |
| 27 | Hummus | 8.50 | 0 | 2 | 1 |
| 40 | Bag of Lettuce | 0.00 | 1 | 5 | 6 |
| 40 | Tomatoes Kg. | 0.00 | 1 | 5 | 6 |
| 25 | Daily Menu | 12.50 | 0 | 1 | 1 |
2. UPDATE PRODUCTS:
Option to update or add information to existing products via a CSV file.
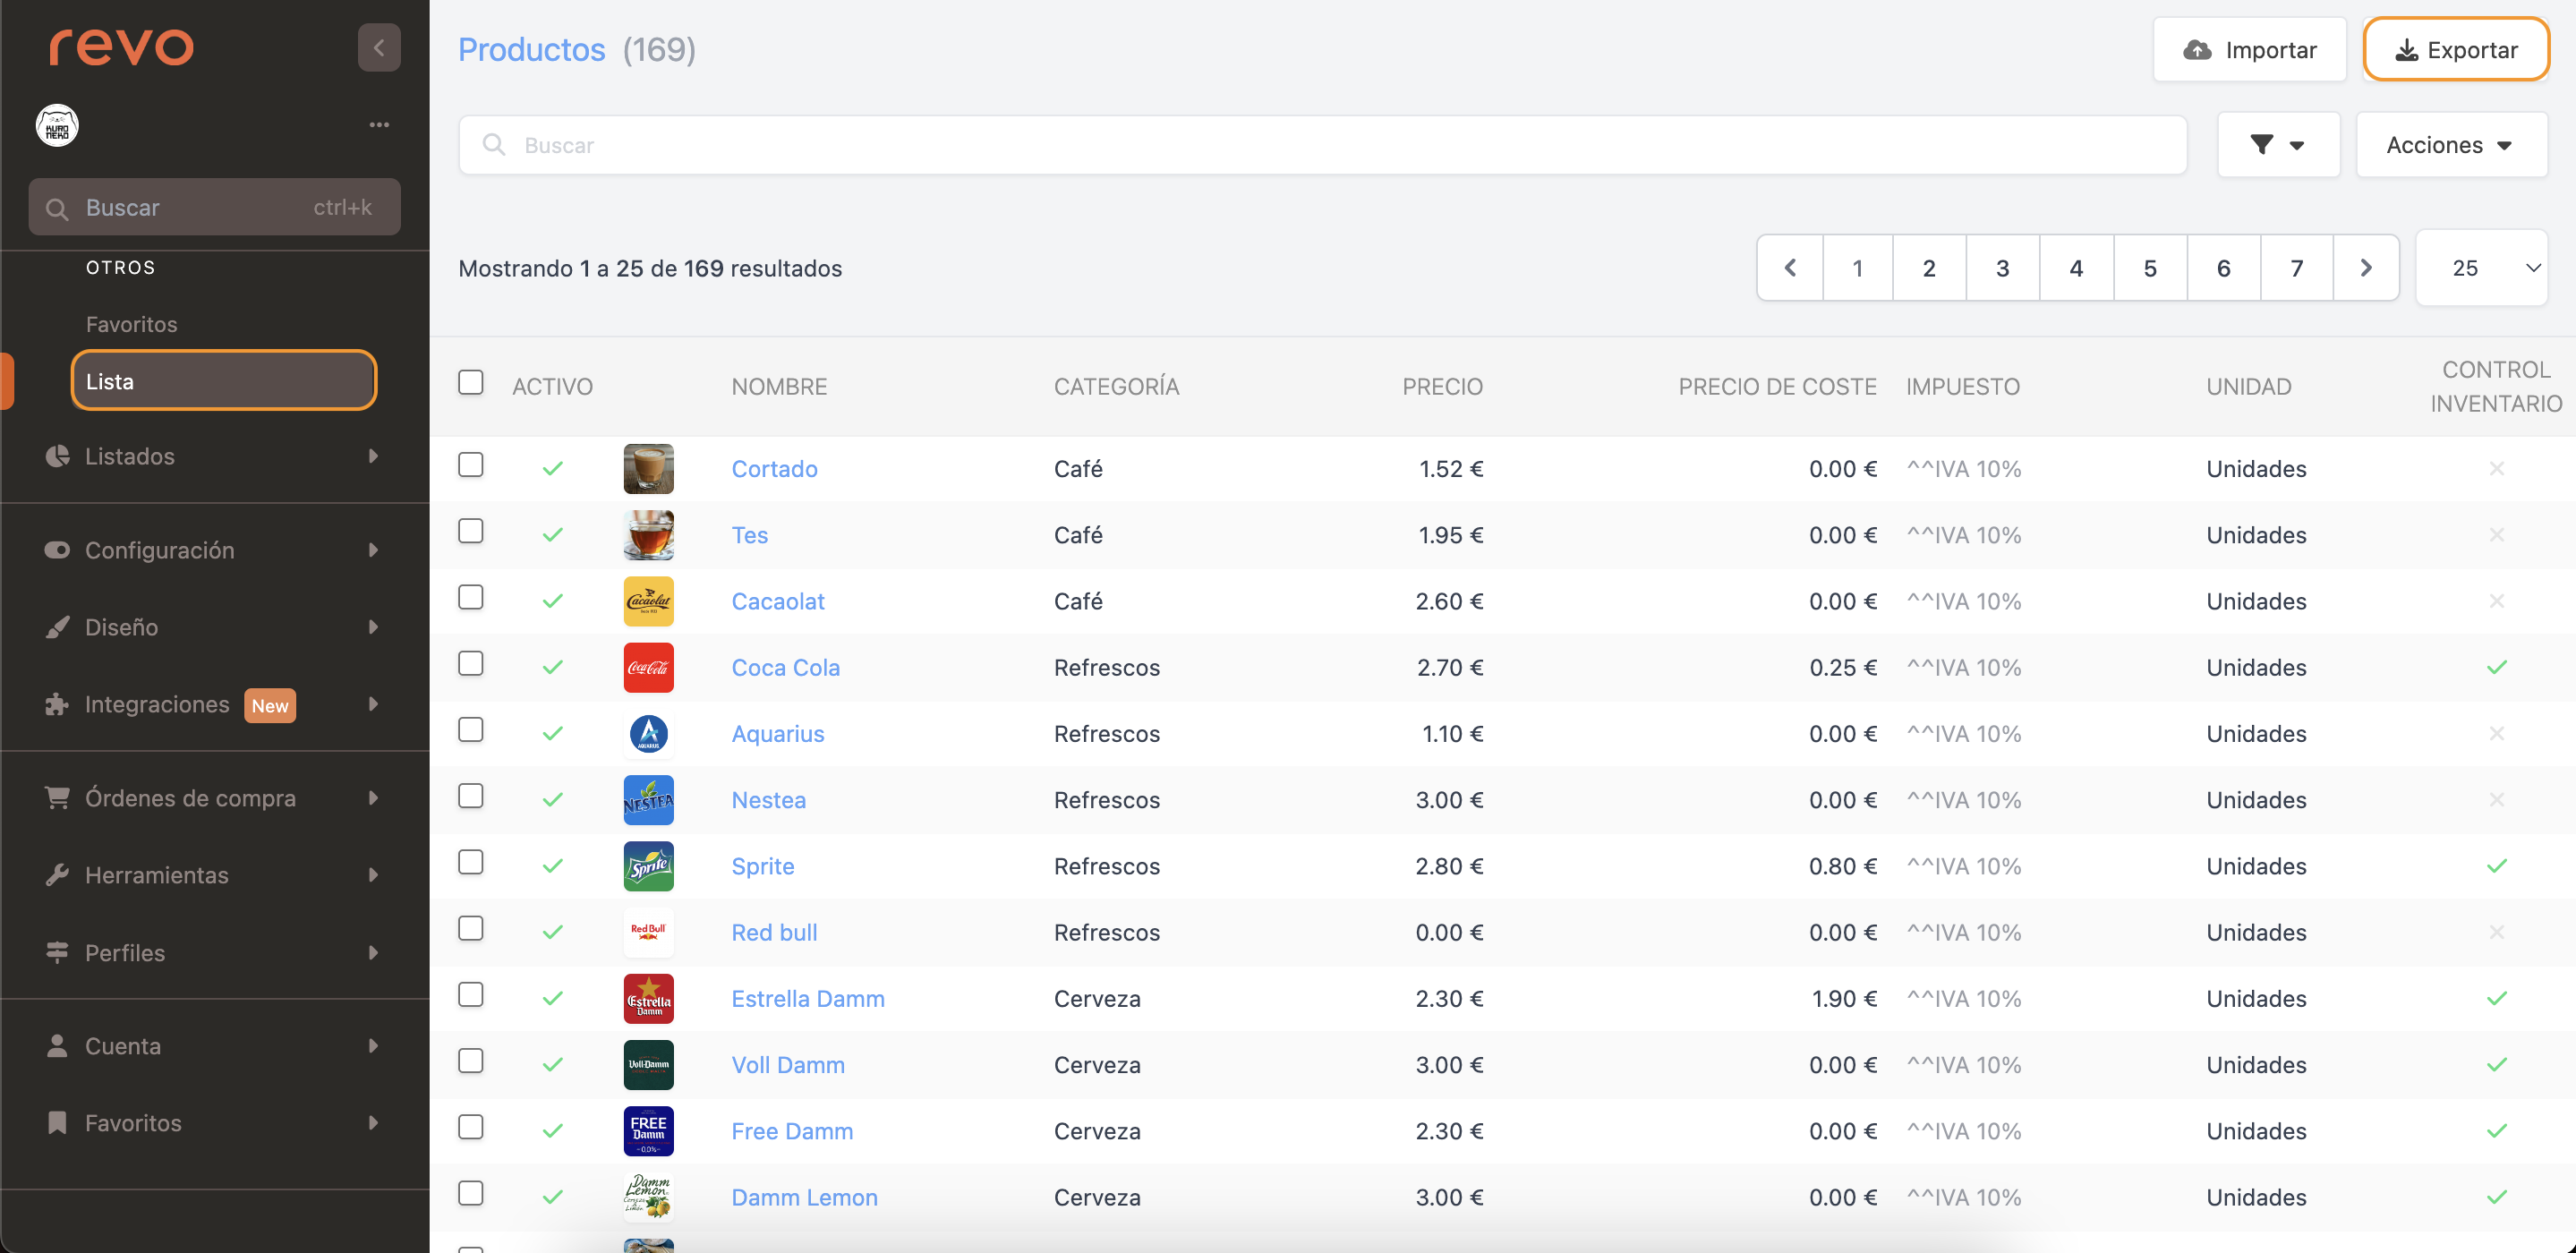
Since the ID (Product ID) is mandatory, it is recommended to start with the product list from REVO. To do this, click on the list and export the CSV file. This will provide you with the product IDs. You can delete the other fields and enter the ones you need.
Mandatory Fields:
These fields are essential to update products. Without them, an error will occur.
- id: Product ID. This ID is created when the product is first imported or manually created in the back-office.
Optional Fields:
All fields you have previously seen in products.
EXAMPLE OF UPDATING PRODUCTS:
Example: after downloading the CSV file from the product list, the columns we were not interested in were removed and the following were added: print description (kitchen name), cost price, and whether the product type is a menu.
| EXAMPLE: | |||
|---|---|---|---|
| id | nameKitchen | costprice | isMenu |
| 100 | Espresso | 0.00 | 0 |
| 101 | Coca-Cola | 0.49 | 0 |
| 102 | Red Wine | 8.95 | 0 |
| 103 | White Wine | 7.35 | 0 |
| 104 | White Rum | 11.00 | 0 |
| 105 | Green Salad | 0.00 | 0 |
| 106 | Cheese Fondue | 0.00 | 0 |
| 107 | Hummus | 0.00 | 0 |
| 108 | Lettuce Bag | 1.50 | 0 |
| 109 | Tomatoes Kg | 2.35 | 0 |
| 110 | Daily Menu | 0.00 | 1 |
3. CONTAINERS:
Containers are folders where you can add products. REVO uses a three-level organisation system (Groups, Categories, and Products), and containers would be a "fourth level". For example: a Water Container could include products such as 0.5 L Water, 1 L Water, and 1.5 L Water.
Mandatory Fields:
-
category_id: ID of the category where you want to create the container.
-
name: Name of the container.
Optional Fields:
- photo: File name of the photo. Example: waters.jpg
EXAMPLE OF CONTAINERS:
| EXAMPLE: | |
|---|---|
| category_id | name |
| 10 | COFFEES |
| 15 | WATERS |
| 17 | RED WINES |
| 18 | WHITE WINES |
4. CONTAINER ITEMS:
You’ve learned how to create a container, now associate products with it. For example, add 0.5 L Water, 1 L Water, and 1.5 L Water to the Water container.
Mandatory Fields:
-
main_item_id: Container ID.
-
item_id: Product ID.
Remember, you can obtain the container and product IDs by hovering over the icon.
Optional Fields:
-
order: Display order within the container. If not specified, the imported list order will be maintained. Use numbers: 1, 2, 3, 4, 5, etc.
-
dish_order_id: Default dish order for the product. Leave it blank if it’s not required. Check the ID by hovering over the icon for each of the dish orders.
-
active: 0 for inactive, 1 for active. If this field is not included, all products will be active by default.
EXAMPLE OF CONTAINER ITEMS:
ID 140 is for 0.5 L Water, 141 for 1 L Water, and 142 for 1.5 L Water.
| EXAMPLE: | |
|---|---|
| main_item_id | item_id |
| 15 | 140 |
| 15 | 141 |
| 15 | 142 |
5. ITEM SELLING FORMATS:
You can import products with selling formats.
Mandatory Fields:
-
quantity: Quantity to be deducted from stock.
-
price: Price with a decimal point. Example: 10.20
-
order: Display order in the back-office and the app. If not specified, the imported list order will be maintained. Use numbers: 1, 2, 3, 4, 5, etc.
It is advisable to use the same order for products with the same selling formats to improve app usability.
-
format_id: Selling format ID. Hover over the icon for the selling format.
-
item_id: Product ID. Download the list of products to find the ID.
-
combination_group_id: ID of the combination group. If you want to associate a combination group with the selling format, you’ll need the ID. For example, a rum combination where you’ll be asked for the mixer. Hover over the icon in combinations.
-
unit_id: Unit ID for stock control. Hover over the icon in the units.
EXAMPLE OF IMPORTING PRODUCTS WITH SELLING FORMATS:
Here is an example with 6 different products, each with 3 different selling formats (combined, solo, and shot), their prices, quantity to be deducted from stock, unit (cl.), visibility order, and associated combination group.
| EXAMPLE: | ||||||
|---|---|---|---|---|---|---|
| item_id | format_id | price | quantity | unit_id | order | combination_group_id |
| 196 | 3 | 12 | 5 | 7 | 00 | 2 |
| 197 | 3 | 15 | 5 | 7 | 00 | 2 |
| 198 | 3 | 14 | 5 | 7 | 00 | 2 |
| 199 | 3 | 11 | 5 | 7 | 00 | 2 |
| 200 | 3 | 10 | 5 | 7 | 00 | 2 |
| 201 | 3 | 16 | 5 | 7 | 00 | 2 |
| 196 | 4 | 11 | 5 | 7 | 01 | 0 |
| 197 | 4 | 14 | 5 | 7 | 01 | 0 |
| 198 | 4 | 13 | 5 | 7 | 01 | 0 |
| 199 | 4 | 10 | 5 | 7 | 01 | 0 |
| 200 | 4 | 9 | 5 | 7 | 01 | 0 |
| 201 | 4 | 15 | 5 | 7 | 01 | 0 |
| 196 | 5 | 3 | 3 | 7 | 02 | 0 |
| 197 | 5 | 4 | 3 | 7 | 02 | 0 |
| 198 | 5 | 4 | 3 | 7 | 02 | 0 |
| 199 | 5 | 3 | 3 | 7 | 02 | 0 |
| 200 | 5 | 2.50 | 3 | 7 | 02 | 0 |
| 201 | 5 | 4.50 | 3 | 7 | 02 | 0 |
6. ADDING INVENTORY:
This option is used to add stock to your products, especially for the first time.
Required Fields:
-
item_id: Product ID. Download the list of products to find out the ID.
-
quantity: Quantity to add to the inventory.
-
warehouse_id: Warehouse ID. Hover over the icon in the warehouses.
If you have multiple warehouses, you can repeat the product IDs in the file and change the warehouse ID to add stock to different warehouses.
EXAMPLE OF ADDING STOCK:
| EXAMPLE: | ||
|---|---|---|
| item_id | quantity | warehouse_id |
| 100 | 150 | 1 |
| 102 | 150 | 1 |
| 103 | 150 | 1 |
| 100 | 500 | 2 |
| 102 | 500 | 2 |
| 103 | 500 | 2 |
| 110 | 235 | 1 |
| 111 | 235 | 1 |
| 112 | 235 | 1 |
| 118 | 50 | 1 |
| 304 | 200 | 1 |
| 305 | 200 | 1 |
7. SET/ADJUST INVENTORY:
Use this option to set the stock levels of your products, ideal after a stocktake to correct the inventory.
Required Fields:
-
item_id: Product ID. Download the list of products to find out the ID.
-
quantity: Quantity to set in the inventory.
-
warehouse_id: Warehouse ID. Hover over the icon in the warehouses.
If you have multiple warehouses, you can repeat the product IDs in the file and change the warehouse ID to set stock levels in different warehouses.
Optional Fields:
-
defaultQuantity: Default quantity of the product in the warehouse.
-
alert: Minimum stock level to receive an alert.
EXAMPLE OF SETTING/ADJUSTING INVENTORY:
| EXAMPLE: | ||
|---|---|---|
| item_id | quantity | warehouse_id |
| 100 | 100 | 1 |
| 102 | 100 | 1 |
| 103 | 100 | 1 |
| 110 | 232 | 1 |
| 111 | 230 | 1 |
| 112 | 236 | 1 |
| 118 | 45 | 1 |
| 304 | 198 | 1 |
| 305 | 199 | 1 |
8. MOVE INVENTORY:
Use this option to transfer stock between warehouses.
Required fields:
-
item_id: Product ID. Download the list of products to find out the ID.
-
quantity: Quantity to add to inventory.
-
warehouse_id: ID of the warehouse. Hover over the icon in the warehouses.
If you have multiple warehouses, you can repeat the product IDs in the file and change the warehouse ID to add stock to different warehouses.
-
to_warehouse_id: ID of the warehouse to which you want to move the stock.
EXAMPLE OF MOVING INVENTORY:
| EXAMPLE: | |||
|---|---|---|---|
| item_id | quantity | warehouse_id | to_warehouse_id |
| 100 | 100 | 1 | 2 |
| 102 | 100 | 1 | 2 |
| 103 | 100 | 1 | 2 |
| 110 | 100 | 1 | 2 |
| 111 | 100 | 1 | 2 |
| 112 | 100 | 1 | 2 |
| 118 | 30 | 1 | 2 |
| 304 | 100 | 1 | 2 |
| 305 | 100 | 1 | 2 |
9. VENDORS:
Use this option to import vendors, ideal if you have many and want to use the purchasing module.
Required fields:
-
name: Vendor's name (minimum 3 characters).
-
address: Vendor's address.
-
nif: Vendor's NIF.
Optional fields:
-
city: Vendor's city.
-
state: Vendor's state.
-
country: Vendor's country.
-
postalCode: Vendor's postal code.
-
web: Vendor's website.
-
email: Vendor's email address.
-
phone: Vendor's phone number.
-
notes: Information field for the vendor.
-
shouldBeNotified: 1 to notify the vendor about changes to their orders, 0 to not notify.
EXAMPLE OF IMPORTING VENDORS:
| EXAMPLE: | ||||||
|---|---|---|---|---|---|---|
| name | address | nif | postalCode | city | country | notes |
| Vendor 1 | Gran Via, 30 | A58818501 | 28010 | Madrid | Spain | Vendor for food products. |
| Vendor 2 | Via Laietana, 222 | B54416504 | 08010 | Barcelona | Spain | Vendor for soft drinks. |
| Vendor 3 | Calle de La Paz, 11 | V51218667 | 46003 | Valencia | Spain | Vendor for cleaning products. |
| Vendor 4 | Sierpes, 45 | S16815999 | 41004 | Seville | Spain | Vendor for various liquors. |
| Vendor 5 | Rúa Nova, 111 | L53389701 | 15003 | La Coruña | Spain | Vendor for dairy products. |
10. VENDOR PRODUCTS (vendor items):
Use this option to import your vendors' products. It's useful when you have many products associated with them and want to use the purchasing module.
Required Fields:
-
vendor_id: Vendor ID. Find the ID by hovering over the icon of each vendors.
-
item_id: Product ID. Download the list of products to find the ID.
Optional Fields:
-
reference: Vendor reference code, if you have one.
-
pack: Units per pack. Example: if 1 pack contains 24 cans, indicate 24.
-
costPrice: Cost price with a point for decimals. Example: 8.2
-
unit_id: Sales unit ID. Find the ID by hovering over the icon in the units.
-
tax_id: Default tax ID for the product. Find the ID by hovering over the icon in the taxes.
EXAMPLE OF VENDOR PRODUCTS:
| EXAMPLE: | |||||
|---|---|---|---|---|---|
| vendor_id | item_id | pack | costPrice | unit_id | tax_id |
| 1 | 100 | 24 | 0.25 | 1 | 2 |
| 1 | 102 | 24 | 0.30 | 1 | 2 |
| 1 | 104 | 24 | 0.33 | 1 | 2 |
| 1 | 105 | 24 | 0.22 | 1 | 2 |
| 1 | 107 | 24 | 0.50 | 1 | 2 |
| 1 | 108 | 24 | 0.30 | 1 | 2 |
11. IMPORT CUSTOMERS:
Option to import customers. Ideal for importing many customers at once.
Required fields:
- name: Customer name (at least 3 characters).
The address is optional, but if provided, the following fields will become mandatory:
- address_street_address Customer address.
- address_postal_code Postcode.
- address_city City.
- address_state County/Province.
- address_country Country (ISO 3166-1 alpha-2 code Example: GB (United Kingdom)).
Optional fields:
-
active: 0 for inactive, 1 for active. If this field is not included, all customers will be activated by default.
-
last_name: Remove column.
-
nif: Customer’s NIF. (If provided, address becomes mandatory)
-
email: Customer’s email.
-
phone: Customer’s phone number.
-
language: Customer’s preferred language.
-
photo: Remove column.
-
level: Remove column.
-
nationality: Customer’s nationality.
-
birth_date: Customer’s date of birth.
-
gender: Customer’s gender.
-
allergies: Customer’s allergies.
-
promotions_accepted: Remove column.
-
web: Customer’s website.
-
notes: Customer information field.
-
extra_id: If customers belong to a group, you can add the group’s ID here.
-
extra_attributes: Remove column.
-
remember_token: Remove column.
-
prevent_deletion: Remove column.
-
address_notes: Address notes related to the customer.
EXAMPLE OF IMPORTING CUSTOMERS:
| EXAMPLE: | |||||||
|---|---|---|---|---|---|---|---|
| name | address_street_address | nif | address_postal_code | address_city | address_state | address_country | notes |
| Hugo "Hurley" Reyes | Gran Via, 30 | A58818501 | 28010 | Madrid | Madrid | ES | He loves our special dish. |
| Once | Via Laietana, 222 | B54416504 | 08010 | Barcelona | Barcelona | ES | Always reserves table 15. |
| Maggie Greene | Calle de La Paz, 11 | V51218667 | 46003 | Valencia | Valencia | ES | Table with sea views. |
| John Snow | Sierpes, 45 | S16815999 | 41004 | Seville | Seville | ES | Always pays at the end of the month. |
| Darth Vader | Rúa Nova, 111 | L53389701 | 15003 | La Coruña | La Coruña | ES |
12. GIFT CARDS:
Use this option to import gift cards into the back office, ideal for large volumes.
Required Fields:
-
uuid: Unique code for the gift card. It can include both text and numbers.
-
total: Balance of the card. Must be numeric.
Optional Fields:
-
active: 0 for inactive, 1 for active. If not included, all cards will be activated by default.
-
balance: Remaining balance. Generally not used unless you want a balance different from the total.
-
campaign_id: Campaign ID. Associate cards with a campaign, such as Christmas. Obtain the ID by hovering over the icon in the campaign.
-
customer_id: Customer ID. Check the ID by hovering over the icon in the customers.
EXAMPLE OF IMPORTING GIFT CARDS:
| EXAMPLE: | ||
|---|---|---|
| uuid | total | campaign_id |
| 00000123456 | 100 | 1 |
| 00000789100 | 100 | 1 |
| TR1234567 | 50 | 1 |
| example | 50 | 1 |
| hello I am a gc | 50 | 2 |
| Pedro González | 75 | 2 |
| Macarena Pérez | 75 | 2 |
13. RECHARGING GIFT CARDS:
Use this option to import recharges for gift cards into the back office.
Required Fields:
-
uuid: Gift card code.
-
reloadAmount: Amount to load.
EXAMPLE OF RECHARGING GIFT CARDS:
| EXAMPLE: | |
|---|---|
| uuid | reloadAmount |
| 00000123456 | 100 |
| 00000789100 | 100 |
14. RATES:
To import rates, go to: https://revoxef.works/thrust/prices/import
Required Fields:
-
priceable_id: add the IDs.
-
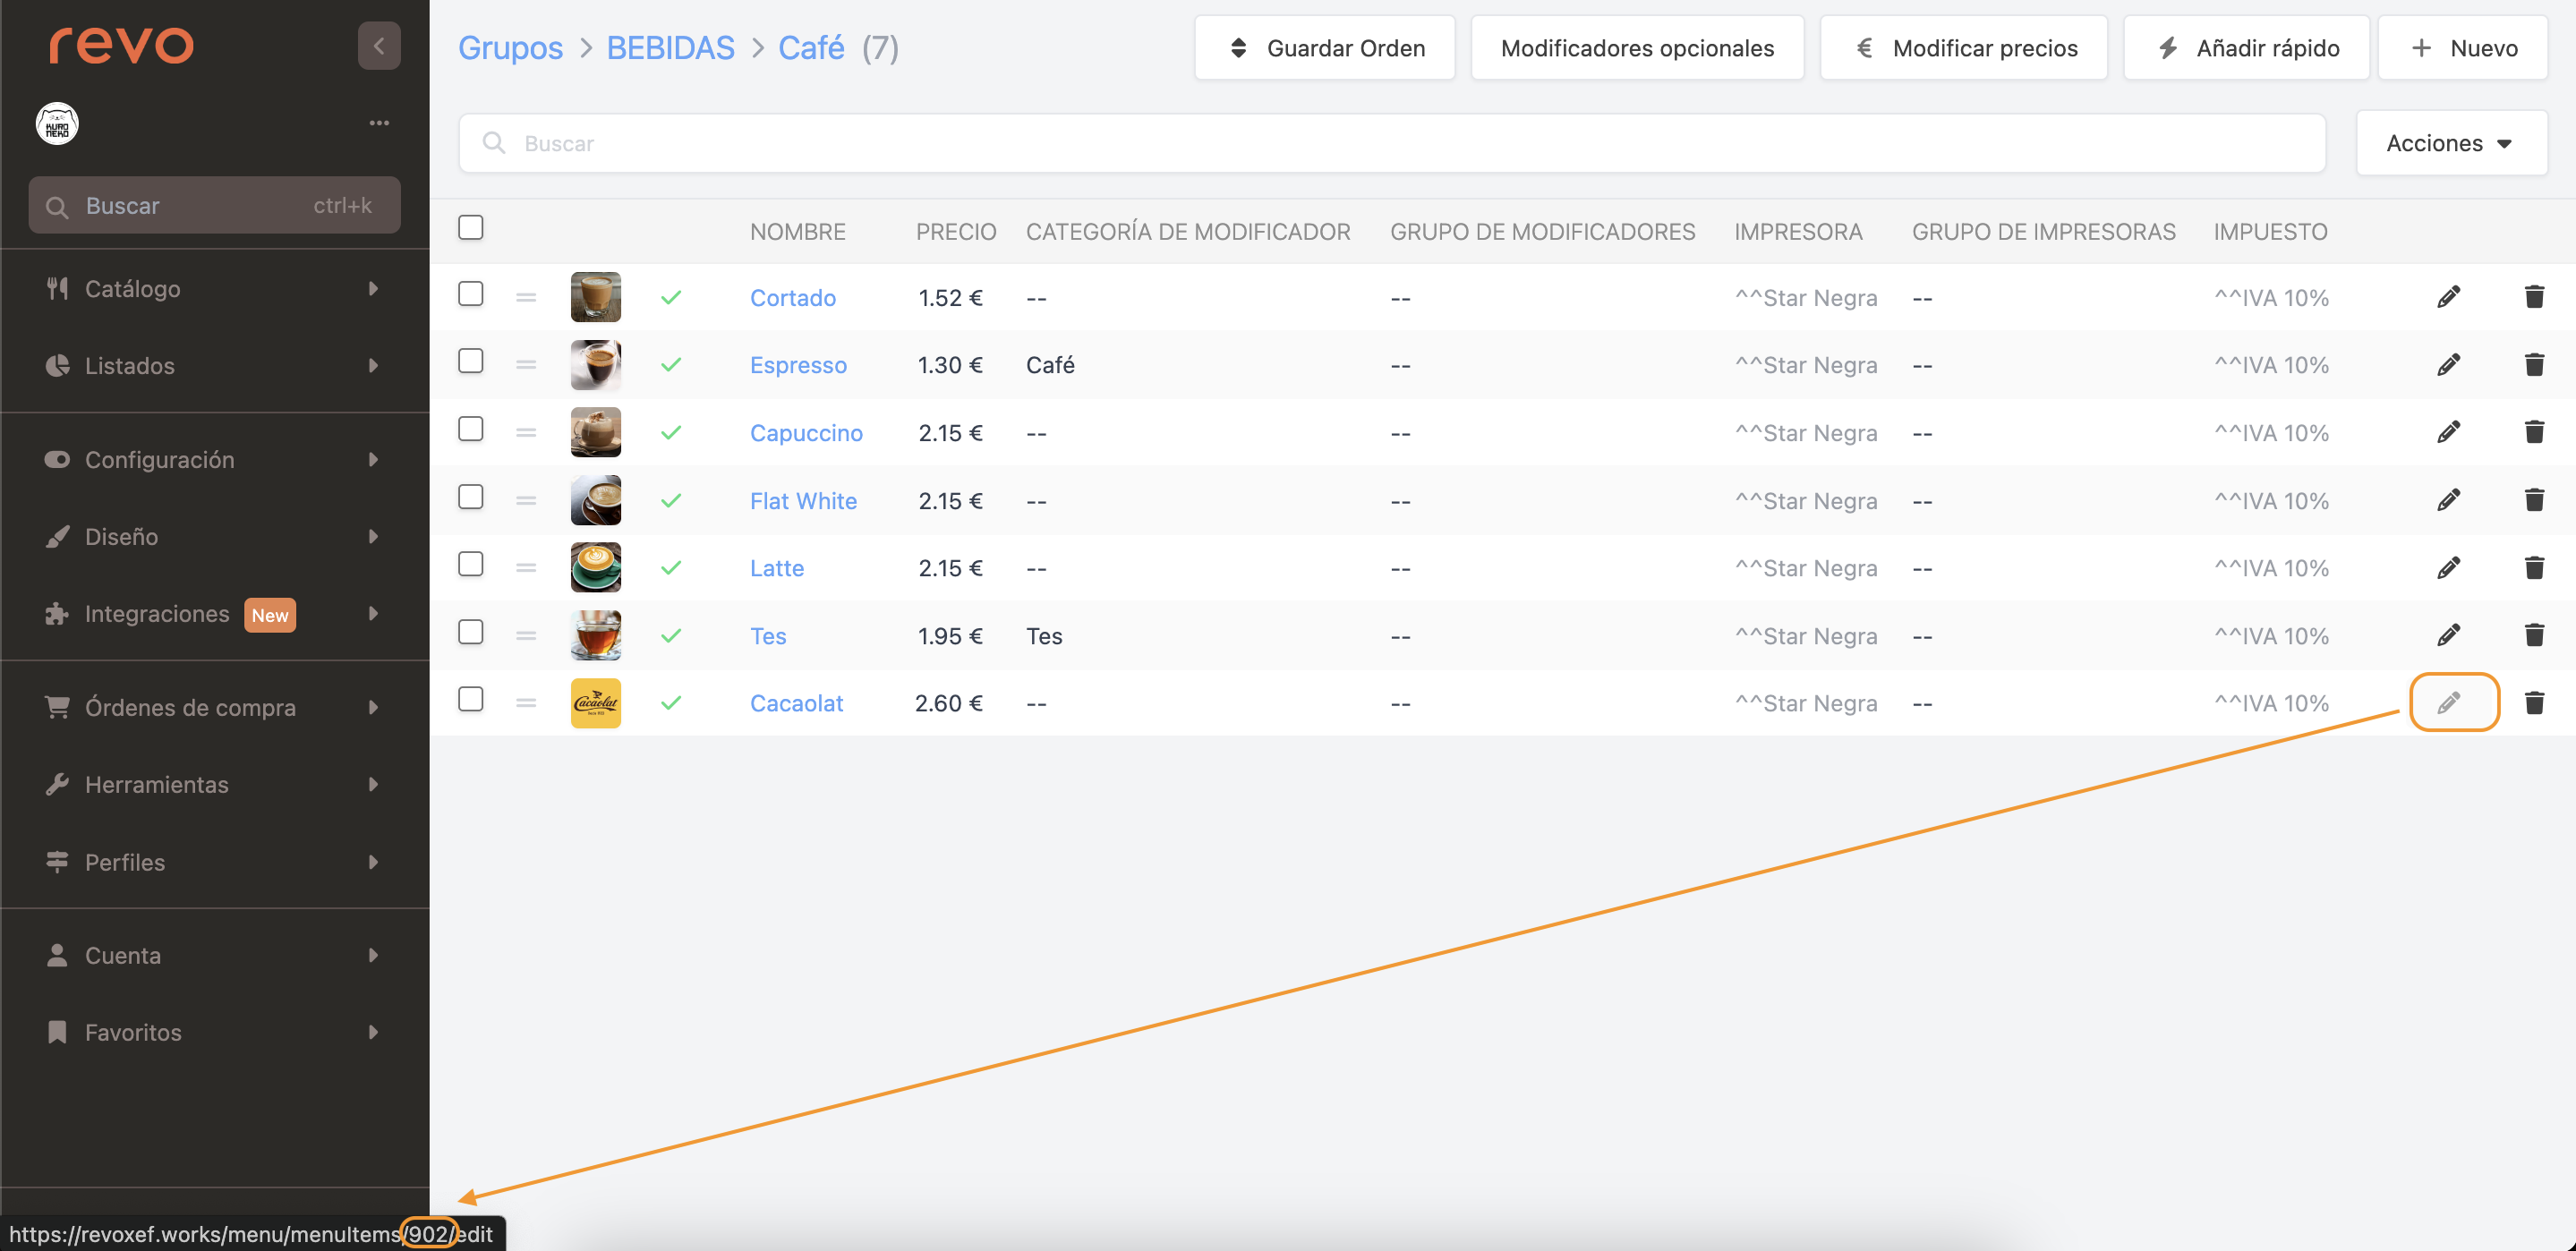
Products: ID of the product. Obtain the ID by hovering over the of the product.
-
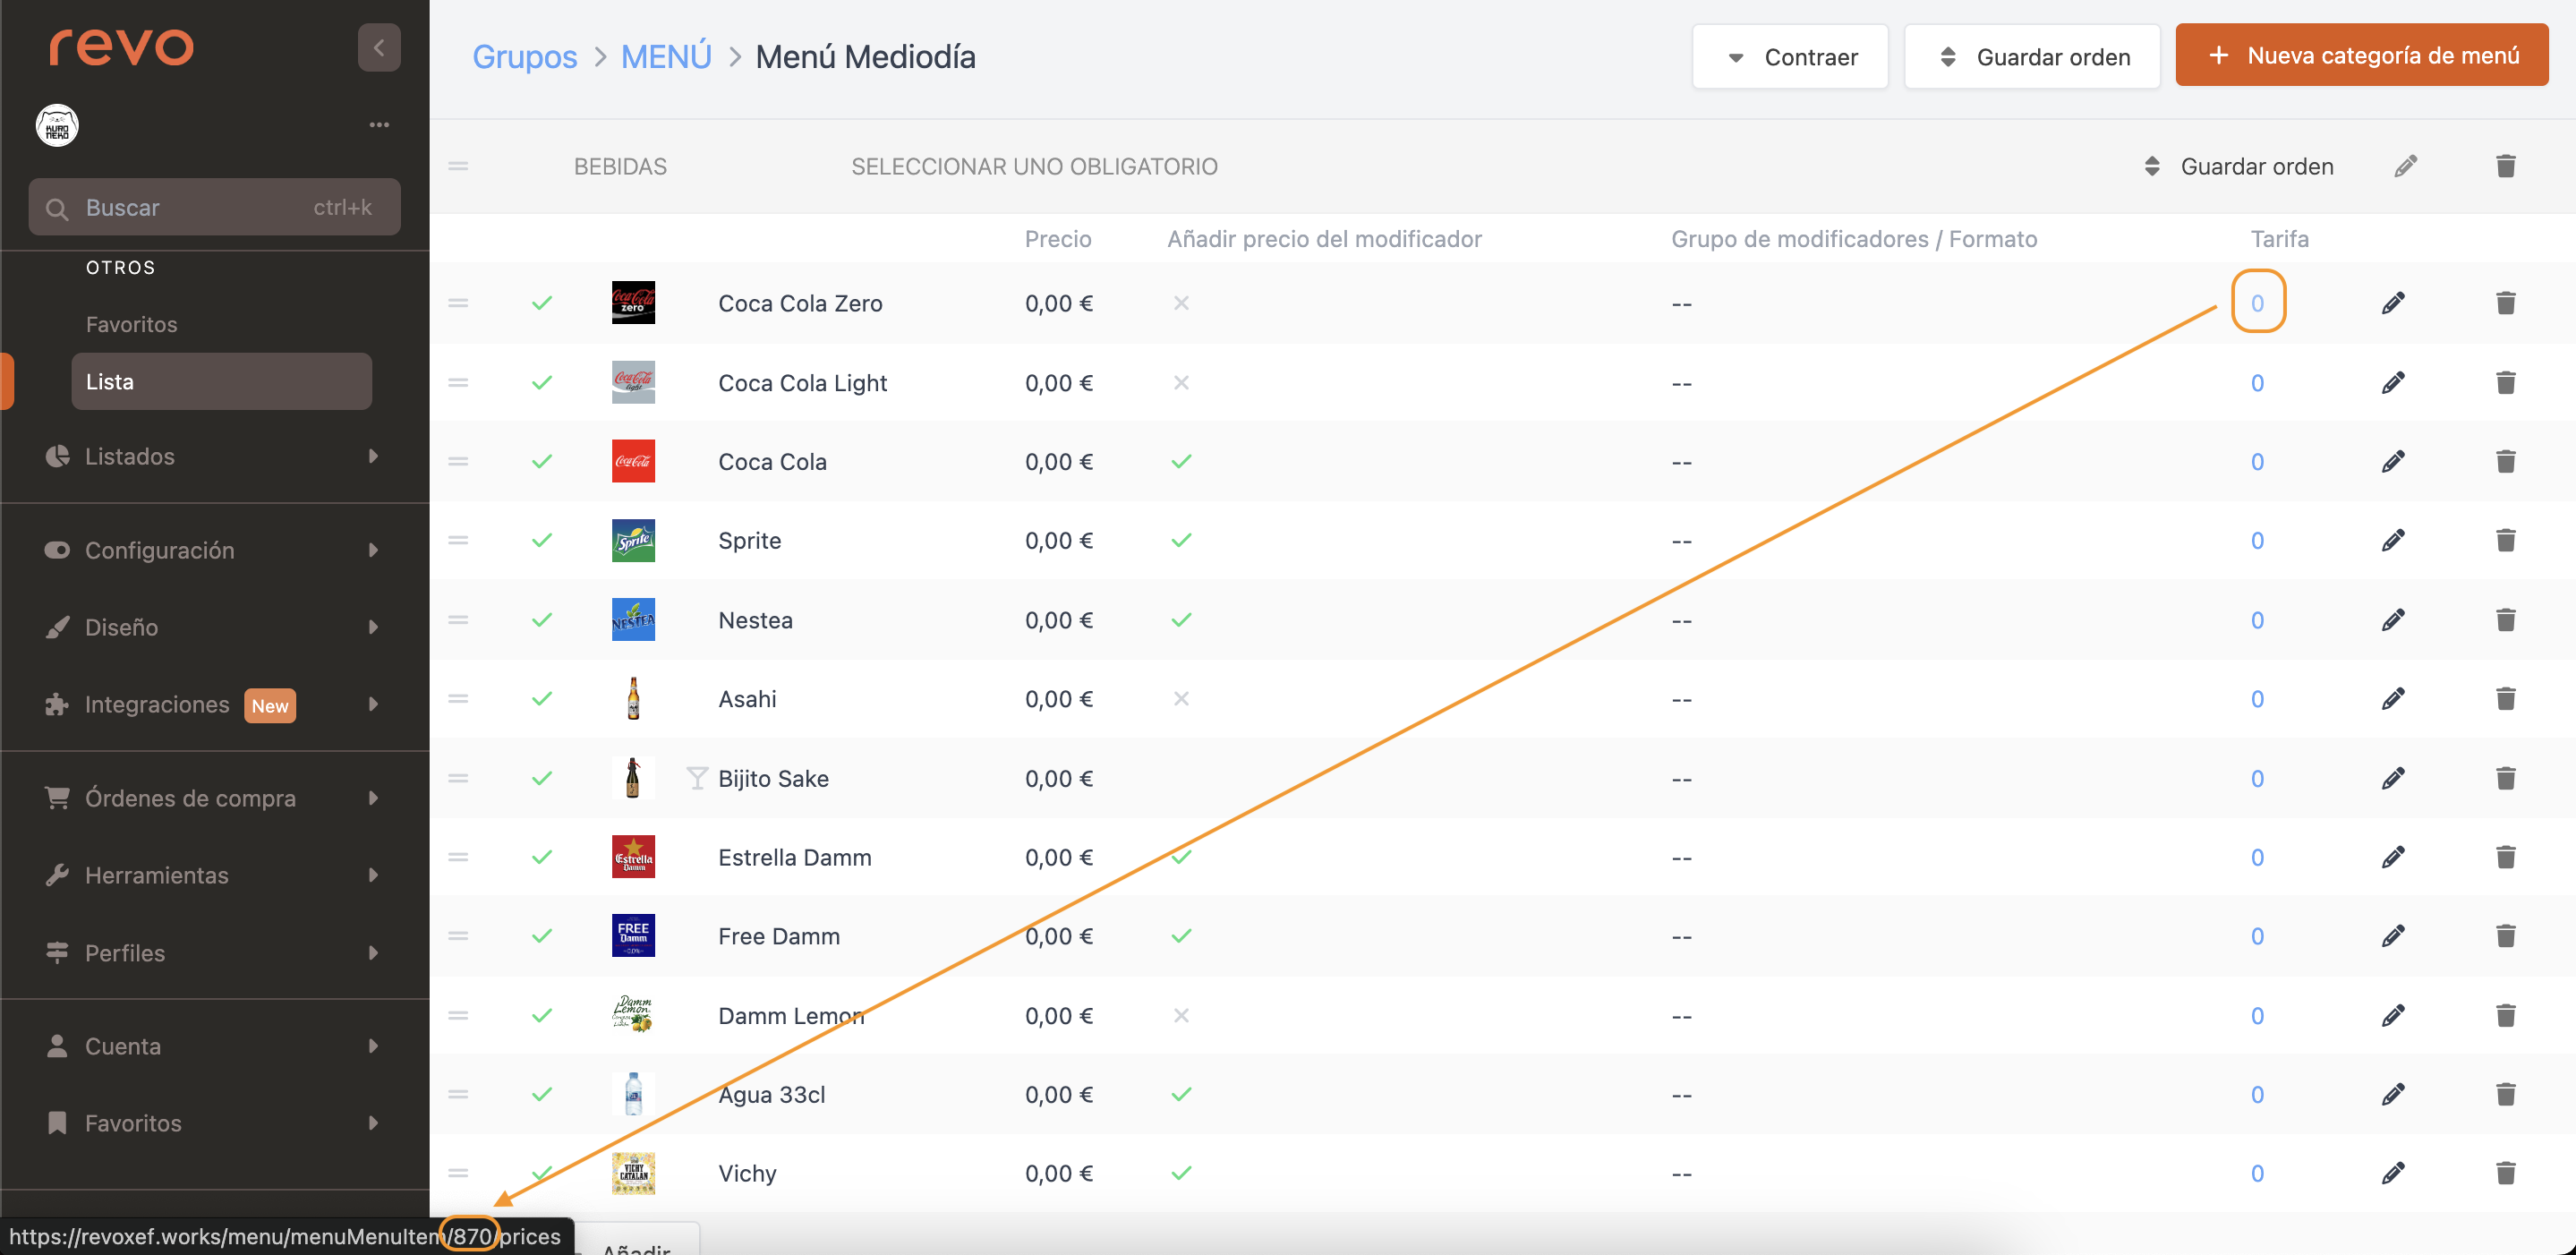
Menu Products: ID of the rate within the menu. Obtain the ID by hovering over the 0 in the rate.
-
Modifiers: ID of the modifiers. Obtain the ID by hovering over the of the modifier.
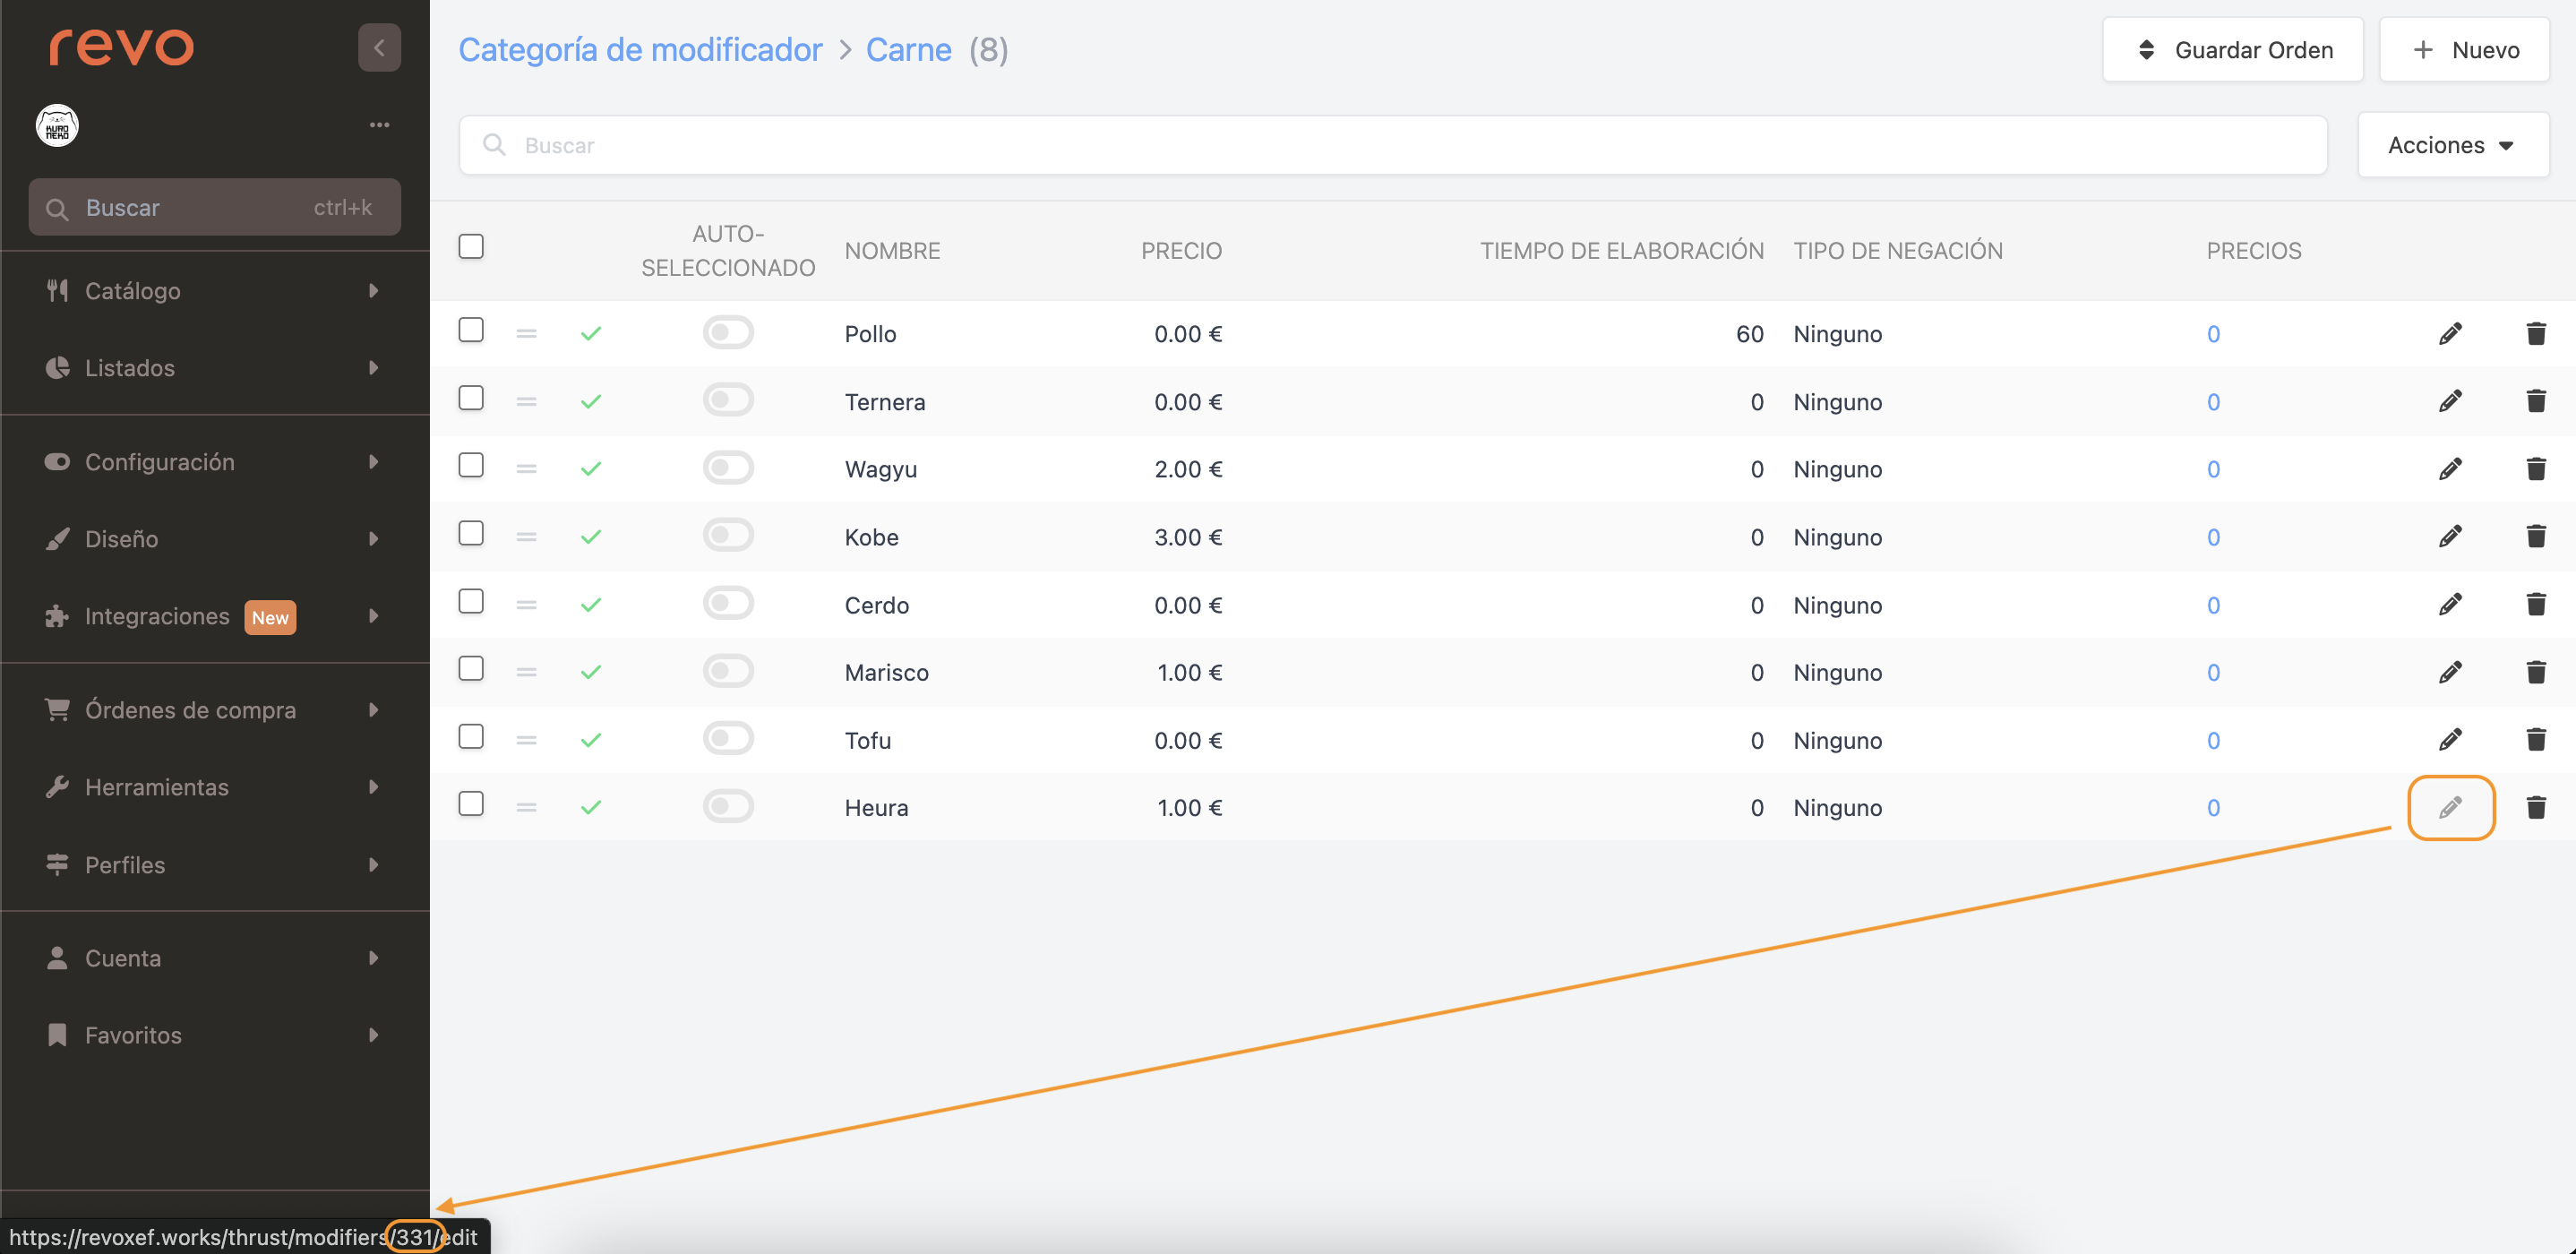
-
Selling Formats: ID of prices in selling formats. Obtain the ID by hovering over the 0 in prices from the product with the selling format.
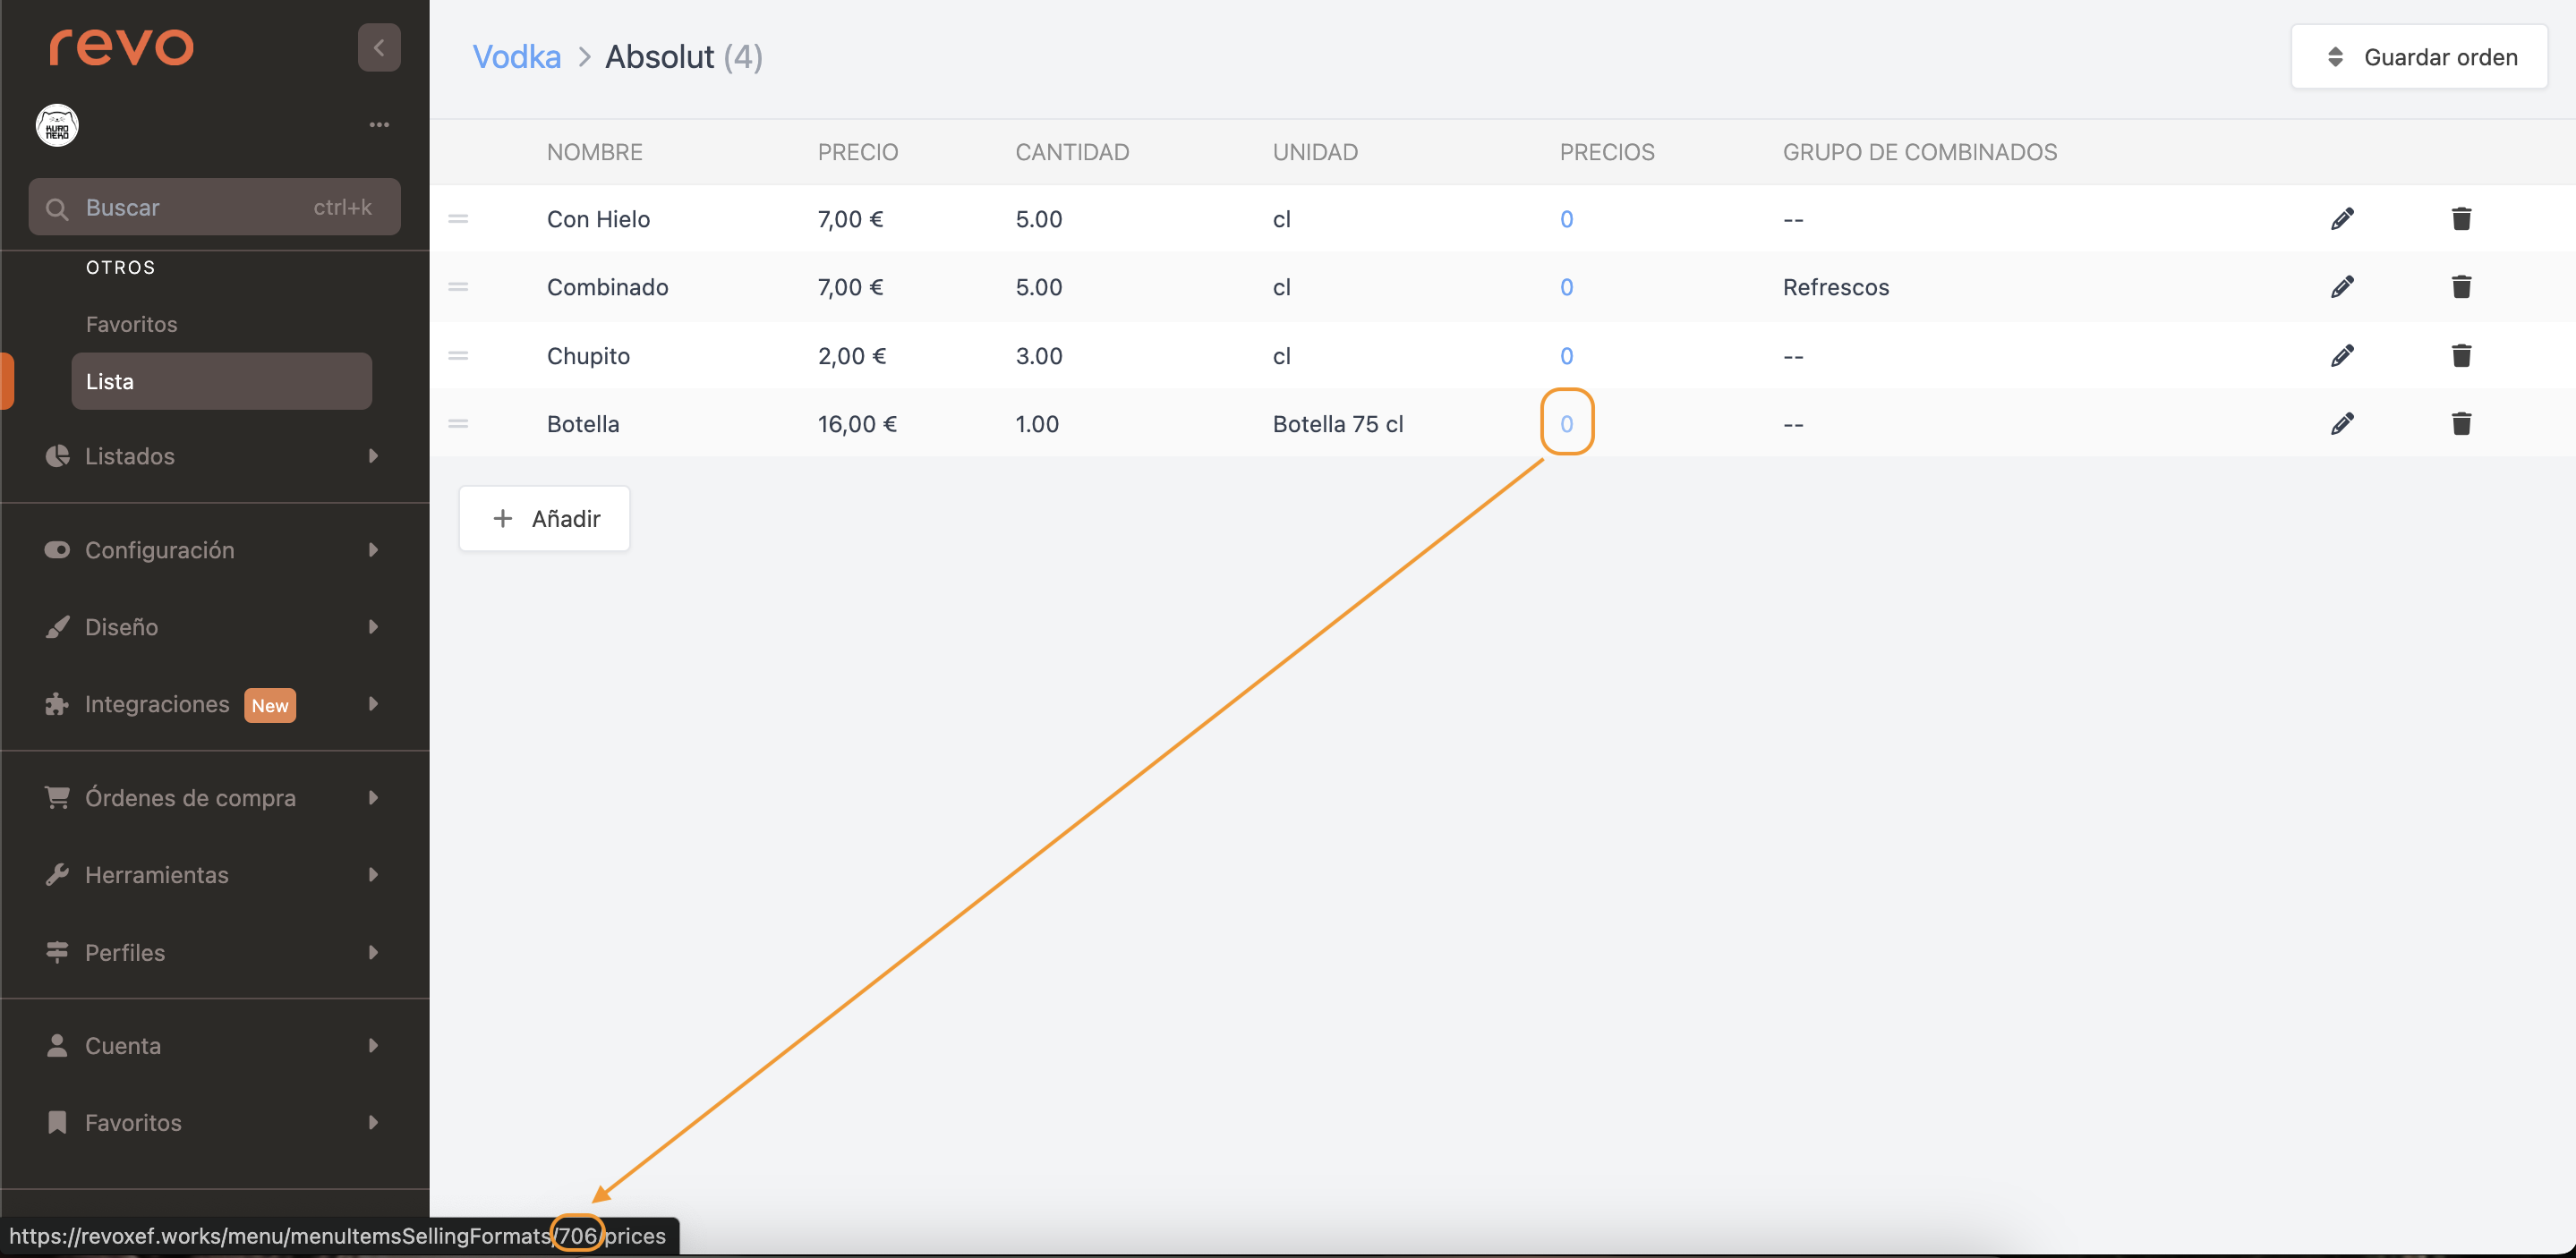
-
Combos: ID of rates in combos. Obtain the ID by hovering over the 0 in rates for products in combos.
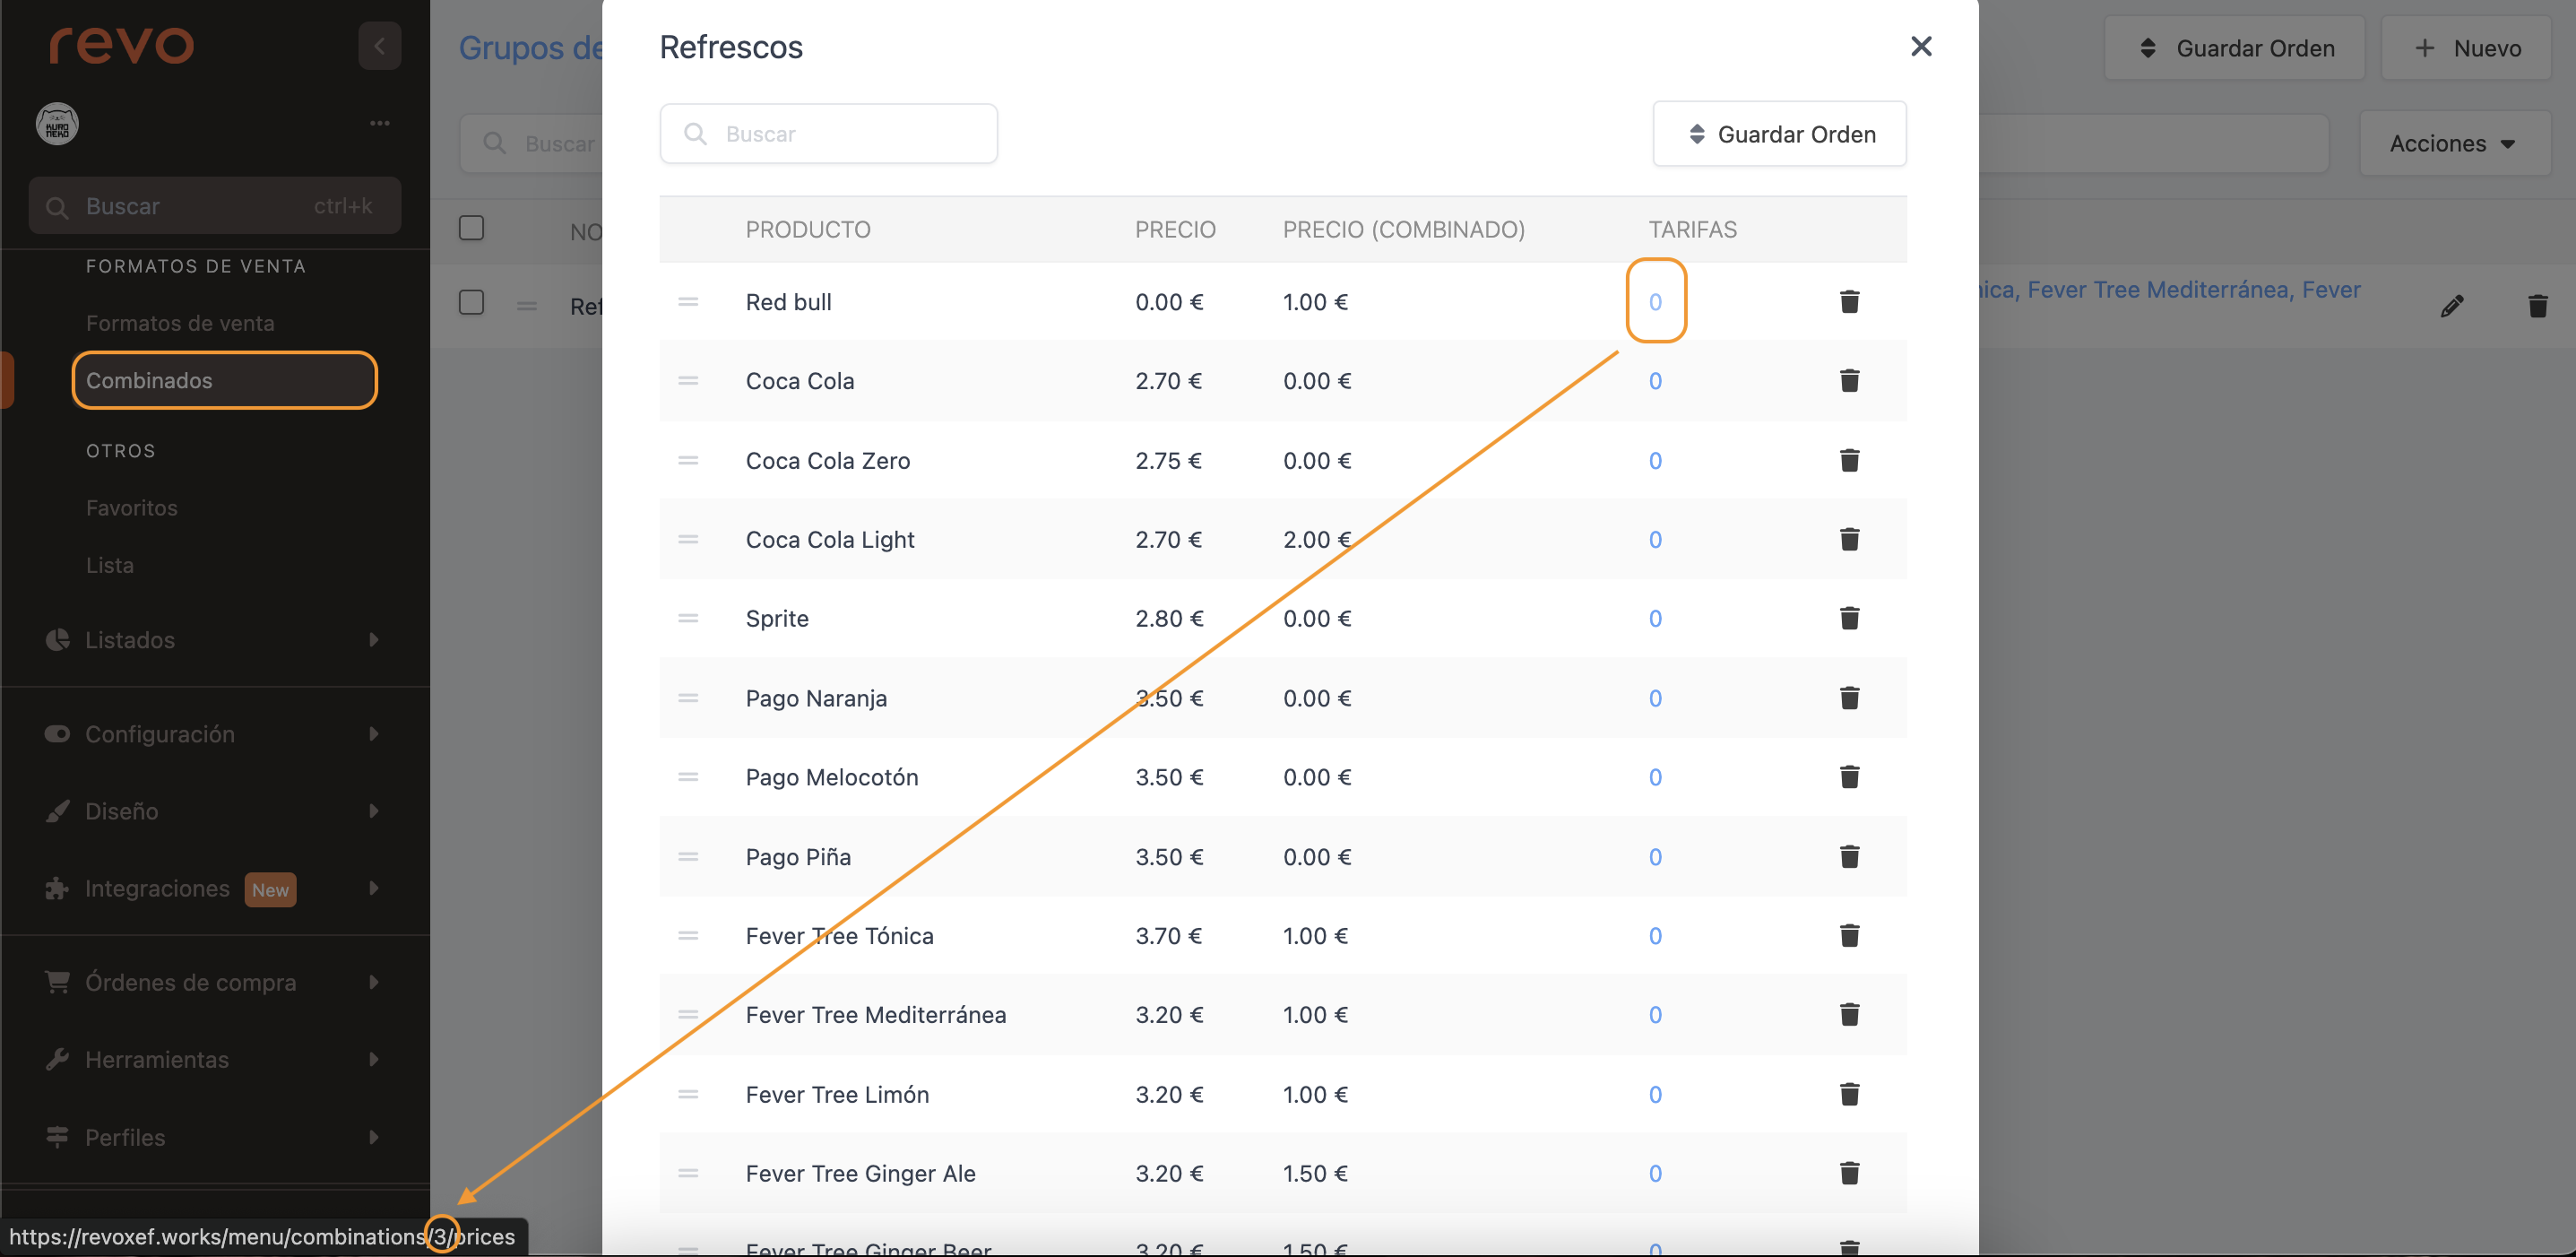
-
-
table_price_id: ID of the rate. Select it without clicking the edit icon on the rate.
-
price: Price with a decimal point. Example: 10.20
-
priceable_type: select from:
- Products: App\Models\Menu\MenuItem
- Menu Products: App\Models\Menu\MenuMenuPivot
- Modifiers: App\Models\Menu\Modifier
- Selling Formats: App\Models\Menu\ItemSellingFormatPivot
- Combos: App\Models\Menu\Combination
Attach the CSV file and click next. If the titles are correct, they will be automatically mapped. If any do not appear, select them from the dropdown menu.

EXAMPLE OF IMPORTING RATES:
| EXAMPLE: | |||
|---|---|---|---|
| priceable_id | table_price_id | price | priceable_type |
| 902 | 2 | 4.00 | App\Models\Menu\MenuItem |
| 870 | 2 | 3.00 | App\Models\Menu\MenuMenuPivot |
| 331 | 2 | 1.50 | App\Models\Menu\Modifier |
| 706 | 2 | 18.00 | App\Models\Menu\ItemSellingFormatPivot |
| 3 | 2 | 1.50 | App\Models\Menu\Combination |
15. EMPLOYEES:
Option to import employees. Ideal for importing many employees at once.
Required Fields:
-
name: Employee’s name.
-
pin: Numeric PIN for the employee.
-
permission_id: App privilege ID for the employee. Find the ID by hovering over the icon in the app privileges.
Optional Fields:
-
active: 0 for inactive, 1 for active. If not included, all employees will be activated by default.
-
surname: Employee’s surname.
-
username: Employee’s username.
-
email: Employee’s email address.
-
phone: Employee’s phone number.
-
notes: Additional information about the employee.
-
profile_id: Employee’s profile ID. Find the ID by hovering over the icon in the profile.
-
password: Employee’s password.
-
photo: Filename for the photo. Example: employee.jpg. After importing, contact support to upload the photos.
-
cashier_id: Cashier ID for the employee. Find the ID by hovering over the icon in the cashiers.
-
identifier: Additional method for identifying the employee, such as a magnetic card or QR code.
-
back_permission_id: Back-office privilege ID for the employee. Find the ID by hovering over the icon in the back-office privileges.
-
nif: Employee’s DNI.
EXAMPLE OF IMPORTING EMPLOYEES:
| EXAMPLE: | ||||||||||
|---|---|---|---|---|---|---|---|---|---|---|
| active | name | surname | phone | nif | cashier_id | pin | permission_id | username | back_permission_id | |
| 1 | Fran | Marjolaine | email73614@gmail.com | 803233695 | 73436604L | 2 | 1111 | 1 | Fran | 2 |
| 1 | Lucía | Kailey | email32277@gmail.com | 465589655 | 32881921V | 1 | 2222 | 2 | 1 | |
| 1 | Catharine | Pouros-Hoeger | email72270@gmail.com | 646528473 | 1 | 3333 | 3 | 1 |
16. UPDATE EMPLOYEES:
Option to update or add information to existing employees via a CSV file.
Since the ID is mandatory, it is recommended to start from the REVO employee list. To do this, go to employees and export the CSV file. This will provide you with the employee IDs. Other fields can be deleted and replaced with the ones you need.

Required Fields:
These fields are essential for updating employees. Without them, an error will occur.
- id: Employee ID. This ID is created when the employee is first imported or manually created in the back-office.
Optional Fields:
All the fields previously mentioned for employees.
EXAMPLE OF UPDATING EMPLOYEES:
Example: When downloading the CSV file for employees, columns that were not needed have been removed and the following columns have been added: username, password, and back-office privilege.
| EXAMPLE: | |||
|---|---|---|---|
| id | username | password | back_permission_id |
| 2 | maria | marIa24! | 1 |
| 3 | pedro | pEdro24! | 3 |
| 6 | claudia | clauDia24! | 3 |
